Who doesn’t like an extra source of money? But would you like it if someone else is earning that extra money by running ads on your website? I am sure no one would.
To prevent such ads from appearing on your website, you can use the Ads.txt file in WordPress. It’s just not a matter of a few bucks; these ads can badly affect the reputation of your website and the consequences won’t be good.
By adding ads.txt to your WordPress, you will be able to put barriers to fraud advertisers and allow only authorized advertisers to run ads on your pages. This way, you can achieve both: prevent fraud advertisers and earn more income from the ads in your AdSense account.
However, the question arises of how to add ads.txt to WordPress. Let’s look at them!
Understanding Ads.txt File
Ads.txt file stands for Authorized Digital Seller file. As the name suggests, this file comprises a list of authorized companies that can legally or rightfully sell their products on your WordPress site.
This file allows Google to confirm that the advertisers are allowed to show ads on a website. In short, it ensures that only authorized sellers such as AdSense, Ad Exchange, and Doubleclick sell your digital ad inventory.
It is simple to add Ads.txt file, you just need to enter ads.txt on the root domain of the website. It consist of one line per authorized seller and don’t forget to add seller’s account ID and domain. Adding this helps publishers and advertisers to buy confidently digital ad space and on the contrary making it difficult for fraudulents to make profit by selling other’s inventories.
Now, when you are aware about ads.txt file, let’s see how you can add it in WordPress with and without plugins.
Important Insight: Before adding the ads.txt to your WordPress, you will need to create an ads.txt file for your site. To create an ads.txt file, you can follow these simple steps:

The first step to creating an ads.txt file is to log in to your AdSense account.

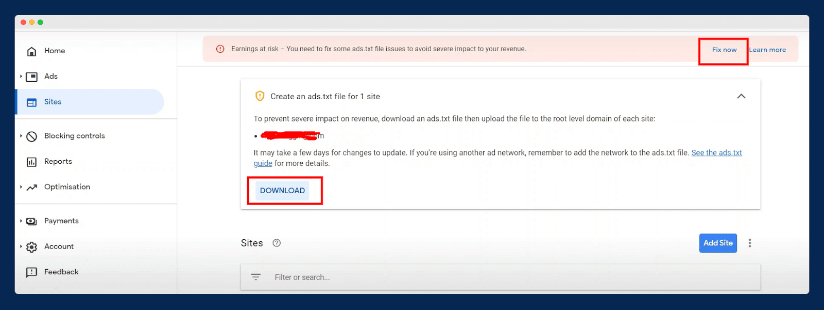
After logging in, you will see a page that will appear as shown on the page. Here, a red bar will flash with “Earning at risk.” On the same bar, you can see “Fix now” on the right; click on that.
Now, you have to download your ads.txt file, and for that, click on the “Download” button. And your work is done; the ads.txt file is now downloaded to your computer’s hard drive.
Adding Ads.txt File in WordPress With Plugin
Finally, the wait is over and we are ready to learn how we can add ads.txt in WordPress by using plugins. This method is one of the easiest methods and is used by many users.
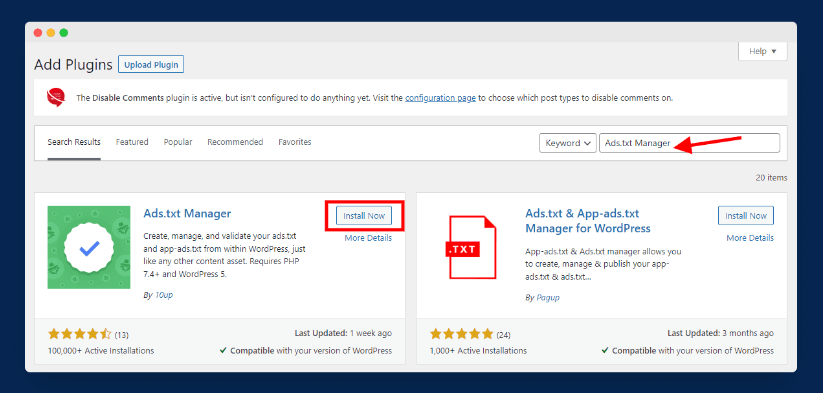
There are plenty of plugins available to add ads.txt file like WP AdCenter, Ads.txt Manager, AdSanity, etc. But, I will recommend using Ads.txt Manager plugin as it is free and I have personally used it on my websites.
This plugin has never disappointed me and is also trusted by more than a million trusted users.

First, log in to your WordPress dashboard and then go to the “Plugins” section. Under the Plugin section, go to “Add New” and search for the “Ads.txt Manager” plugin. (you can refer to the above image for your understanding)
Now, you will see the “Install” option. Click on that to install the Ads.text Manager plugin on your WordPress.

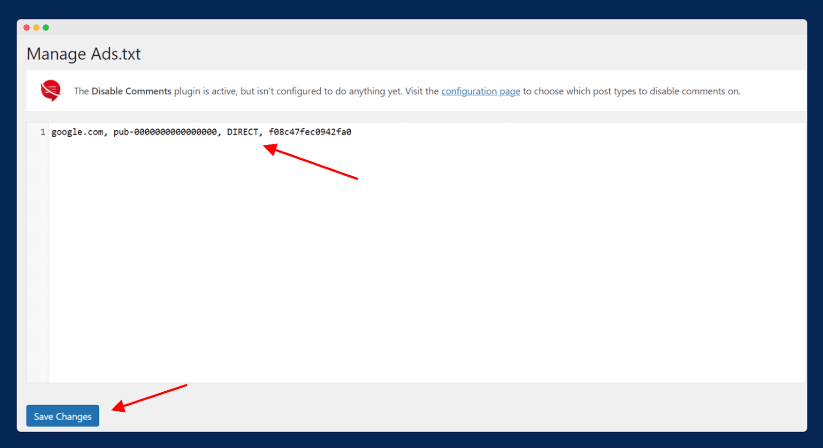
After performing the above steps, go to “Settings” and then “Ads.txt.” You will observe a new white box that will open under the heading Manage Ads.txt. Here, you need to add information on authorized sellers, resellers, or both.
In my situation, I have inserted the AdSense code for the declaration.
google.com, pub-0000000000000000, DIRECT, f08c47fec0942fa0Remember to add each name carefully in separate lines, and all letters should be small. Each line should contain the following information:
- The domain address of your website: e.g., google.com
- AdSense publisher ID: e.g., pub-0000000000000000
- Relationship type of publisher: e.g., Direct or Reseller
- The ID of the advertiser: e.g., f08c47fec0942fa0
You can see the above image for reference to know how to put all this information in a line. Also, don’t forget to change “pub-0000000000000000” with your unique Google Adsense publisher ID.
These are the steps to add ads.txt using plugins. In the next section, we will see how to add ads.txt to WordPress without using a plugin.
Adding Ads.txt in WordPress Without Using Plugin
It is easy to work with plugins, but using too many plugins can slow down our website’s speed. Therefore, to avoid such circumstances, we have an alternative: adding ads.txt manually to WordPress. For this method, you will need access to your site’s cPanel.
This method involves adding/uploading the Ads.txt file to the website’s root directory. Let’s see how to use this method!

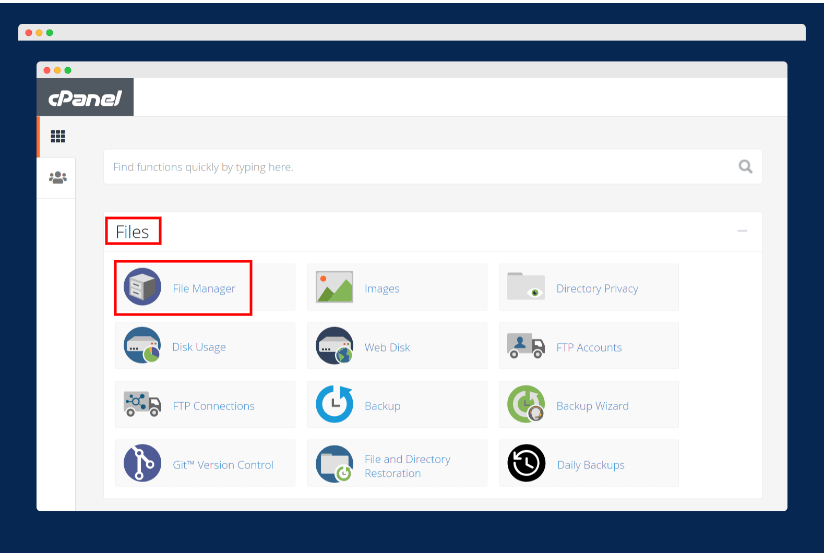
The first step in this method involves logging in to your “cPanel” and then going to “Files.” Under the Files section, open the “File Manager” option.

Now, you need to go to the “public_html” folder and make a new file named ads.txt. After creating the new file, you are required to insert the same line of code as you did in the above method.
After that, click on “Save Changes.”

Now, if you want to see whether you were successful in the task or not, you can add “ads.txt” behind your domain name. (For e.g., example.com/ads.txt)
If the same code appears as the one you added, then congratulations, my friend; you did it. And if not, don’t worry; you can recheck the steps and look for your mistake. But I am sure you won’t need it.
These are the steps to add ads.txt to WordPress without using plugins. Now, it’s time to look at some of the advantages of this approach.
Advantages of Adding Ads.txt to WordPress
There are various benefits of adding “ads.txt” to WordPress. In fact, it has been seen that Google is hitting the publishers who don’t have “ads.txt” files on their websites. I am sure you do not want to be one of that. Apart from this, other advantages of adding “ads.txt” are as follows:
Helps in Increasing Ad revenue
It is true that adding an “ads.txt” file to your WordPress can increase your ad revenue. But the question is how? Let me answer that for you.
When you add an ads.txt file to WordPress, you can manage which ad networks can sell their inventory and at what prices. Therefore, you can choose to work with premium networks and increase your profits.
Protects from Ad Fraudulent
One of the important advantages of using “ads.txt” is it can save you from ad fraud. This file ensures that the ads displayed on your website are from authorized sellers and not from third-party sellers.
Moreover, ads.txt helps minimize certain fraudulent activities like bot-driven traffic and click fraud, used by many people to increase the number of ad clicks on certain websites. It also protects you from scammers who pretend to be you and sell your product on others’ websites.
Enhance the Quality of Ads
Adding an ads.txt file to WordPress can also help enhance the quality of the ads displayed on your website. As these ads will be from authorized sellers, their quality will be much better than that of third-party sellers.
Having a better quality ad will build trust among your website users and also improve transparency in online advertising.
Easy to Setup
It is very easy to add “ads.txt” to your WordPress. You can do it by two methods: either by using the plugin or without using the plugin.
Both of these methods are easy to follow. You just need to create the text file before following them, as I mentioned in the above section. Setting up an “ads.txt” is a matter of just a few minutes. So, don’t wait further and add “ads.txt” to your WordPress.
Final Words!
To conclude, adding an “ads.txt” to your website can provide you with several benefits, including adding extra bucks to your earnings.
In this article, I have shared the two methods by which you can add “ads.txt” to WordPress. You can do it by using plugins or without using plugins. Both of the above methods are a piece of cake that you can follow without any difficulty. If you want to use the plugin method, then I recommend using the Ads.txt Manager plugin.
At last I would like to say you should don’t forget to add “ads.txt” to WordPress and do it as soon as possible.
That’s all from my side. Don’t forget to share it with your friends who are looking for an easy guide to add/upload “ads.txt” in WordPress.
Thank you for being wonderful readers.
Have a nice day!
