As a beginner writer, creating a book template shouldn’t be that challenging, as it can demotivate you to start with the writing process. But it is a demanding task that takes up most of your time, even when you use specialized tools. That is why you should use a simple tool like Google Docs to create your book template.
The popular platform Google Docs allows you to create customizable book templates easily. In Google Docs, it is possible to create a template that meets the specific needs of a book project. This can include everything from setting up margins to creating headings and subheadings to adding page numbers and more.
Furthermore, it provides users with the option of creating their own personalized book template, making writing easier for everyone. This article explains how to create a book template on Google Docs to help you get started with the process.
Follow our article from start to end to make your writing process easier by creating a book template in Google Docs.
So let’s start…
Reasons to Use A Book Template in Google Docs
Before we know the steps to create a book template, we need to have a solid reason to create a book template. Here are some of the reasons why as a writer, you might want to create your book template using Google Docs.
- Easy to collaborate: Google Docs is an excellent tool for collaboration. It allows multiple people to work on the same document simultaneously, making it a great tool for collaboration on a book project. This can be particularly useful when working with a team of authors or editors.
- Accessible to All: Google Docs is accessible from anywhere with an internet connection, making it easy for authors and editors to work on the book from different locations. Talents from different parts of the world can be connected together and bring out their best using this tool.
- Cloud Storage: You do not need to worry about storage as Google Docs uses cloud storage to store all the data. Google also gives you free storage of up to 15 GB, so there is no need for writers to worry about running out of storage space and spending money to buy extra space.
- Makes The Writing More Professional: Writing a book on Google Docs with proper formatting makes the book more professional and presentable. It gives the book authenticity and makes the writer look like an established author who knows what he is doing.
- Easy To Publish: Another advantage of using a book template in Google Docs is that it is easier to publish the book at the end. A customized book template can help organize the content of the book, making it easier to navigate and structure the information. This can be particularly useful when working on a book with multiple chapters or sections.
- Saves You Time: Having a pre-designed structure, the formatting, and layout of the book will be consistent throughout the document, which can enhance the overall aesthetic of the final product. Additionally, by using Google Docs, you save time since it eliminates the need to learn it from scratch, unlike other writing tools. It is an easy tool that can be used by anyone.
- Saves You Money: Using Google Docs also saves the money that you may need to invest in other software or writing tools. Google Docs is a free tool that has all the features that a writer needs, and it is completely free to use.
Simple Steps to Create A Book Template in Google Docs
Having read about the advantages of using Google Docs to create a book template, do you feel eager to get started?
It is, in fact, very simple to create a book template in Google Docs. It seems like a daunting task until you know the process.
Google Docs already have many templates available like Resumes, Letters, Project Proposal Etc. Although there is not a book template that is readily available, we can easily create one of our likings within minutes.
So let us show the step-by-step procedure to Simple Steps To Create A Book Template In Google Docs with images to make it easy for you to follow through.
Step 1: Creating Your New Book Template
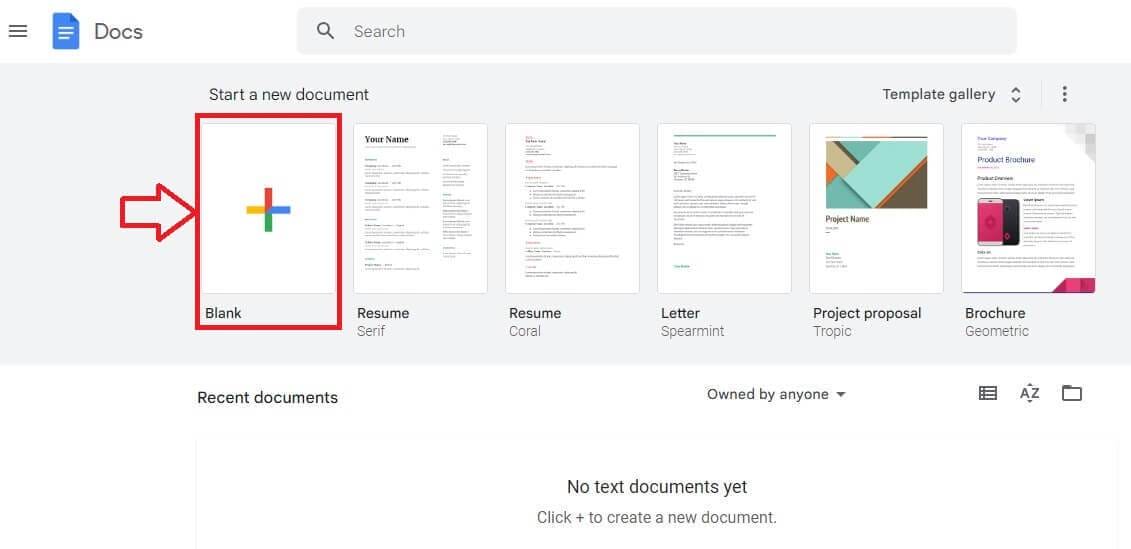
First of all, we need to create a new document for our book template. So, Start by going to Google Docs on your computer and log in with the account that you want to create a book template. Click on the “Blank” option at the top left corner.
Author’s Note – You can click on the “Template Gallery” to view other readymade templates available in Google Docs. You can always choose a booklet template or a brochure template in case you do not want to spend time creating your own book template.
Step 2: Setting Up Your Page to Create A Book Template
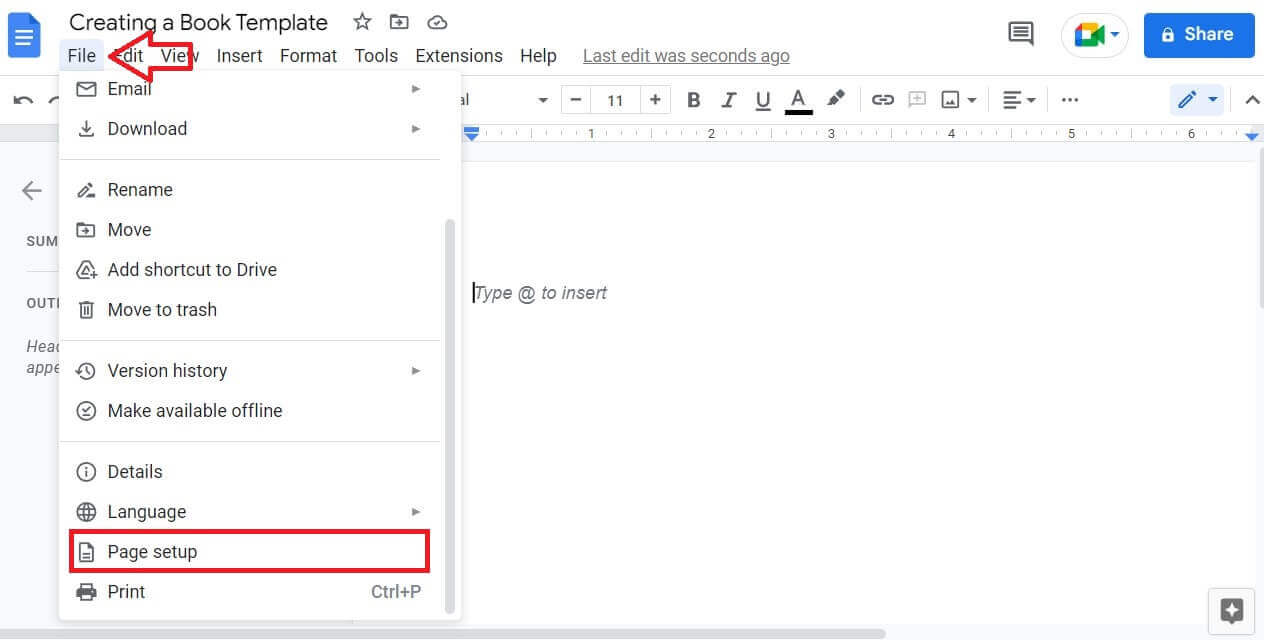
Once the blank template is ready, we can start customizing our book template. Now, navigate to File -> Page setup.
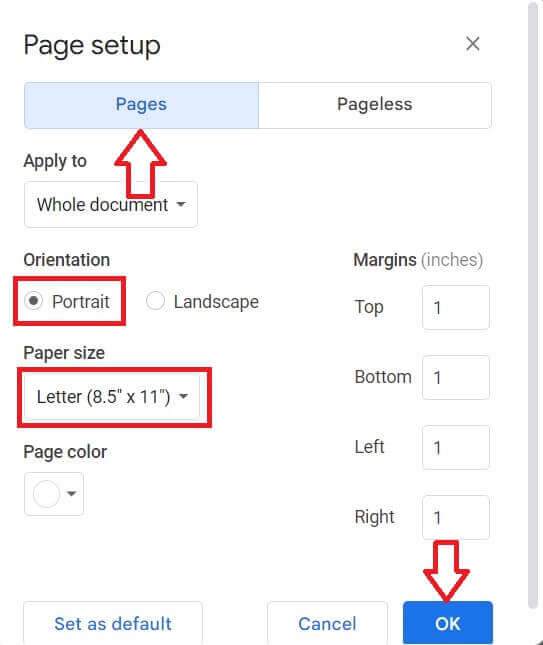
Here you will see various options available to change page customization. It is the norm to have
- Page setup as pages instead of pageless
- The orientation as a Portrait
- Paper Size as Letter (8.5” * 11”)
Ensure you have set all the options right and click on “OK”.
Step 3: Deciding the Font Type and size
Now that we have set up the page, we can move on to deciding the font type and size of your book template.
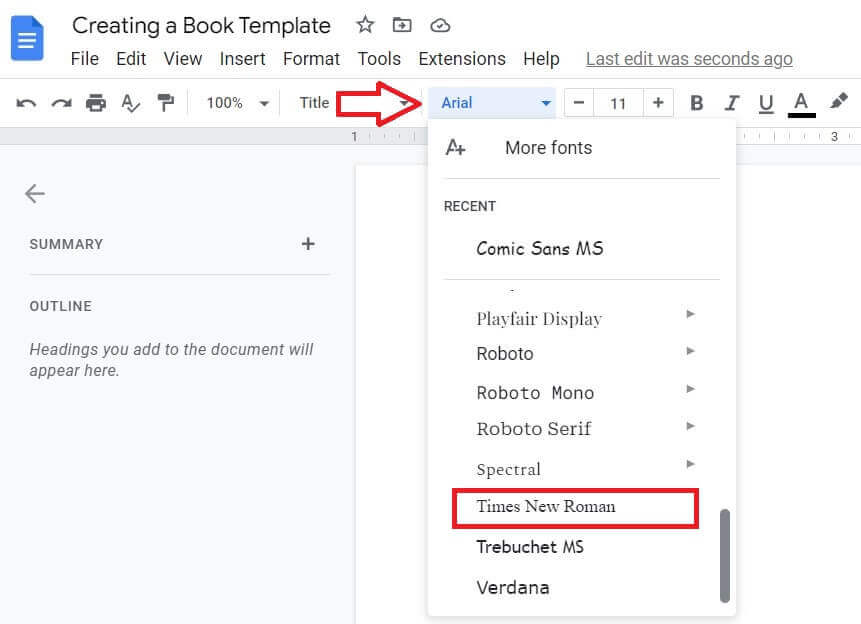
The font option is given at the top of the page. Usually, the default font type is “Arial” but we recommend you go with “Times New Roman” or “Calibri” as they are the standard font type used worldwide.
Click on the Arial option that is set as the default font option to view a list of fonts. Choose the “Times New Roman” font as your font type.

Make sure the size is above 11 or 12 so that it is easy for the eyes to read the book. Likewise, click on the “+” icon nearby to increase the size of the font.
Step 4: Creating the Title of Your Book
If you have seen the books that are already published, you can see that the title is usually placed at the top or in the middle of the page. We are going with the title that is placed at the top of the page.
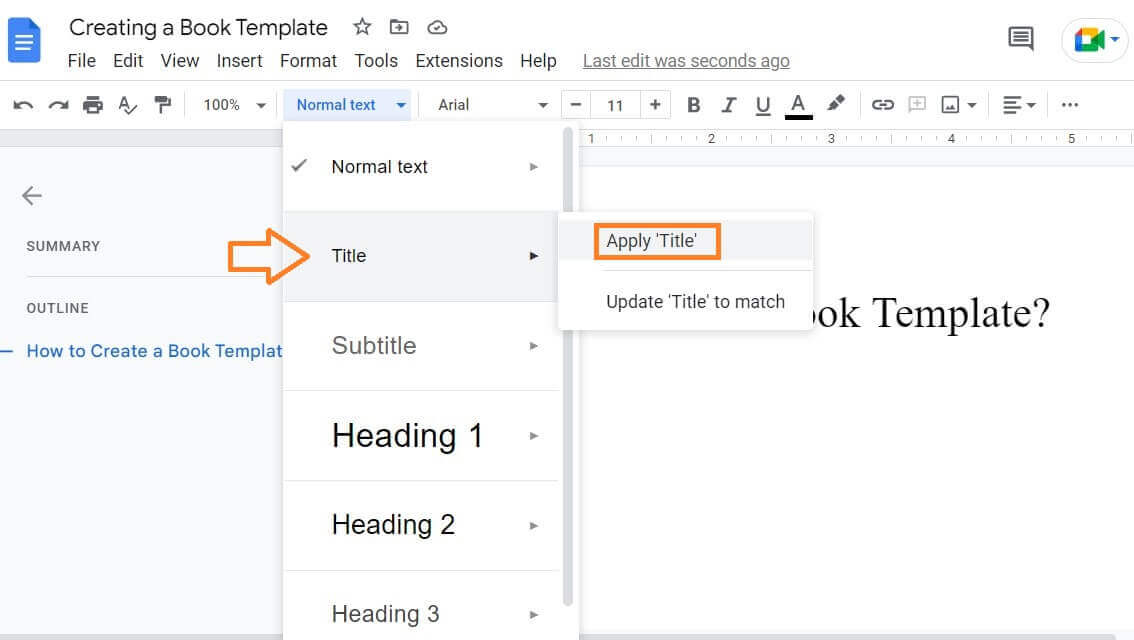
So at the top of the page, type your book title.
Click on the “Normal Text” default option and select “Title”. Once done, you can see that in the Summary outline section of the document, the title of your book will be shown.
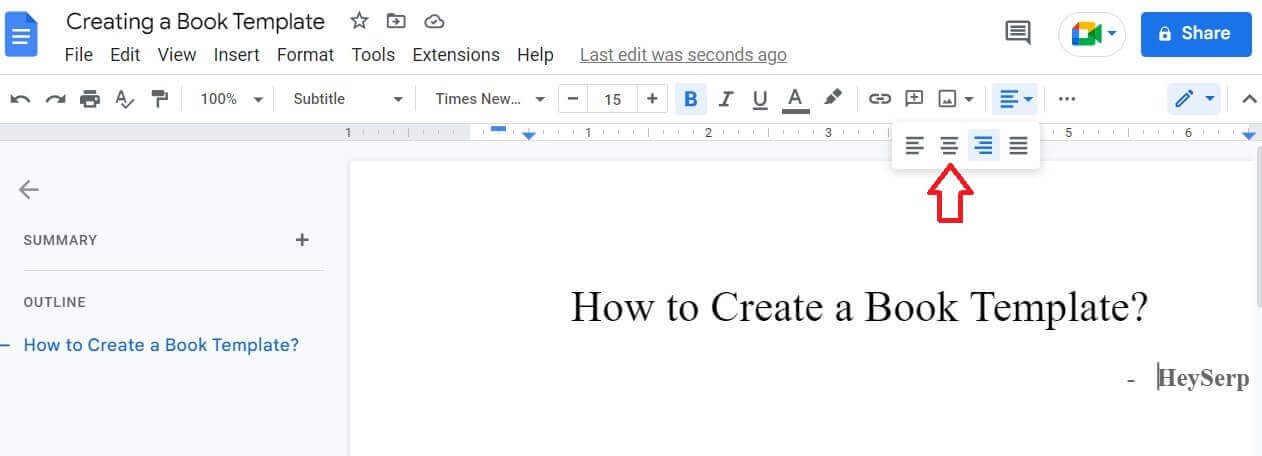
You can also leave a space below and type out your name under the title. Normally, the title aligns itself to the right. So to make it center, click on the align option and choose the center.
Like a cakewalk, we have now created the Title page of our book.
Step 5: Creating Headers and Footers and Page numbers
Headers and Footers are important while you are writing a book. Headers contain the chapter name and numbers, while the footer contains the page numbers.
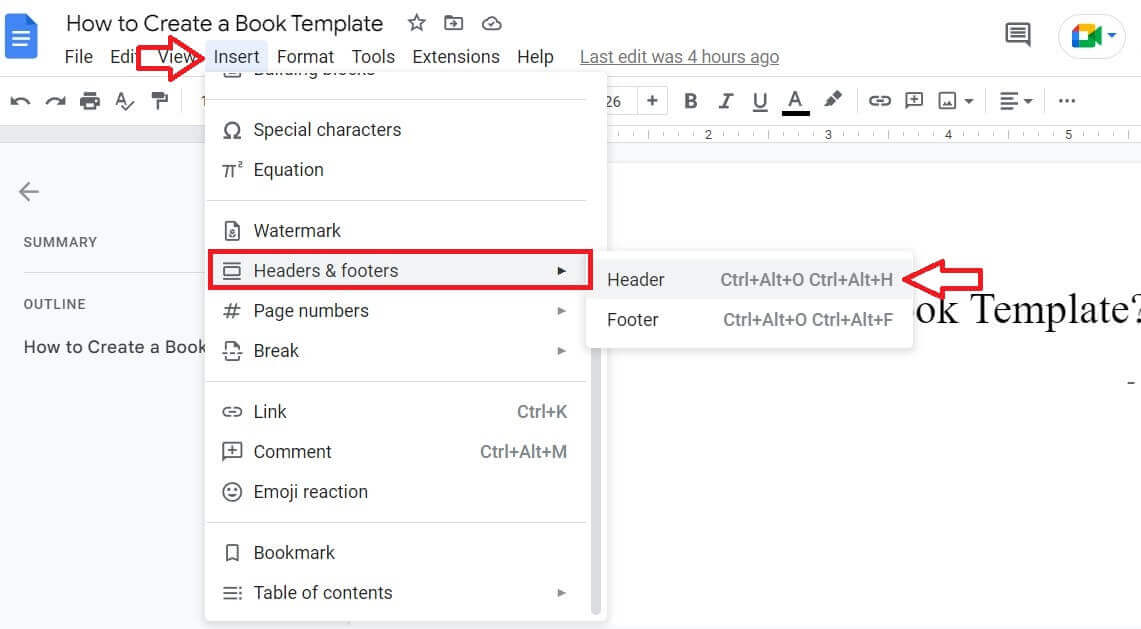
To insert headers and footers in your book template, Click on “Insert -> Headers and Footers ->Header”.
Author’s Note – There is also a shortcut key to insert headers and footers in your document. For headers, you can click on Ctrl + Alt + H, and For footers, you can click Ctrl + Alt + F button on your keyboard.

Now you can see that the Header section has been inserted into your document. You can use the same process to insert footers as well.
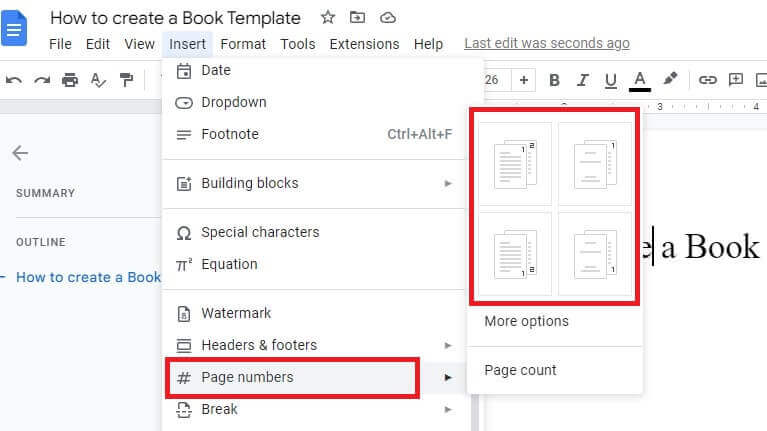
Similarly, to insert page numbers, click on Insert-> Page numbers. Various types of page number formats are available out of which you can choose one and insert it into the book template.

We chose the format where the page number will be shown in the bottom right corner. As you can see in the image, the page number has appeared in the footer section.
Step 6: Making Table of Contents
The Table of contents is similar to an Index that lets the readers know about the chapter number and name after the Book title page. It helps the readers to navigate to the chapter that they want to start reading.
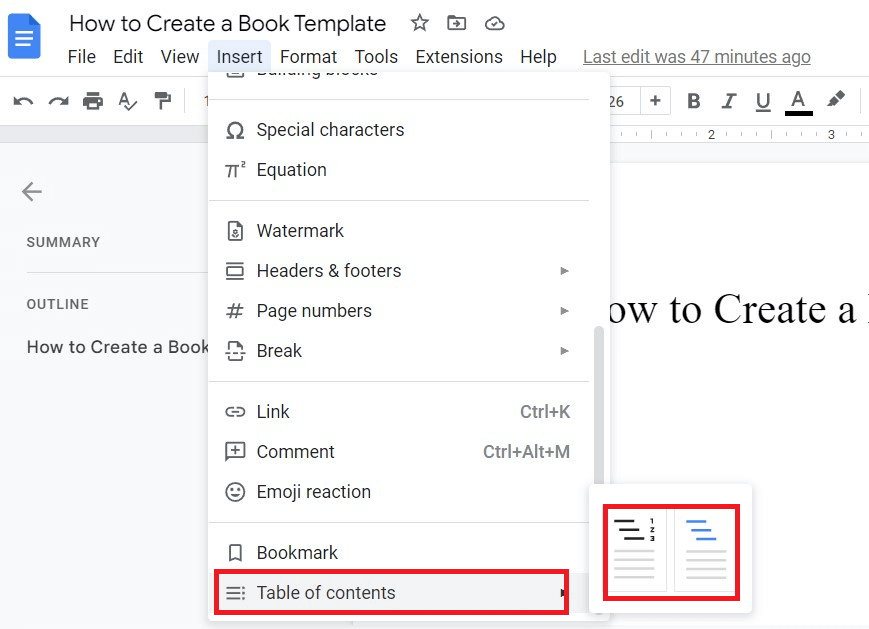
Click on Insert -> Table of contents. Select the type of table of content you want in your book template and click on it.
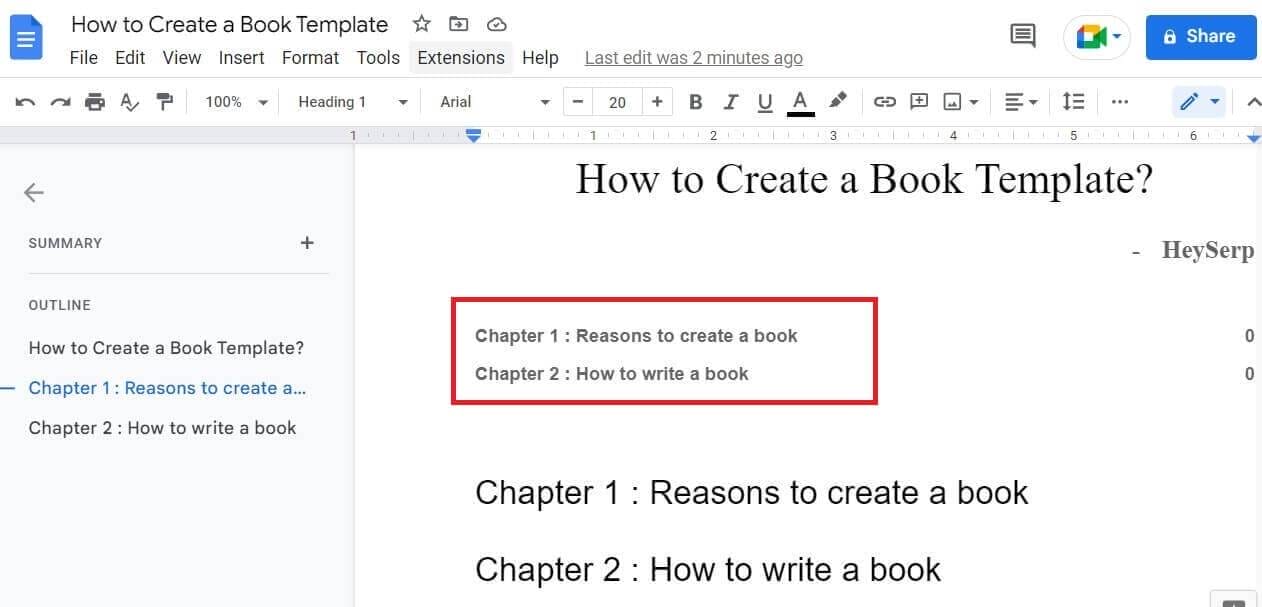
As you can see, the table of contents is inserted below the title. If you want to insert it on a different page, give a page break and enter it on the new page. You can find the page break option by clicking on Insert -> Break -> page break.
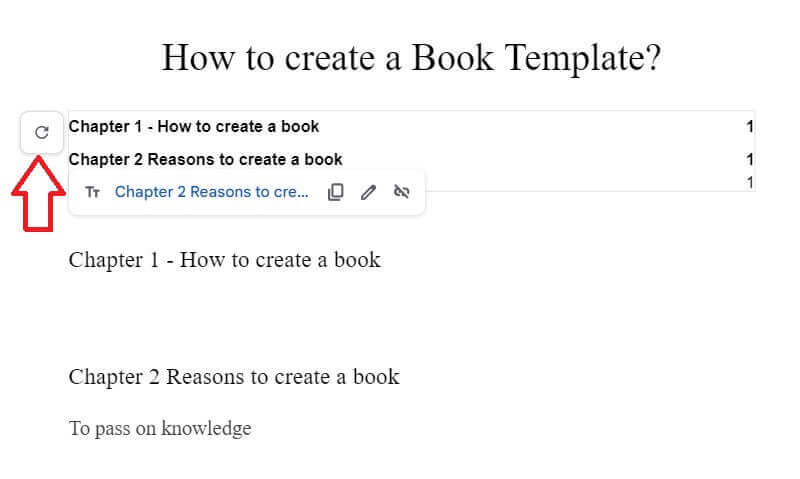
The different types of headings that you give throughout the book, such as Heading 1, Heading 2, Heading 3, etc., will be updated in the Table of contents as you click on the arrow mark on the right side of the Table of contents.
Step 7: Naming the Document

Now that we are done with all the main processes, it is time to name the document. Click on the top left corner where you can see the “Untitled document” text.

The title that we have chosen for our book will automatically get updated in the slot. This step is important to ensure easy finding out of your article the next time you open it.
Author’s Note – If you are planning to write more than one book, you can simply make a copy of the book template that we have created and use it for your next book. You can keep this format forever and use it for all the books that you will write in the future.
Frequently Asked Questions (FAQs)
There are some questions that you would have on your mind after reading this article. We have curated some of them and answered them in this section.
Q1. Is Creating a book template in Google Docs completely free?
A1. Yes. Google Docs is a service provided by the infamous company google. As such, this is a free tool used by many for their writing purpose. There is no cost at all to use this tool at any point in time.
Q2. What are the benefits of creating a book template in Google Docs?
A2. Google Docs is;
- A free tool
- Easy to use
- Completely free
- Easy to share with others
- Offers free storage
It is really a beneficial tool for beginner writers to save time and money on buying and using other software.
Q3. How can I share the book template with my team?
A3. Google Docs is well-known for its easy sharing method. When you open a document, in the top right corner, you can see a blue button that says “Share”. Click on that and choose the privacy setting as per your need. Then just click on “Copy link” and share the link with your team. It is that simple.
Final Thoughts
In conclusion, creating a book template in Google Docs can be a useful tool for writers and editors who want to ensure consistency, organization, and efficiency in their work.
By using the various formatting and layout options available in Google Docs, it is possible to create a template that meets the specific needs of a book project. Additionally, the ability to collaborate and access the document from anywhere with an internet connection makes Google Docs a valuable resource for creating a book template.
We have shared all the things you might want to know before creating your book template in Google Docs. In case you have any queries regarding this one, leave a comment, and we will get back to you within hours. We hope this article has been of great help to you, so do share this with anyone who might not know about this!
