
If you’re running an Amazon affiliate site on WordPress, you already know that a well-placed “Buy on Amazon” button can make or break your commission earnings. I’ve been using Amazon affiliate buttons across multiple WordPress sites since 2019, and the difference between a plain text link and a styled Amazon button is massive — we’re talking 2-3x more clicks.
Here’s the problem: most guides on this topic only show you ONE method (usually the plugin they’re trying to sell). In this guide, I’ll cover 5 different methods — from a zero-plugin approach to premium solutions for serious affiliates.
TL;DR: The quickest way to add a “Buy on Amazon” button in WordPress is the native Gutenberg Button block — no plugin needed. Add a Button block, type “Buy on Amazon,” paste your affiliate link, and publish. For icons and advanced styling, use a free plugin like Ultimate Blocks or Spectra. WooCommerce stores can use the External/Affiliate product type. Serious affiliates should consider AAWP or AmaLinks Pro for automated product data and professional buy boxes.
Why Should You Add a “Buy on Amazon” Button?
As an Amazon affiliate, your job is simple: get readers to click through to Amazon and buy something. A plain hyperlink saying “check it out here” doesn’t cut it anymore. People scroll past text links without noticing them.
A styled “Buy on Amazon” button stands out visually and tells users exactly where they’re going. Here’s why it matters:
- Higher click-through rates — Buttons get 2-3x more clicks than plain text links, according to Amazon’s own affiliate best practices.
- Brand trust — The word “Amazon” in your button leverages a brand that 89% of US shoppers trust. Readers feel safe clicking because they know where they’re going.
- Mobile-friendly — Over 60% of web traffic comes from mobile devices in 2026. Buttons are significantly easier to tap on a phone than a small hyperlink buried in a paragraph.
- Clear call-to-action — “Buy on Amazon” leaves zero ambiguity. The reader knows exactly what happens when they click.
Bottom line: if you’re writing product reviews, comparison posts, or “best of” lists and using plain text links to Amazon, you’re leaving money on the table.
What You Need Before Adding Amazon Buttons
Before you add any “Buy on Amazon” buttons, you need an Amazon Associates account. This is Amazon’s free affiliate program that gives you unique tracking links — when someone clicks your link and purchases on Amazon within 24 hours, you earn a commission.
Quick setup steps:
- Go to Amazon Associates Central and sign up with your Amazon account
- Enter your website URL, preferred Associates Store ID, and profile details
- Choose your payment method (direct deposit, check, or Amazon gift card)
- Amazon gives you 180 days to make 3 qualifying sales — once you hit that, your account is fully approved
Commission rates vary by product category — most range from 3-6%. Luxury Beauty pays 10%, Amazon Games pays 20%, and standard categories like Electronics pay around 4%.
How to get your affiliate link: Once approved, visit any product page on Amazon while logged in. You’ll see the SiteStripe bar at the top of the page. Click “Get Link” → “Text” to copy your unique affiliate link. This is the URL you’ll paste into your buy button.
Quick Note: As of late 2023, Amazon discontinued Image and Text+Image link types from SiteStripe. You can now only generate text-based affiliate links directly. For product images in your posts, use your own screenshots or the Product Advertising API.
Got your Associates account and affiliate link ready? Let’s add those buttons.
How to Add “Buy on Amazon” Button in WordPress (5 Methods)
I’ve arranged these methods from simplest to most advanced. Start with Method 1 if you just want a quick button, or jump to Method 5 if Amazon affiliate income is a major part of your revenue.
Method 1: Using the Native WordPress Button Block (No Plugin)
This is the fastest method and works with every modern WordPress installation — no plugins required. If you’re new to WordPress, check out our WordPress tutorial for beginners first.
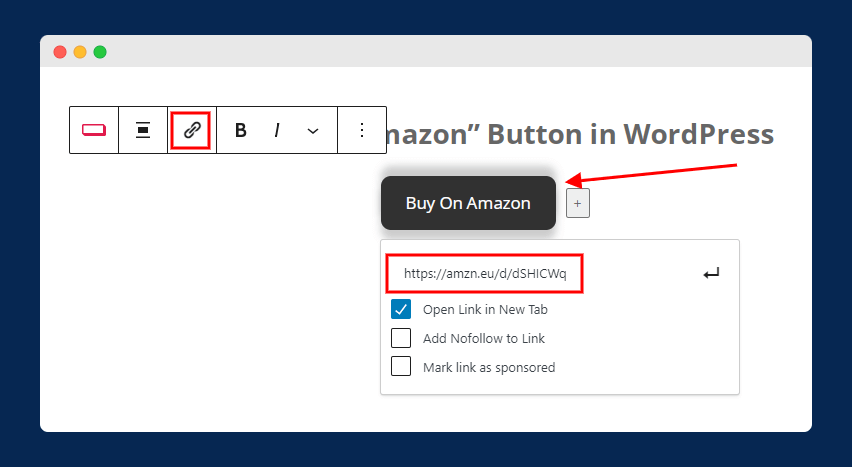
Step 1: Open any post or page in the WordPress Block Editor (Gutenberg).
Step 2: Click the “+” icon to add a new block, search for “Buttons,” and select the Buttons block.
Step 3: Type “Buy on Amazon” as your button text.
Step 4: Click on the button text, then click the link icon in the toolbar (or press Ctrl+K / Cmd+K) and paste your Amazon affiliate link.
Step 5: In the block settings panel on the right, customize the button:
- Change the background color to Amazon’s orange (
#FF9900) for instant brand recognition - Set the text color to black (
#000000) or white for contrast - Under “Advanced,” add
nofollow sponsoredto the rel attribute — this is required by both Google and Amazon - Enable “Open in new tab” so readers don’t lose your page
That’s it — you have a working “Buy on Amazon” button without installing anything.
The downside? The native Button block doesn’t support icons. You can’t add the Amazon logo or a shopping cart icon next to your text. If you want that extra visual touch, Method 2 is your answer.
Method 2: Using a Free Block Plugin (With Icon Support)
If you want more customization — especially adding an Amazon or shopping cart icon to your button — a free block plugin is the way to go. I’ll show you two solid options: Ultimate Blocks and Spectra.
Option A: Ultimate Blocks
Ultimate Blocks is a free plugin with 20+ Gutenberg blocks, including a “Button (Improved)” block with built-in icon support.

Step 1: Go to Plugins → Add New, search for “Ultimate Blocks,” and click Install Now → Activate.

Step 2: Open your post, click “+”, search for “Button,” and select “Button (Improved)” from Ultimate Blocks.
Step 3: Type “Buy on Amazon” and paste your affiliate link in the URL field.

Step 4: In the block settings on the right, click the “Icon” section. Search for “amazon” or “shopping-cart” and select an icon. Choose whether it appears before or after the text.
Step 5: Customize colors, border radius, and hover effects to match your theme. I typically use Amazon’s orange (#FF9900) background with black text.
Option B: Spectra (by Brainstorm Force)
If you’re already using the Astra theme, Spectra is a natural fit. It’s used by 400,000+ WordPress sites and offers one of the most feature-rich Button blocks available for free.
Step 1: Install and activate Spectra from Plugins → Add New.
Step 2: Add a “Buttons” block by Spectra to your post.
Step 3: Customize everything — text, link, icon, colors, gradients, hover animations, box shadow, and border.
Spectra gives you the most design flexibility among free options. I wrote a detailed Spectra review covering all its blocks and features if you want to dig deeper.
Method 3: Using Custom HTML + CSS (No Plugin, Full Control)
This is my preferred method on performance-focused sites. No plugin overhead, no JavaScript — just a clean HTML link styled with CSS. It loads instantly and you control every pixel.
Step 1: Add a “Custom HTML” block to your post and paste this code:
<a href="YOUR-AMAZON-AFFILIATE-LINK"
   target="_blank"
   rel="nofollow sponsored"
   class="tgx-amazon-btn">
   🛒 Buy on Amazon
</a>
Step 2: Add CSS to style the button. Go to Appearance → Customize → Additional CSS and paste:
.tgx-amazon-btn {
    display: inline-block;
    background-color: #FF9900;
    color: #000;
    padding: 14px 28px;
    border-radius: 8px;
    text-decoration: none;
    font-weight: 700;
    font-size: 16px;
    text-align: center;
    transition: background-color 0.3s ease;
    border: none;
    cursor: pointer;
}
.tgx-amazon-btn:hover {
    background-color: #e68a00;
    color: #000;
    text-decoration: none;
}
Replace YOUR-AMAZON-AFFILIATE-LINK with your actual Amazon affiliate URL. The rel="nofollow sponsored" attribute is required — don’t skip it.
This gives you a clean, professional Amazon button that matches Amazon’s signature orange and loads with zero JavaScript overhead. No plugin bloat, no compatibility issues, no update headaches.
Observation: I use this HTML/CSS method on sites where Core Web Vitals scores matter. Every plugin you add increases page weight and potentially hurts your LCP and INP scores. A pure CSS button adds essentially zero overhead.
Method 4: Using WooCommerce External/Affiliate Product
If you’re running a WooCommerce store and want to showcase Amazon products alongside (or instead of) your own products, WordPress has this built right in. No extra plugins needed — WooCommerce supports “External/Affiliate” products natively.
Step 1: Go to Products → Add New in your WordPress dashboard.
Step 2: In the Product Data dropdown, select “External/Affiliate product” instead of “Simple product.”
Step 3: Two new fields appear:
- Product URL — paste your Amazon affiliate link here
- Button text — type “Buy on Amazon”
Step 4: Fill in the product title, description, product image, categories, and tags as usual.
Step 5: Publish the product.
Now visitors see a “Buy on Amazon” button instead of “Add to Cart” on the product page. Clicking it redirects them to Amazon through your affiliate link.
This method is ideal for building product comparison sites, niche review stores, or curated product catalogs where you earn affiliate commissions instead of fulfilling orders. If you’re already using WooCommerce, you might also want to check out the best WooCommerce email customizers to improve your store’s customer communication.
Quick Note: Don’t display Amazon’s product price on your WooCommerce product page. Amazon’s prices change frequently, and showing outdated prices violates their Operating Agreement. Either leave the price field blank or use an API-connected plugin that pulls live pricing.
Method 5: Using Dedicated Amazon Affiliate Plugins (For Serious Affiliates)
If Amazon affiliate marketing is a significant revenue stream for you, free button blocks won’t cut it. Dedicated Amazon affiliate plugins automatically pull product data, generate professional product boxes with “Buy on Amazon” buttons, keep pricing updated, and handle geo-targeting for international visitors.
Here’s a comparison of the top options as of March 2026:
| Plugin | Starting Price | Auto-Update Prices | Product Boxes | Comparison Tables | Geo-Targeting |
|---|---|---|---|---|---|
| AAWP | €79/year | Yes | Yes | Yes | Yes |
| AmaLinks Pro | $42/year | Yes (with API) | Yes | Yes | No |
| AzonPress | $31/year | Yes | Yes | Yes | Yes |
| Auto Amazon Links | Free | Yes | Basic | No | No |
My recommendation: If you’re earning more than $200/month from Amazon commissions, AAWP is worth every penny. It creates professional product boxes with a “Buy on Amazon” button automatically, pulls live pricing from Amazon’s API, and supports geo-targeting so visitors from different countries see their local Amazon store (Amazon.com, Amazon.co.uk, Amazon.de, etc.).
AmaLinks Pro is a solid mid-range option at $42/year, especially if you don’t need geo-targeting. It has a “no API mode” that works without connecting to Amazon’s Product Advertising API, making setup faster.
For beginners or sites with minimal Amazon affiliate content, stick with the free methods (Methods 1-3). The ROI of a paid plugin only makes sense when you’re generating consistent affiliate revenue.
Which Method Should You Use?
After testing all five methods across different sites, here’s my honest recommendation based on your situation:
| Your Situation | Best Method | Why |
|---|---|---|
| Occasional product links in blog posts | Method 1 (Native Button) | Zero setup, no plugins needed |
| Regular affiliate content, want icons | Method 2 (Ultimate Blocks / Spectra) | Free, adds icon support and styling |
| Developer focused on page speed | Method 3 (Custom HTML/CSS) | Zero overhead, full control |
| WooCommerce product catalog | Method 4 (External Product) | Built-in WooCommerce feature |
| Full-time affiliate, 50+ products | Method 5 (AAWP / AmaLinks Pro) | Automation, live pricing, geo-targeting |
Button Design Tips That Actually Increase Clicks
After years of testing Amazon affiliate buttons across multiple sites, here’s what consistently improves click-through rates:
1. Use Amazon’s orange (#FF9900) — People subconsciously associate this color with Amazon. It’s an instant trust signal that tells readers “this goes to Amazon” before they even read the text.
2. Always include “on Amazon” in the button text — “Buy Now” is generic and could go anywhere. “Buy on Amazon” or “Check Price on Amazon” tells users exactly where they’re going, which reduces hesitation.
3. Place buttons above the fold — Don’t bury your buy button at the bottom of a 3,000-word review. Add one near the top (right after your recommendation) and another at the bottom. Two buttons consistently outperform one.
4. Keep button text short — “Buy on Amazon” or “Check Price on Amazon” works far better than “Click Here to Purchase This Product on Amazon.com Right Now.” Short and punchy wins every time.
5. Add rel="nofollow sponsored" to every affiliate link — This is required by Google’s webmaster guidelines and Amazon’s Operating Agreement. Skipping this can hurt your search rankings and potentially get your affiliate account suspended.
Don’t Forget: FTC Affiliate Disclosure
This is something nearly every other guide on this topic completely ignores, but it’s critical for your legal compliance.
The Federal Trade Commission (FTC) requires clear and conspicuous disclosure of affiliate relationships. As of 2026, violations can result in penalties of up to $50,120 per violation. Amazon’s own Operating Agreement also requires you to disclose the affiliate relationship on your site.
What you need to do:
- Add a clear disclosure statement near your affiliate links — not buried in a footer nobody reads
- Use straightforward language like: “This post contains Amazon affiliate links. If you purchase through these links, I may earn a commission at no extra cost to you.”
- Place it at the top of every post that contains affiliate links, or immediately before your first affiliate button
I add a short disclosure at the top of every affiliate post on my sites. It builds trust with readers (transparency is an E-E-A-T signal that Google values) and keeps you on the right side of both the FTC and Amazon.
Frequently Asked Questions
Can I use the Amazon logo on my buy button?
Amazon’s Trademark Guidelines restrict how you can use their logo and branding. You can freely use text like Buy on Amazon or Available on Amazon, but placing the Amazon smile logo or wordmark on custom buttons may violate their trademark policy. The safest approach is text-based buttons with the Amazon name, or official Amazon Associates badges.
Do I need an Amazon Associates account to add a buy button?
Technically no — you can link to any Amazon product page without being an affiliate. But without an Associates account, you won’t earn commissions on purchases. Signing up is free and takes about 5 minutes at affiliate-program.amazon.com. You get 180 days to make 3 qualifying sales before full review.
What is the difference between Buy on Amazon and Buy with Prime?
Buy on Amazon is an affiliate link that redirects visitors to Amazon.com to complete their purchase. Buy with Prime is Amazon’s merchant solution that lets customers use their Prime benefits (fast shipping, easy returns) to checkout directly on YOUR website. Buy with Prime is for sellers who fulfill through Amazon, not for affiliate marketers.
Will adding Amazon buttons slow down my WordPress site?
Methods 1-3 (native block, block plugins, custom HTML) have virtually zero performance impact. Dedicated Amazon plugins like AAWP may add some overhead from API calls to fetch live product data. Choose a plugin that caches API responses locally so it does not call Amazon’s API on every page load.
How do I add nofollow and sponsored attributes to Amazon links?
In the native WordPress Button block, click the link settings and look for the nofollow toggle and rel attribute field. In Ultimate Blocks and Spectra, there is usually a toggle for nofollow in the link options. For custom HTML, add rel=nofollow sponsored directly to your anchor tag. This tells Google the link is paid/sponsored.
What are the current Amazon Associates commission rates?
Rates vary by product category. Most pay 3-6%. Amazon Games pays the highest at 20%, followed by Luxury Beauty at 10% and Amazon Haul at 7%. Electronics pays around 4%, while Amazon Fresh and Physical Video Games pay 1%. Rates change periodically — check the current fee schedule at affiliate-program.amazon.com.
Related Guides:
Summing Up!
Adding a “Buy on Amazon” button in WordPress is straightforward — you don’t need expensive plugins or developer skills. For most bloggers, the native WordPress Button block (Method 1) or a free plugin like Ultimate Blocks (Method 2) handles the job perfectly.
If you’re serious about Amazon affiliate income and manage 50+ product links, invest in a dedicated plugin like AAWP that automates product data, updates pricing in real-time, and generates professional product displays that convert better than basic buttons.
Whatever method you choose, remember two non-negotiable requirements: always add rel="nofollow sponsored" to your affiliate links, and always include a clear FTC-compliant affiliate disclosure near your buttons. These protect both your search rankings and your Amazon Associates account.