
Not sure how to hide the main image on your blog posts or pages? I can help you with that! In this article, I’ll show you three different ways to do it. Just read through the article carefully and follow the instructions.
Hiding a main image in WordPress is quite easy. Most themes have a built-in option for that. All you need to do is check off the main image option, and you’re done. Some themes even allow you to hide the main image from a specific post or page instead of applying the setting to your entire blog.
Before we continue with the article, let me address a few commonly asked questions:
- Can you delete the image instead of hiding it?
- Is hiding a main image the right decision for you?
- Will hiding the main image affect the SEO ranking of your blog?
Feel free to ask if you have any further questions!
Can I Delete the Image Rather Than Hiding It?
We highly recommend you not delete the image because the feature image is one of the most important elements of your blog post. You can think of it as the face of your blog post. The feature image not only appears on your blog post but also plays a crucial role in attracting visitors to your blog.
When someone shares your blog post on any social media platform, only your blog post title and feature image will be displayed. Without a feature image, your blog may go unnoticed.
Whether Hiding a Featured Image is the Right Decision or Not?
It’s completely up to you. In general, bloggers hide featured images because they want their visitors to immediately focus on the content or improve the loading speed of their blog.
There are no disadvantages to hiding featured images from your blog post or page.
Will It Affect the SEO Ranking of Your Blog?
No, if you hide the featured image on your blog, it will not affect your SEO ranking. However, deleting the featured image will have an impact on your ranking and other aspects of your blog.
Here’s a helpful tip: When you hide the featured image, it will not be included in the sitemap’s special section for images. To address this, you can use the Rankmath plugin to create a separate section for feature images in the sitemap.
I hope this answers all your questions. Now, let’s talk about how to hide the feature image. You have two options:
- Hide featured images from all your blog posts.
- Hide the featured image from a specific blog post.
Let’s go through both options one by one.
How To Hide Featured Image From All Blog Posts?
You can easily hide the main image from all your blog posts with just one click. Follow these steps to do it:

- First, log in to your WordPress admin area.
- Then, go to the “Appearance” tab and select “Customizer“. This will take you to a page where you can customize your website.
- In the customizer, look for the option to hide the featured image. The location may vary depending on the theme you are using.
- Once you find the option, simply click on it to hide the featured image from all your blog posts.
That’s how you can hide featured images from all blog posts.
How to Hide Featured Image From Specific Post in WordPress?
Hiding the featured image from a specific post is incredibly simple. Most themes offer an option to show or hide a featured image directly from the WordPress post editor.
But why would you want to remove featured images from specific posts? Let’s use an example to better understand this…
Imagine you are utilizing the Astra theme on another website. Astra is one of the most popular free WordPress themes due to its responsiveness, lightweight nature, and SEO friendliness. Additionally, this theme is compatible with all major page builder plugins, including Elementor Pro.
To hide the featured image from a specific post, please follow the instructions below:
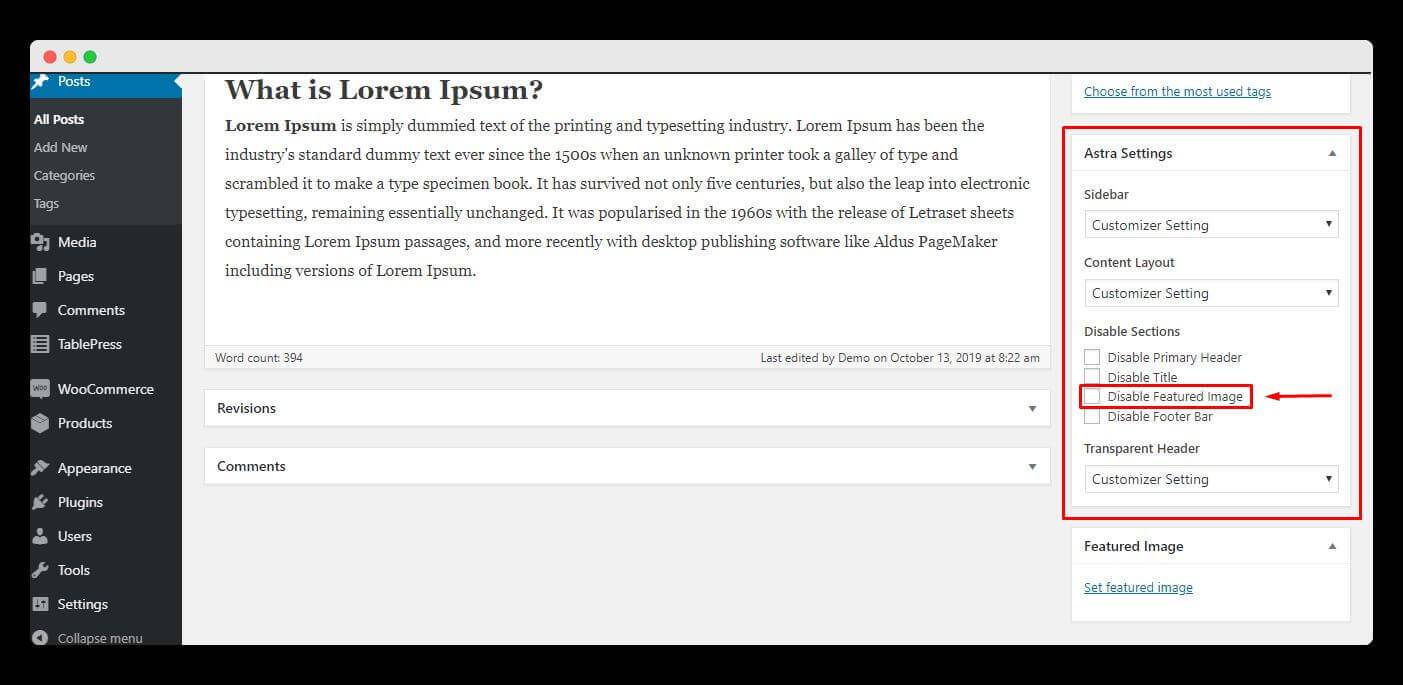
If you are using the Astra theme, then the process is very easy. Login to your WordPress admin area >> Go to Posts >> Open the post in which you want to hide the featured image >> On the right side, you will see the “Astra Settings” section.
In this section, you will have the option to show or hide the featured image. Check the “Disable Featured Image” box to hide the image.
And that’s all there is to it! Hiding the featured image on a specific blog post is easy and only takes a few steps.
Hide Featured Image Using WordPress Plugin
If you’re using a theme that doesn’t have an option to disable the featured image, don’t worry. You can still hide the featured image with the help of a plugin like…
These plugins offer you the option to hide or show a specific blog post’s featured image. The process is quite similar: you need to install and activate the plugin, then open the post in which you want to hide the image and check the “Hide Featured Image” option.
If you’re still not sure how to do it, follow these step-by-step instructions:

To get started, login to your WordPress admin area and go to Plugins. Then, click on Add New and search for “Conditionally display featured image on singular posts and pages.” Once you find the plugin, install and activate it.
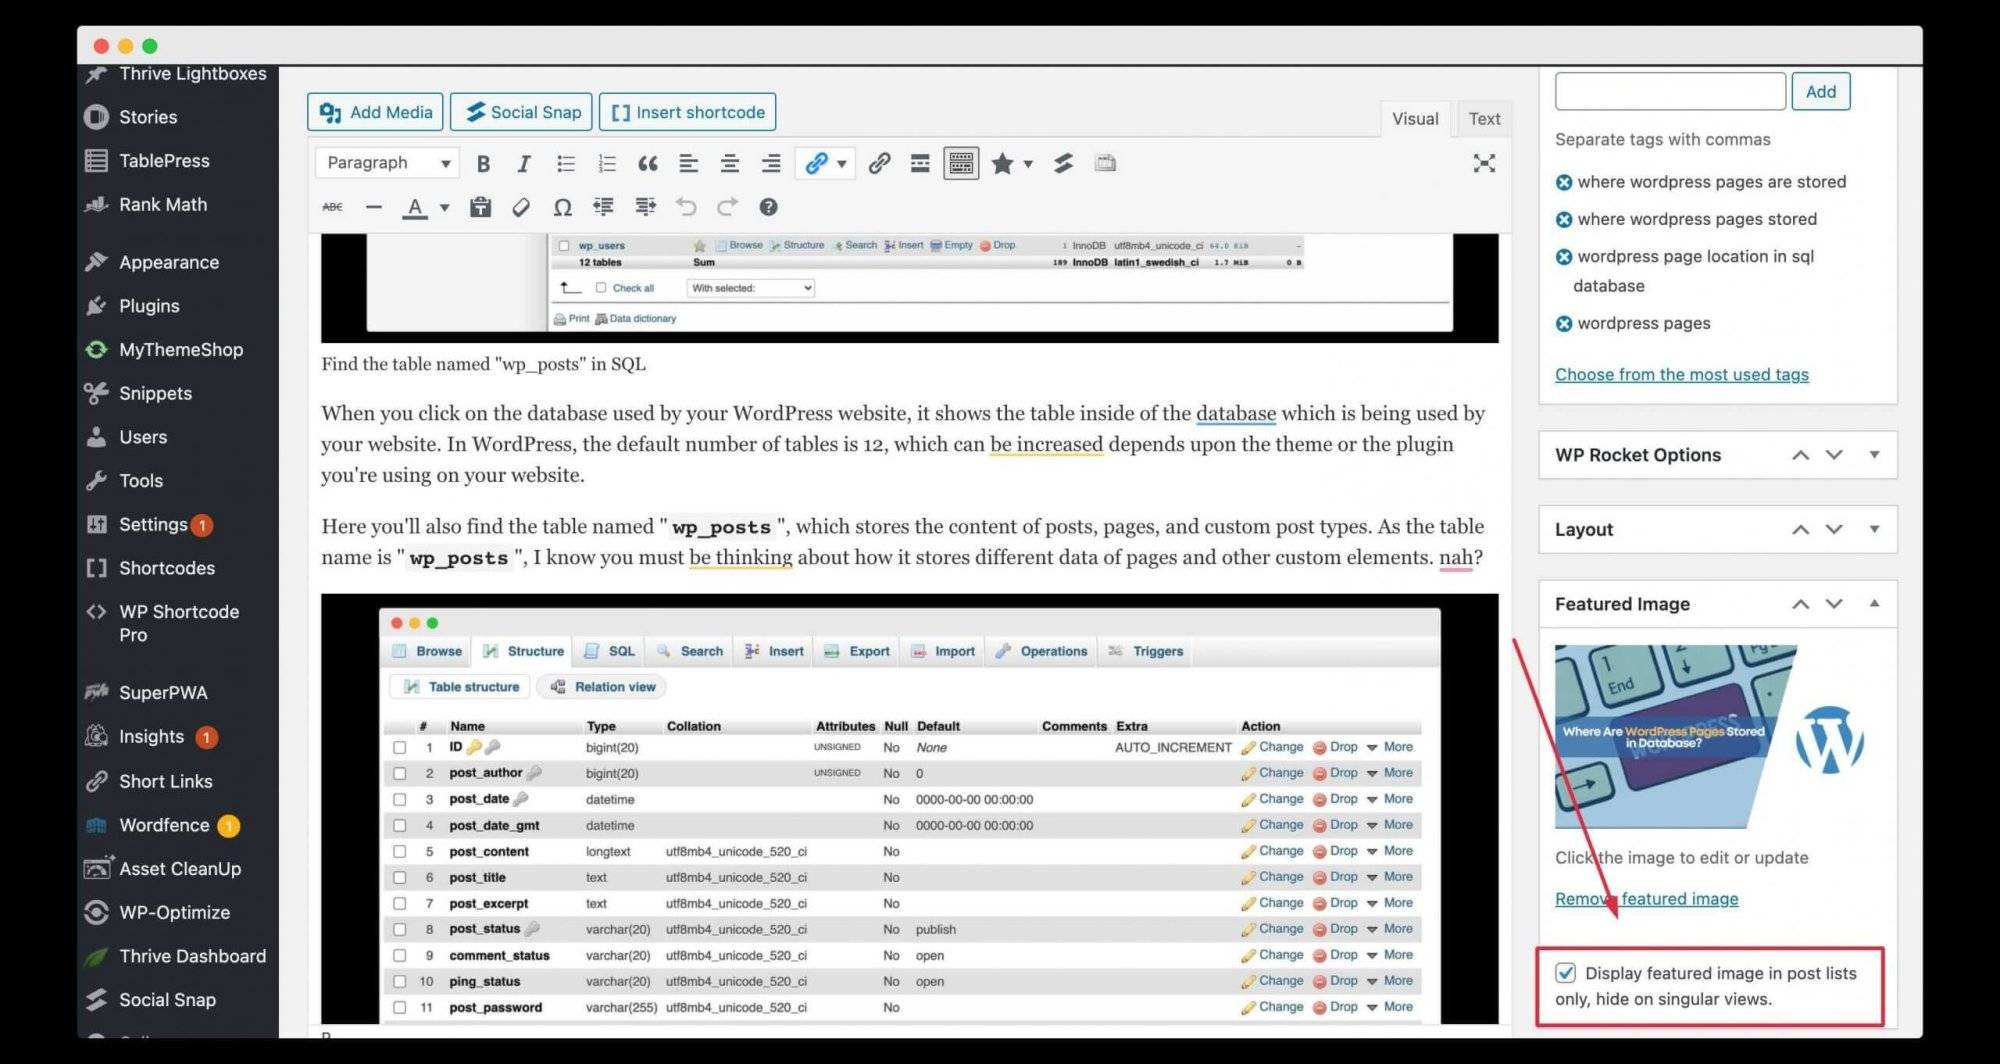
After activating the plugin, open the blog post in which you want to hide the featured image. In the Featured Image section, you will see an option to hide the featured image. Just check the box as shown in the image and you’re all set!
How To Hide Featured Images Using Custom CSS?
The last way to hide the featured image on a website is by using CSS code. I suggest this method only if you have tried the other methods and they didn’t work. Keep in mind that this method might be a bit complicated if you’re not familiar with HTML and CSS.
This method requires some time and effort because you need to identify the specific element using the “Inspect” feature in your browser and then create custom code to hide it. However, it can be worth it if you only have a few published posts.
Let me guide you through the step-by-step process of finding and hiding a featured image:

To hide the featured image on a specific blog post, start by opening that post in your WordPress editor. Then, right-click on the image and select the “Inspect” option at the end. In the code that appears, you will see the featured image class named “featured-image page-header-image-single” and the post ID.
Next, we need to find the post ID. Once you have it, we can use the following code to hide the featured image:
#post-785 .featured-image{ display:none; }
In the code above, make sure to replace “post id” with the actual ID of the post or page where you want to hide the featured image.
To add this code to your WordPress site, log in to your WordPress admin area and go to Appearance > Customizer. Then, scroll down and click on the Additional CSS option at the bottom. Paste the code there and click on Publish to save your changes.
After that, you can refresh the post or page, and you will see that the featured image is no longer visible.
Conclusion
With the method mentioned above, you can easily hide the featured image in WordPress. However, it is not recommended to do so, as the featured image serves as the identity of your entire blog post.
In most cases, you won’t need to use plugins like “Conditionally display featured images on singular posts and pages.” Nowadays, most themes offer the option to show or hide the featured image for specific or all blog posts.
Also, remember to create a new section in the sitemap for the featured image. As we discussed earlier, you can easily do this with the Rank Math SEO plugin, which is a free SEO plugin.
We hope this article on how to hide featured images in WordPress posts is helpful for you. If you find this post useful in any way, feel free to share it on social media.
Nice article I was searching this finally I found, and it worked me.
Thanks,
For sharing this article.
feature image is very important for the post you should not remove it.
Thanks For Sharing this Article and for giving clarity about why we don’t have to delete the feature image that helps me a lot, thanks for all the useful content, the way you are explaining about the things is very impressive. Keep Going.
This is a detailed and practical guide for hiding the featured image in WordPress. I appreciate your efforts in explaining it with multiple approaches. The SEO insights are especially helpful.
Excellent guide on hiding featured images in WordPress! I appreciate the details for different themes and the SEO implications. This is very beneficial for optimizing blog load times and user experience.
The details about hiding featured images that you’ve provided are comprehensive. Your post answers a lot of commonly asked questions related to SEO. I discovered new insights on using SEO friendly functions in WordPress through your content.