Are you looking to delve into the exciting world of fashion blogging? Perhaps you have a unique sense of style that you’d love to share with the world, or an eye for the latest trends. Whatever the reason, starting a fashion blog can be a fun and creatively fulfilling project, not to mention potentially very lucrative.
But where do you begin? How do you take that first step from fashion enthusiast to fashion blogger? Whether you’re completely new to blogging or have dabbled in it before, this guide will outline everything you need to know.
From understanding the fashion blogging landscape, finding your fashion niche, creating engaging content to monetizing your blog, this comprehensive guide will walk you through the process. We will go step by step to ensure you set the right foundation for your fashion blog, grow it effectively, and turn your passion into a profitable opportunity.
And a major part of growing a blog is building a strong social media presence. For instance, gaining Instagram likes can help amplify your content to a wider audience, boosting your credibility and attracting potential brand collaborations.
So, let’s not wait any longer! Jump right in as we explore how to start a fashion blog in this guide. Your fashion blogging journey is about to take off!
Why Should You Start a Fashion Blog?
If you’re passionate about fashion blogging and want to succeed in the industry, you may have looked up some of the most prominent fashion bloggers and influencers on Instagram. Have you ever wondered how these fashion bloggers make money online? How do they afford their makeup, clothes, and other expenses?
Well, many big companies and multinational corporations spend millions on advertisements to promote their brands. They collaborate with fashion bloggers to sponsor their content and products, such as clothes and makeup items. These bloggers then promote these brands through their social media channels. Additionally, they are paid for promoting these products.
Paid and sponsored content is the primary way for fashion bloggers to generate income. You can also earn revenue by promoting these brands through your Instagram channel and even through your blog posts.
In today’s generation, there is a massive craze for Musicl.ly (formerly TikTok) and Instagram Reels. Many of us use these platforms for our daily entertainment, but we may not know how to utilize them to generate revenue.
Some of the biggest musical.ly stars also earn money through their Instagram accounts, and we too can make a good income using this platform.
Here, I’m showcasing some musical.ly stars (you probably already know most of them ????), promoting sponsored content.
Most Effective Ways of Making Money Online.
Here, we are listing the most effective ways through which fashion bloggers can earn money online:
- Placing Ads on a Website (Google Adsense)
- Engaging in Affiliate Marketing
- Promoting Brands
- Growing an Instagram Following
- Operating an Online Store
- Selling Sponsored Posts
We can discuss those matters later. For now, let’s focus on discussing the amount of money I earn monthly through my blog.
A Glimpse at My Earnings.
So, have you ever wondered how much money I make from my blog? No…?
Okay, I’m also going to share my earnings reports with you guys. But first, let me introduce my blog and myself.
TheGuideX was founded by Sunny Kumar, who has been recognized as one of the best emerging bloggers in India. His site has helped many people learn how to blog and make a living from it. His Facebook group, “Blogging for Beginners by TheGuideX,” has over 4.7K members and counting, where people discuss and share their knowledge and experiences.
TheGuideX is an eight-year-old blog and has been recognized as one of the most successful blogs in the fields of blogging and digital marketing.
At TheGuideX.com, we cover topics such as Blogging, WordPress, SEO, Social Media Marketing, and Affiliate Marketing. Our aim is to help you generate a passive income every month by working from the comfort of your home.
I understand that you are eagerly awaiting my monthly income report for this blog. I won’t keep you waiting any longer. ????
So, here is my income report…
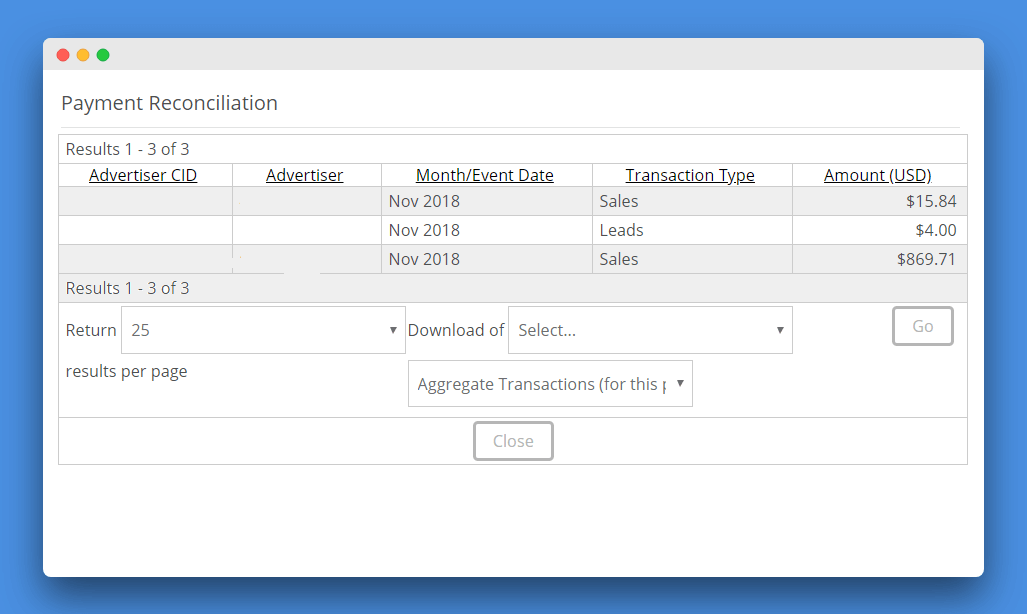
Just with CJ.com (an affiliate network), I made around $889.55, and I also earned nearly $300 using sponsored posts on my website.
So, in total:
$889.55 (affiliate income) + $300 (using sponsored posts) = $1,189.55 USD (approximately 85 thousand INR). So, in Nov 2018, I earned a total of 85 thousand INR (which is now more than 11 Lacs +).
How to Start a Fashion Blog.
I am not only going to share how to start a fashion blog, but I will also provide some incredible tips and techniques to help you skyrocket your blog traffic and make it profitable.
Are you ready?
Let’s delve into the details. If you have any doubts, you can also connect with me on Facebook or email me at [email protected].
Step #1: Choosing a Blogging Platform
The first step in creating a blog is to choose a blogging platform. The platform refers to the blog software that allows you to create your blog without any coding knowledge. There are various blogging platforms available, both free and paid. Some popular options include WordPress.com, Self-Hosted WordPress, BlogSpot, and other popular CMS.
WordPress.com and BlogSpot are free blogging platforms, but they have some limitations. If you are serious about generating passive income and want to succeed in fashion blogging, I do not recommend using these free platforms. You can read here why I don’t recommend blogging on these free platforms.
Instead of using these free platforms, I recommend using Self-Hosted WordPress.org CMS, which is also free but self-hosted. There are also many web building platforms that can be used.
With a self-hosted CMS, you can host the blogging software on your own domain name.
For example, which option would you prefer:
example.wordpress.com or example.com?
Obviously, the second one! In the first option, you are using a sub-domain (wordpress.com after your blog name), but in the second option, you’re using your own domain name. In step 2, I will explain how you can register your domain name and hosting for your blogging CMS.
Step #2: Buying a Domain Name and Hosting Plans

TheGuideX Special Offer for Our Readers: Get your website designed by our experts for free. Email us at [email protected] for more info (terms & conditions apply).
The domain name and hosting plans are vital steps in blogging. If you’re launching a fashion blog, choose a unique and memorable domain name with a .COM extension.
For example, I use the domain name TheGuideX.com for my blog. TheGuideX is the unique name of my blog, and .COM is the domain extension for online identity. You can also choose from various other extensions like .NET, .ORG, .IN, and other top-level domain names (TLDs).
Here is a step-by-step guide on how to purchase a domain name and hosting plans for your fashion blog from the reputable web hosting giant, BlueHost. Usually, a domain name typically costs $14.99 per year, and web hosting can cost $7.99 per month; that is quite expensive for beginners who are just starting out.
However, thanks to BlueHost, they offer a 60% discount on their web hosting plans, along with a free domain name for beginners.
60%
BlueHost is currently offering a limited-time promotion of 60% off on hosting plans, which includes a free domain name. Take advantage of this deal to create your website and enjoy reliable hosting services at a discounted price.…
Bluehost is one of the largest web hosting companies in the market. WordPress.org officially recommends Bluehost for their WordPress hosting. They host millions of domain names, including some of mine!
Click on the link above to buy your domain name and hosting plans. After completing your purchase at Bluehost using our link, contact us at [email protected]. We will set up your blog for free!
Let’s go ahead and purchase your domain name and hosting.
First, click on this link to open the Bluehost Deal Page. (You can get 60% OFF on hosting along with a free domain name using this discounted link.)
Now, click on the green “Get Started Now” button to get started.
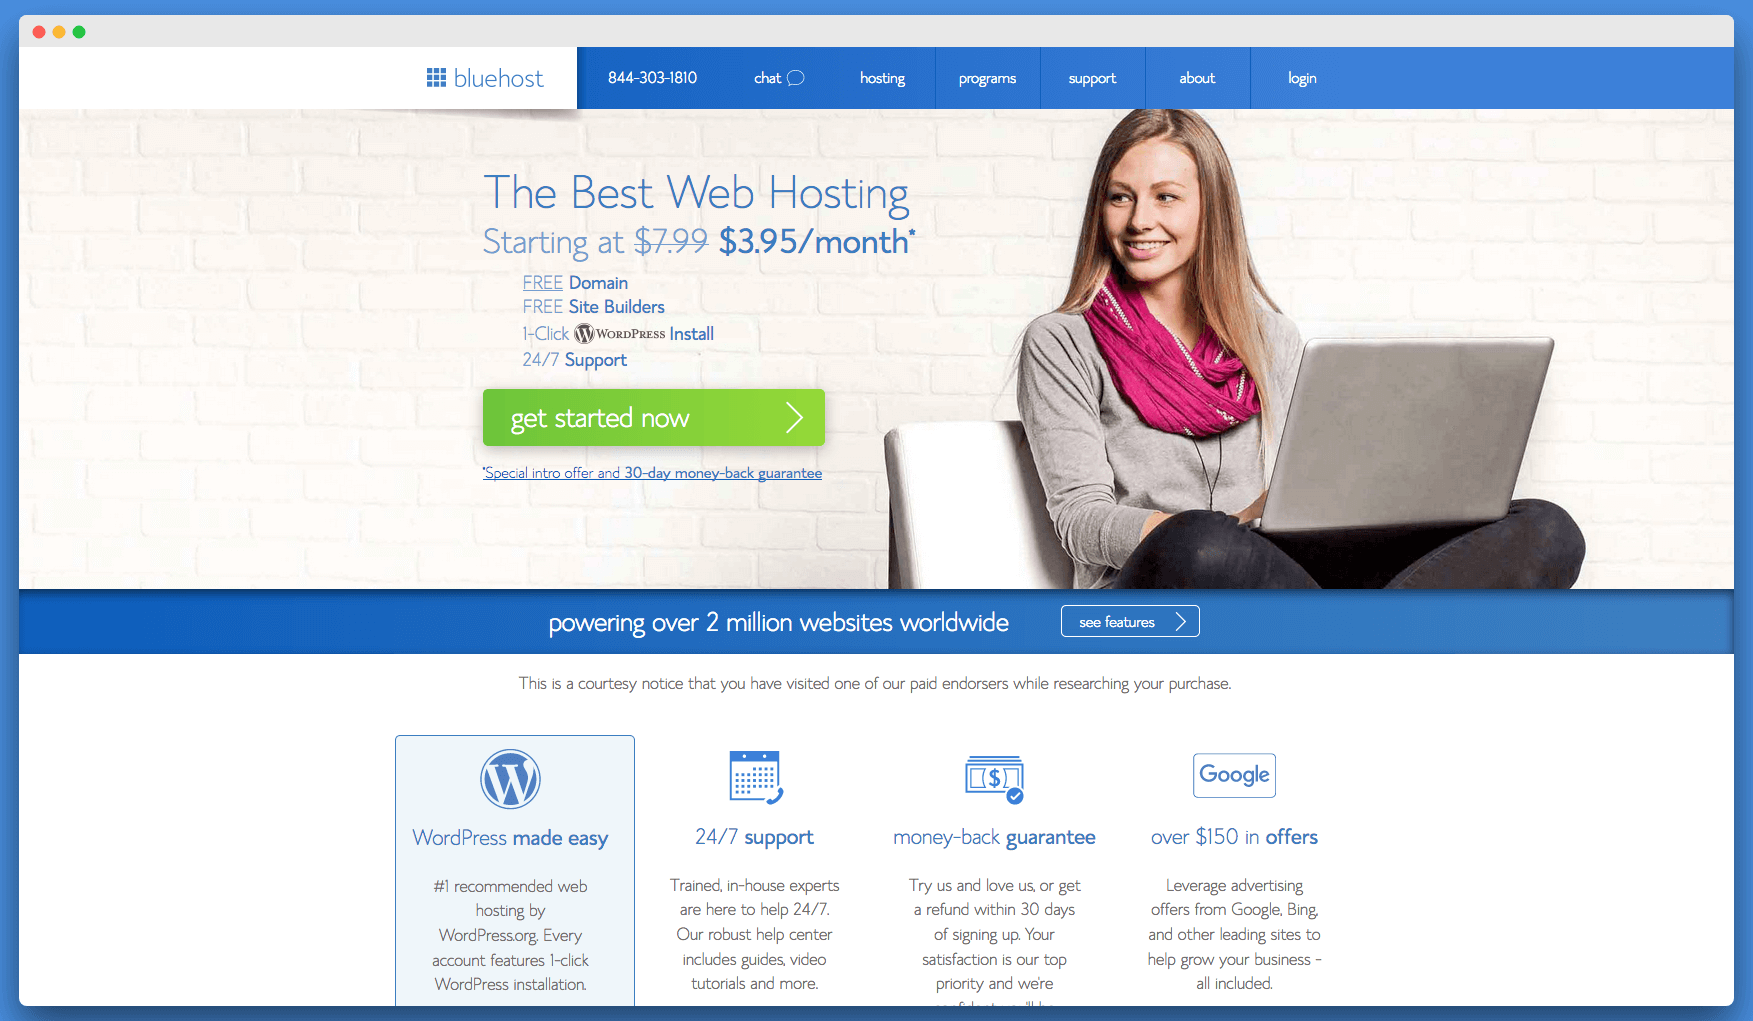
On the next screen, select the hosting plan that is perfect for your fashion blog. Since you are starting your first blog, you can go with their “basic” hosting plan. If you want to host more than one website on your hosting, you can also select the “plus” hosting plan. (The Basic and Plus plans are the most popular plans in Bluehost).
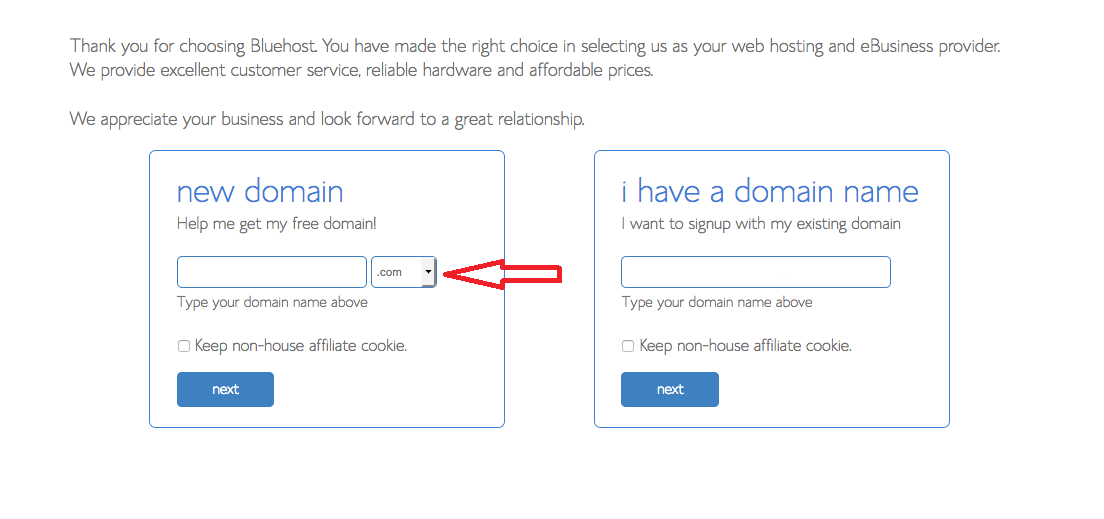
After that, it will ask you to enter a domain name for your new fashion website. Enter a unique and brandable domain name for your blog to claim a free domain name along with your hosting plan.
In the next step, you need to provide your necessary account information and finalize the package details. We recommend selecting the 36-month plan as it offers the best value and allows you to save more with 36-month billing.
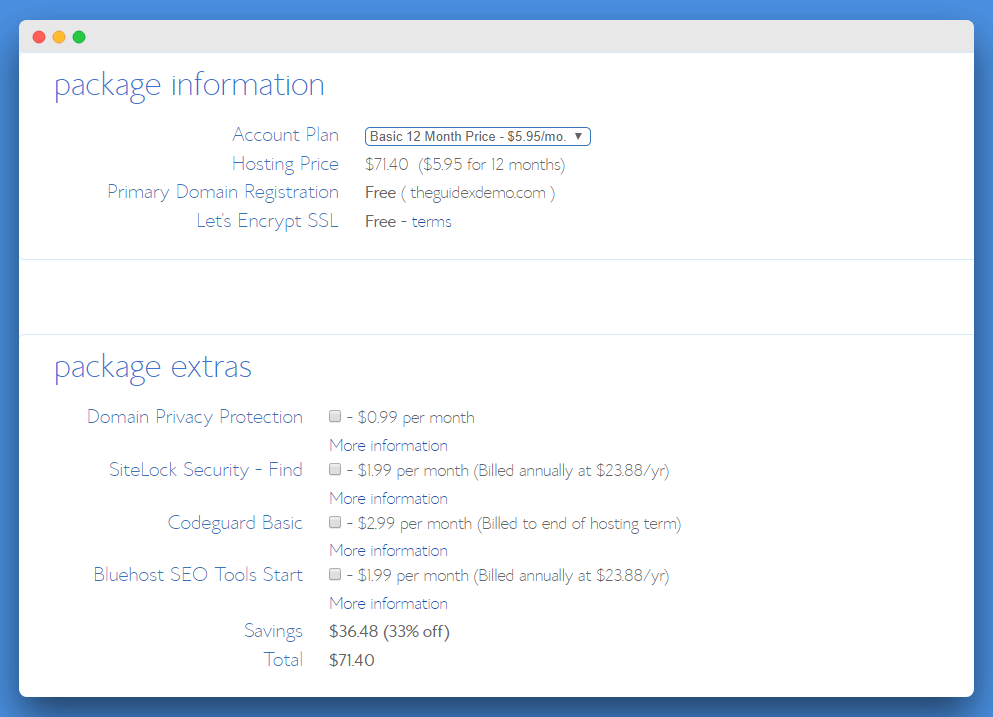
Bluehost also offers a free SSL certificate (HTTPS security) with its hosting plan, along with a free domain name. In a recent announcement by Google, it was stated that blogs with SSL enabled will be given more priority.
Additionally, Bluehost provides various add-ons with its hosting plans, including Domain Privacy, SiteLock, CodeGuard, and SEO Tools. If you wish to add any of these add-ons, simply click on the desired one. However, it is generally not recommended to add these extras as they do not provide any additional value to your blog.
Once you have reviewed the items, enter your payment details to proceed with the checkout process. The checkout process is as simple as purchasing items from an e-commerce website.
Congratulations! You have successfully purchased your hosting plan, which includes a free domain name and SSL security for your website.
Step #3: Installing WordPress
So, we have completed the process of ordering a domain name and hosting account from Bluehost in step #2. Now, in this step, we will proceed with setting up WordPress on our hosting platform.
Installing WordPress is a simple process since you have purchased a hosting plan that includes one-click WordPress integration.
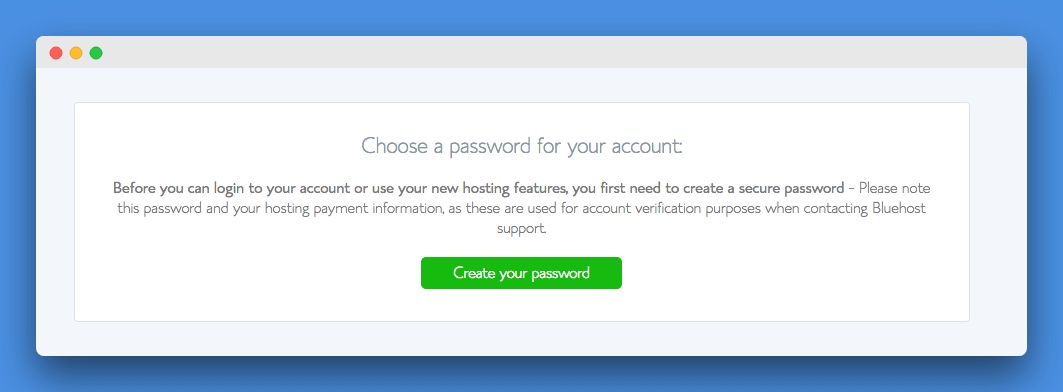
After purchasing a hosting plan, you may be prompted to choose a password for your hosting account. It is crucial to set up a strong password in order to ensure the security of your website and web hosting against hackers.
Therefore, please select a strong password for your account.
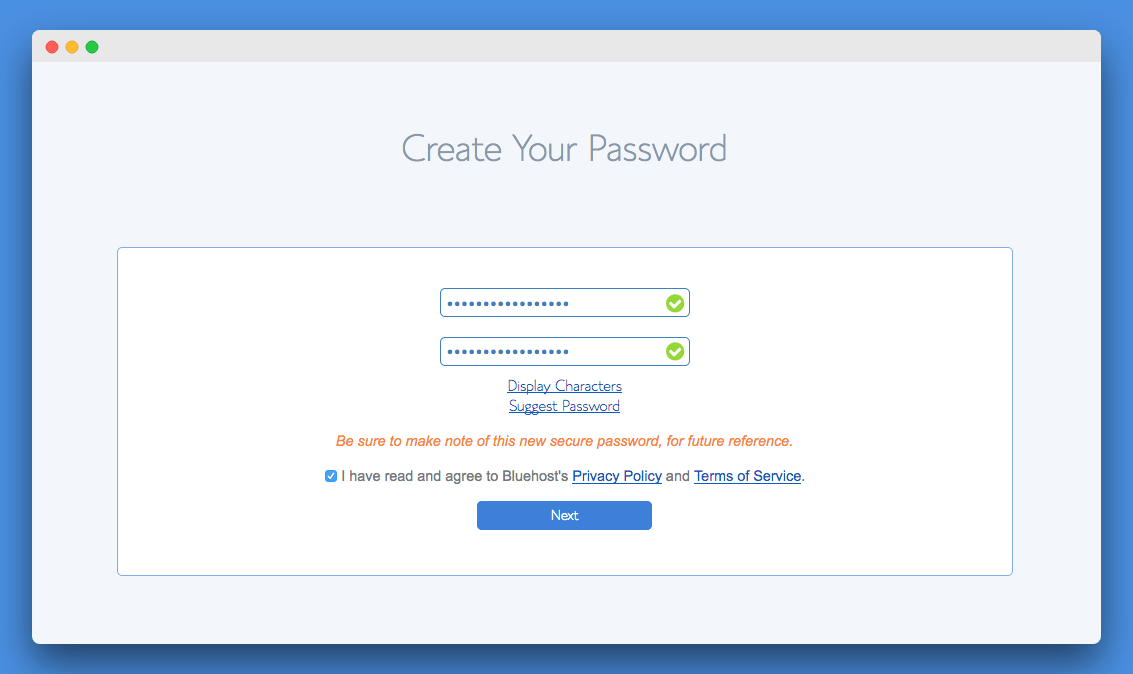
Once you have finished setting up your password, you will be redirected to the main dashboard. From here, you can proceed to install WordPress. On this page, you will be prompted to choose a WordPress theme for your website.
(Select any theme for now, and I will explain how to change the theme in the next step).
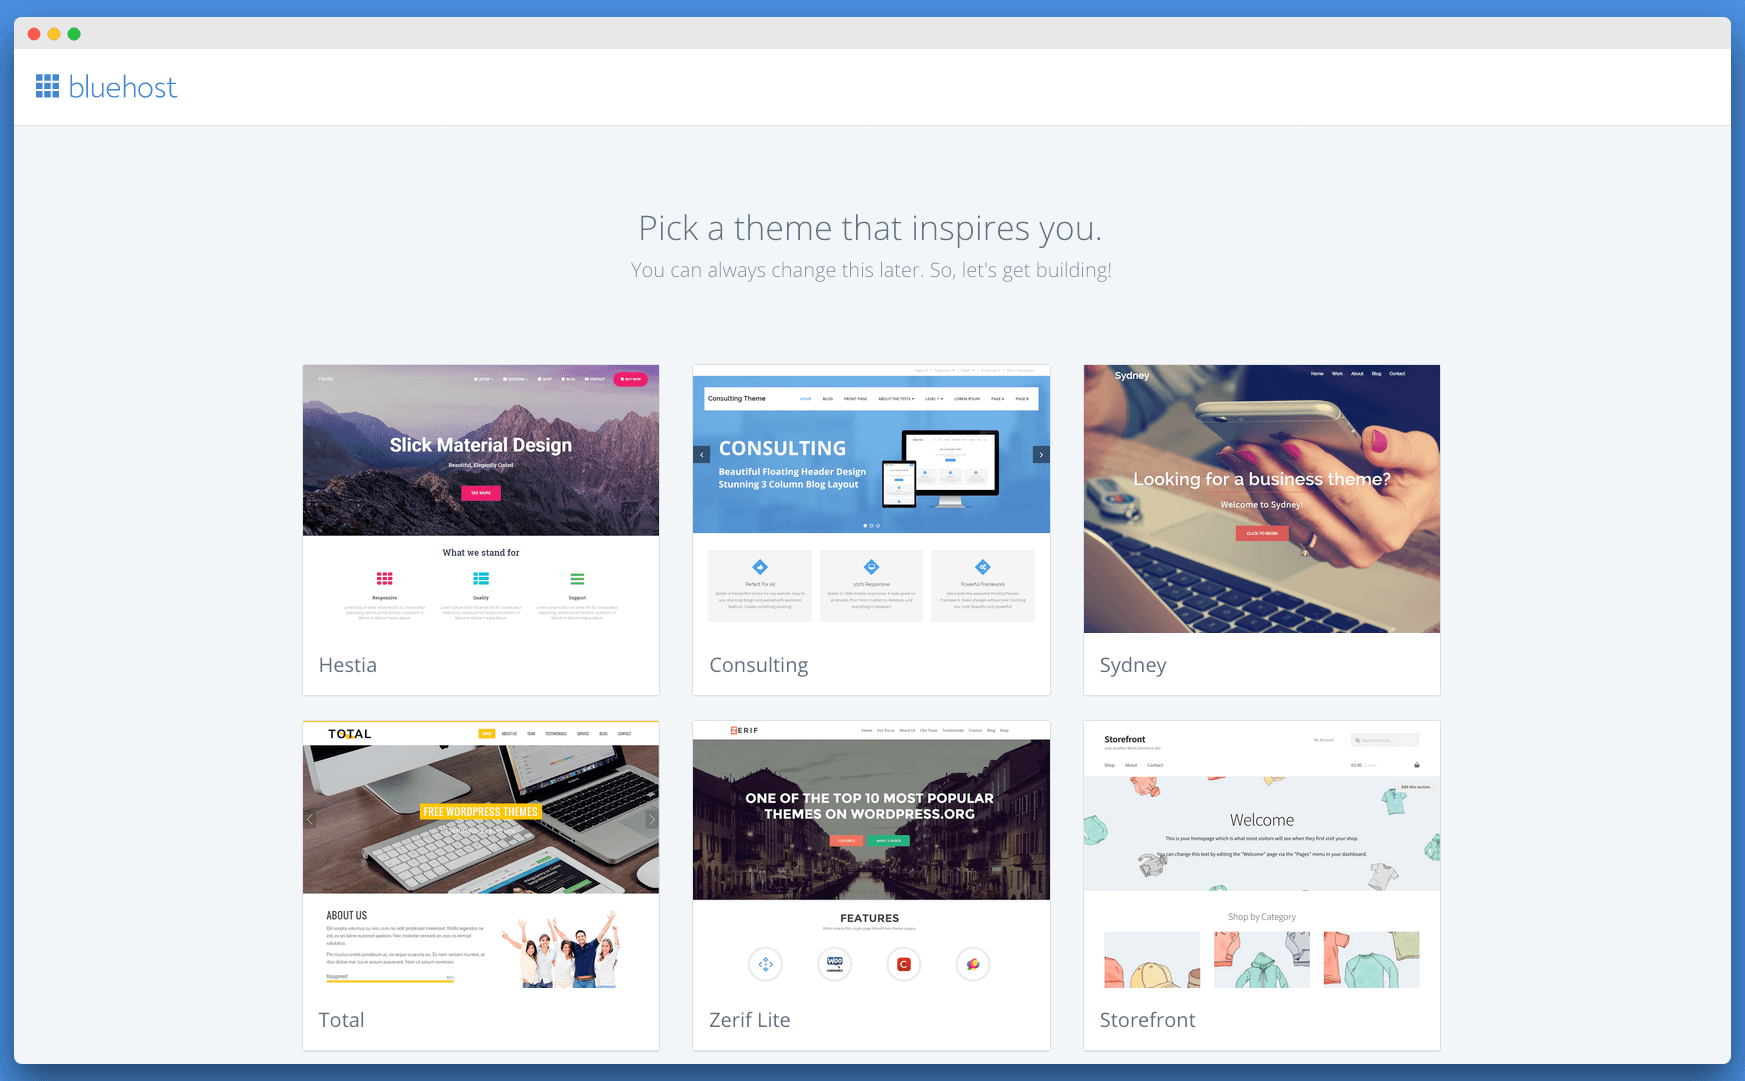
After selecting the WordPress theme, click on the blue “Start Building” button to begin the process of setting up WordPress.
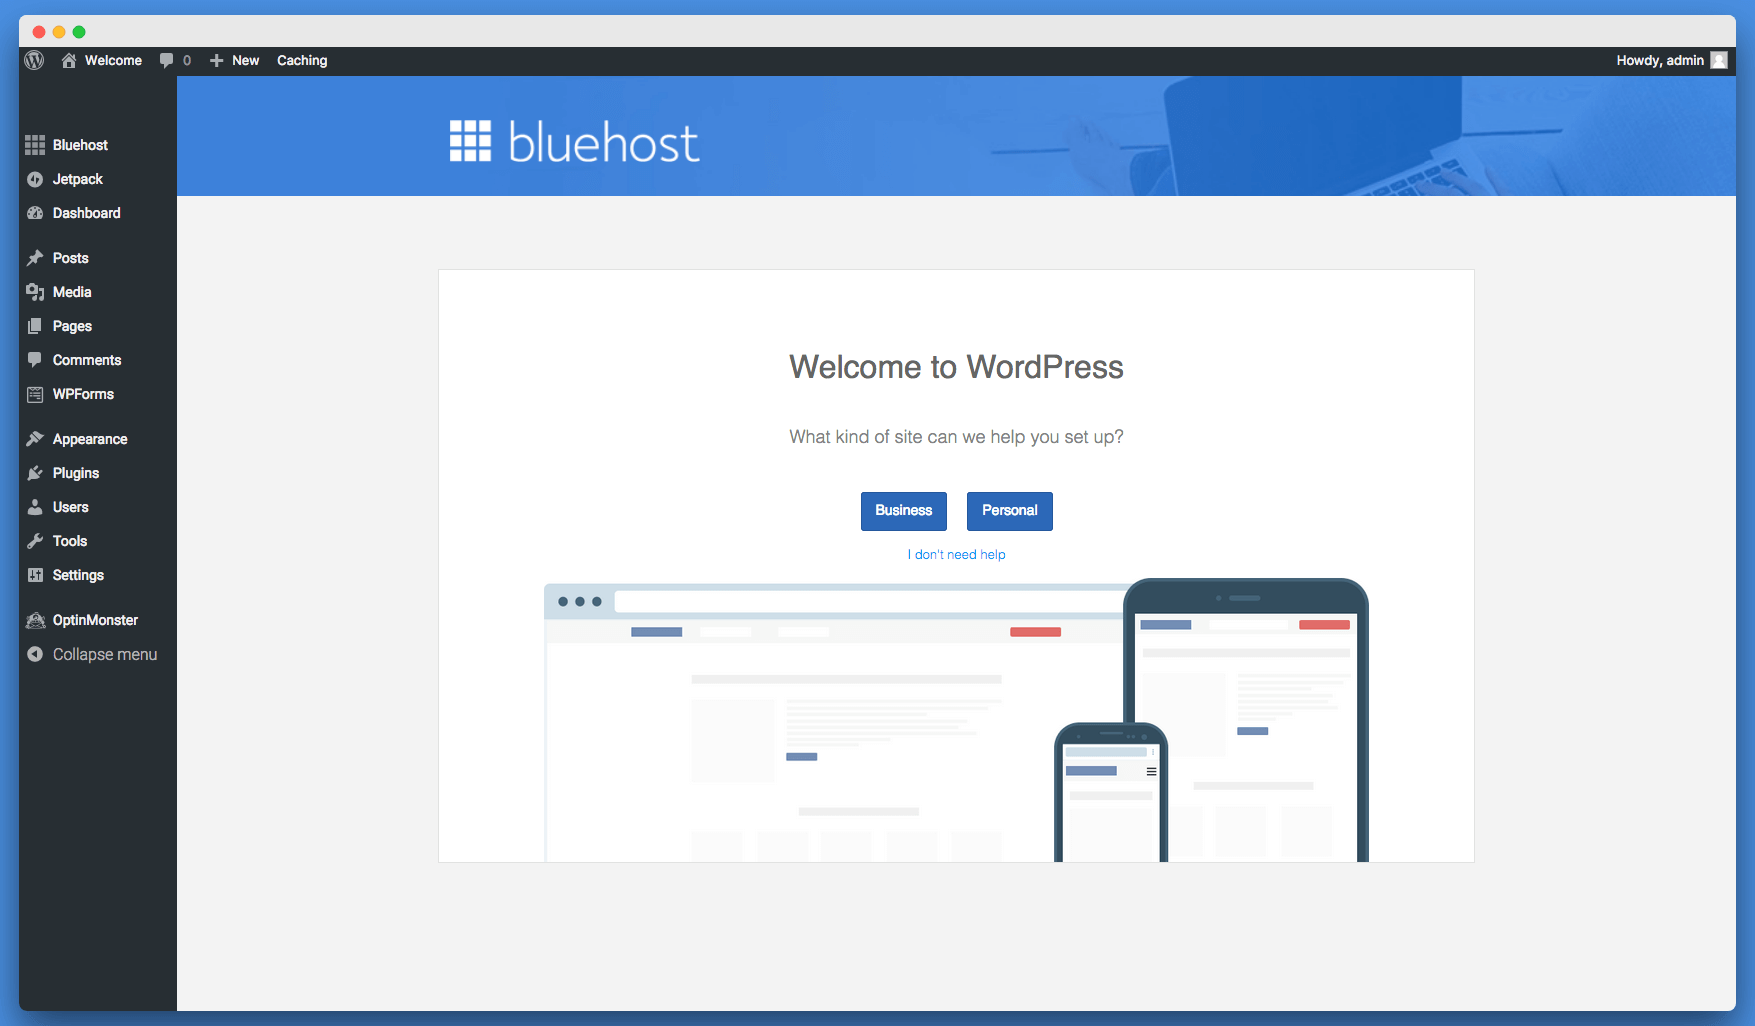
Now, you will be redirected to the WordPress Dashboard. It will display the “Welcome to WordPress” page (indicating that the WordPress setup is complete).
Next, click on the blue “Personal” button on the screen (located below the text “Welcome to WordPress”). This will redirect you to the WordPress launch page. (Please note that your website will continue to display the “Coming Soon” page when visited.)
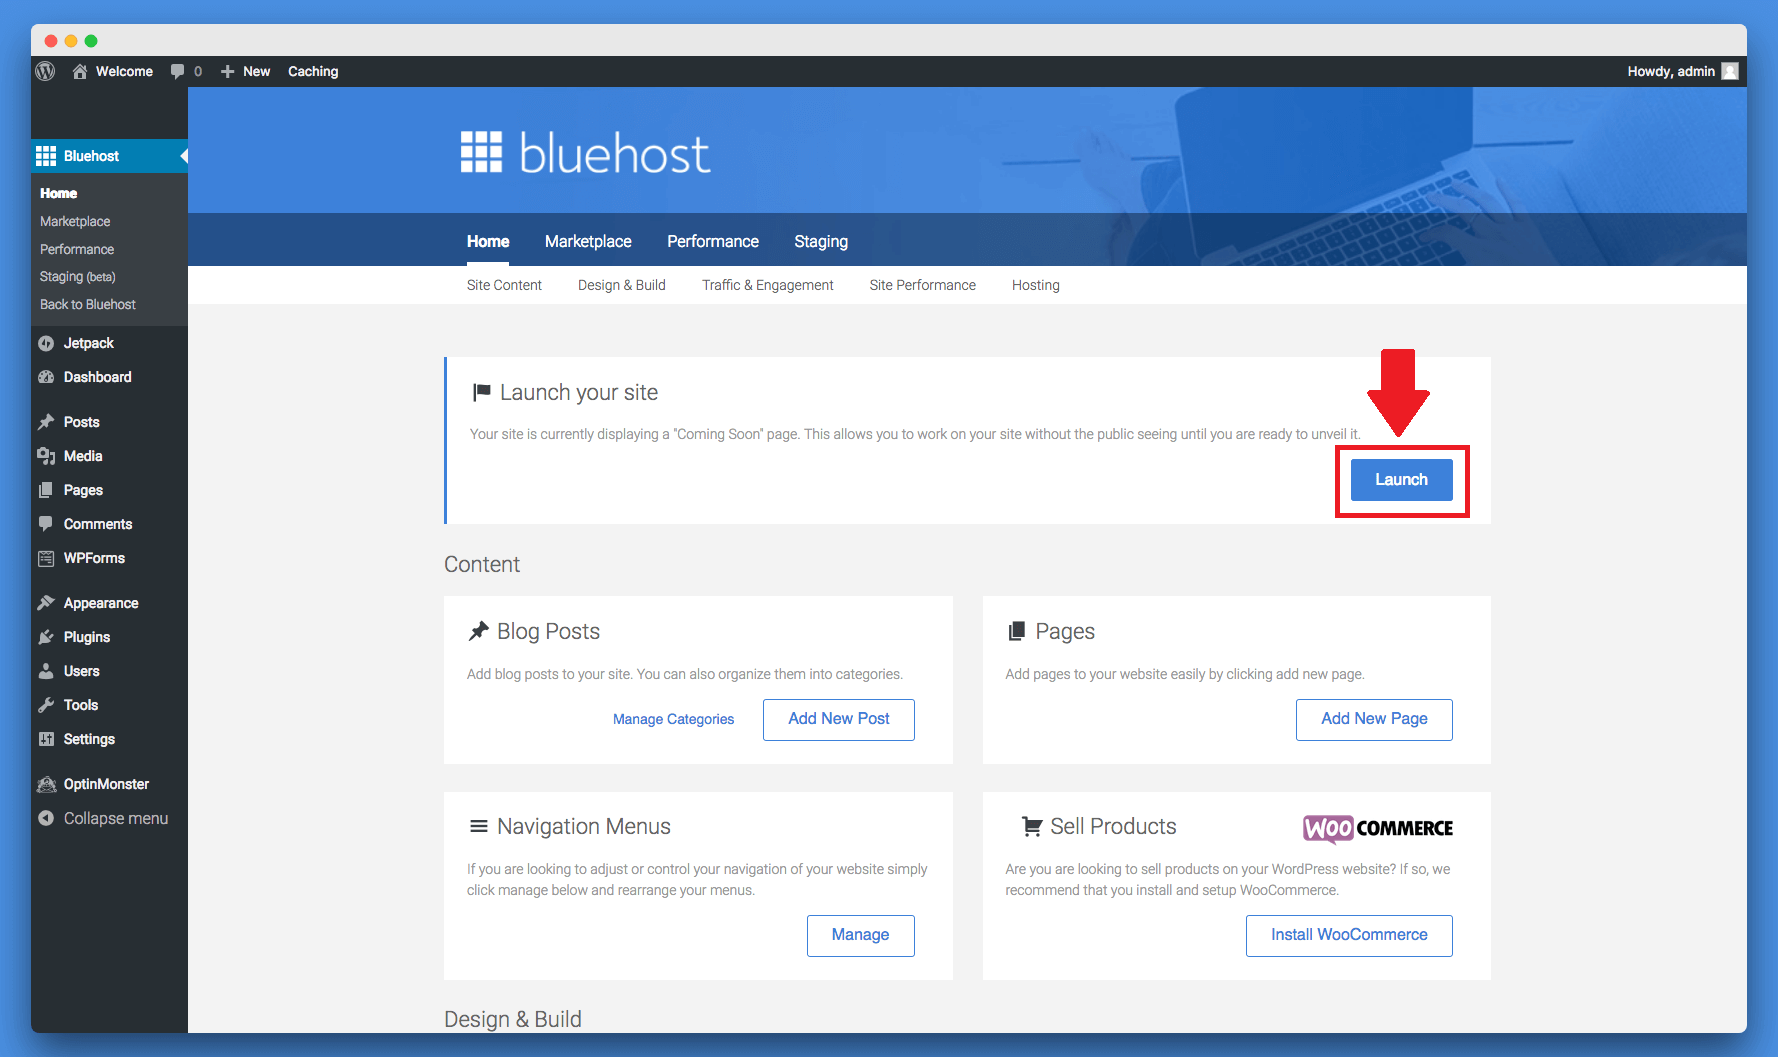
Click the launch button to start setting up your blog and make it live. On the next page, enter your site name and tagline to continue setting up your blog.
Once you have finished setting up WordPress, you will be redirected to the Bluehost cPanel.
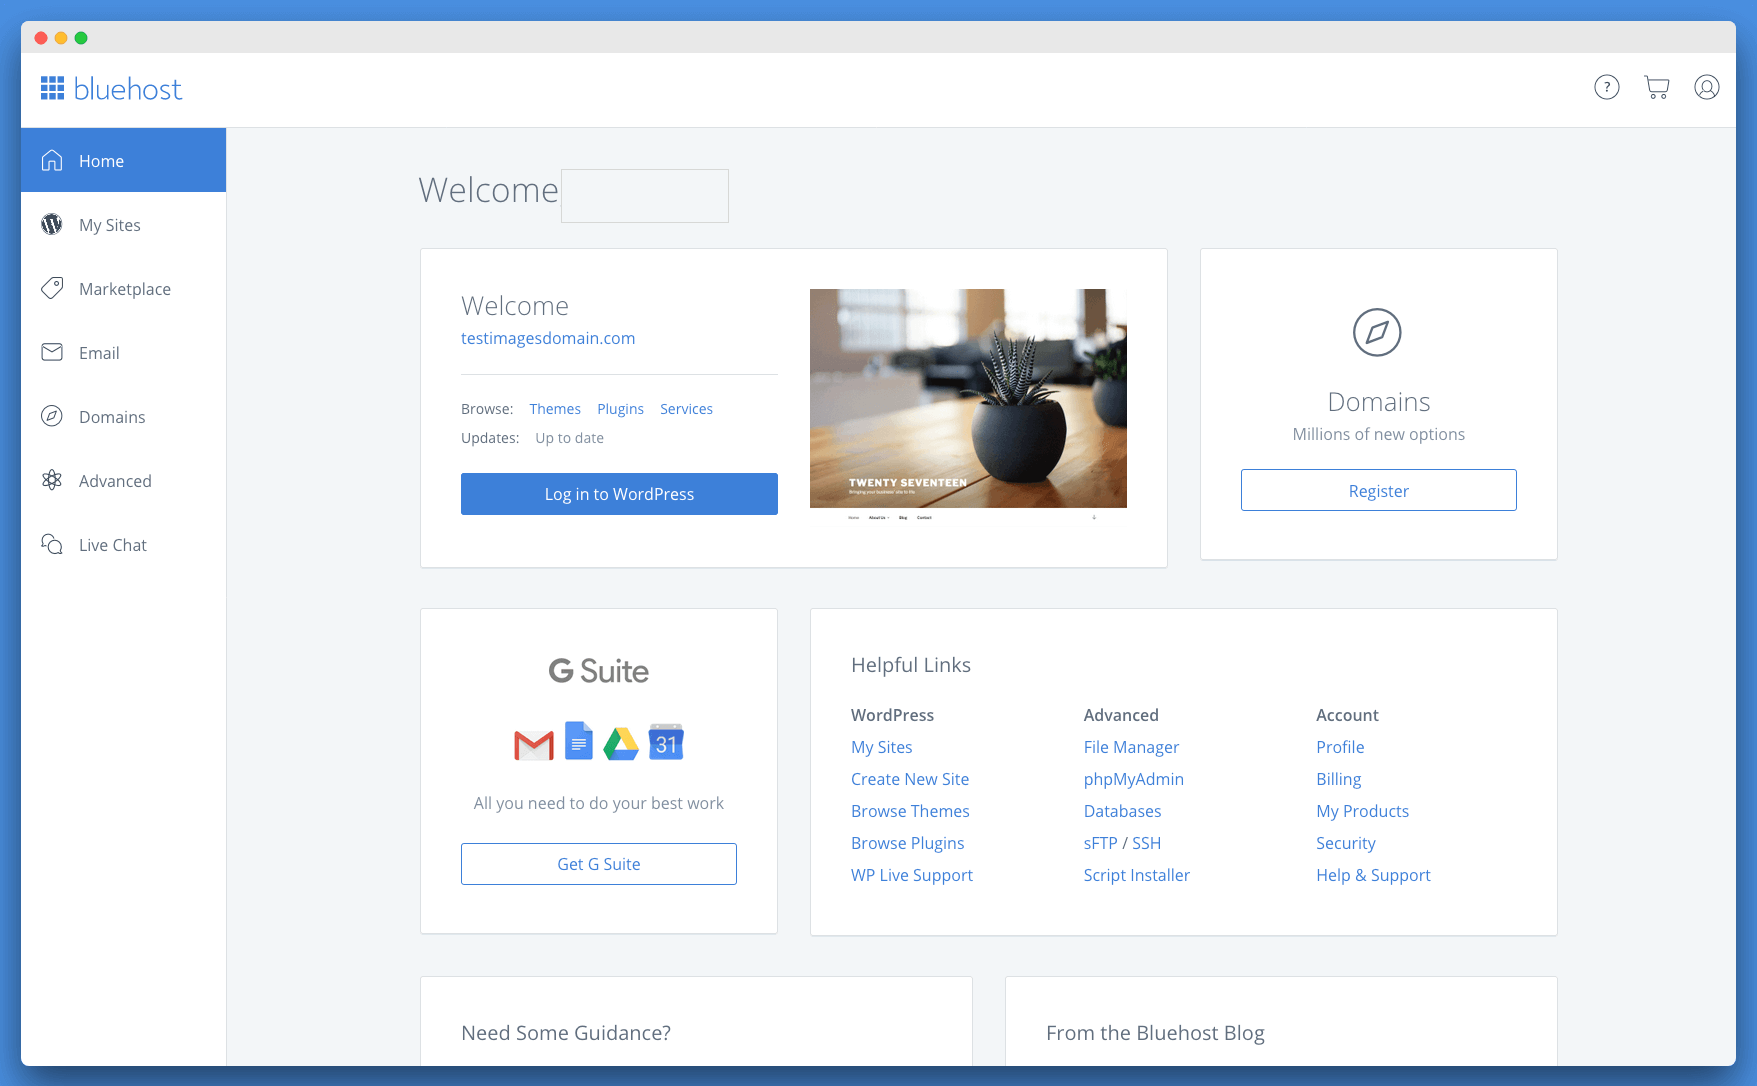
Great! Now, click on “Login to WordPress” to log back into your website’s admin dashboard.
Next, go to the Settings menu in your dashboard and add any other details about your website. If you need further assistance in setting up your blog for free, you can also contact me at [email protected].
Step #4: Setting up a WordPress Theme and Plugins.
Just like you install various themes on your smartphone to change its overall look and design, and also install apps from the Play Store and iOS Marketplace to enhance its features, you can do the same with themes and plugins on your WordPress website.
Themes allow you to change the overall visual effect of your website, while plugins help improve its features.
Here, I’ll show you how to install themes and plugins on your website. I’ll also provide a list of important themes and plugins that you can use to enhance your website overall.
Step #4.1: How to Install a WordPress Theme
In this step, I will show you how to install a WordPress theme on your website. There are thousands of WordPress themes and plugins available for free on WordPress. You can also purchase a premium WordPress theme from ThemeForest, MyThemeShop, StudioPress, Elegant Themes, and other WordPress theme marketplaces.
If you are looking for paid themes for your website, I recommend purchasing your theme from MyThemeShop or StudioPress.
When you visit your blog, it will initially look something like this:
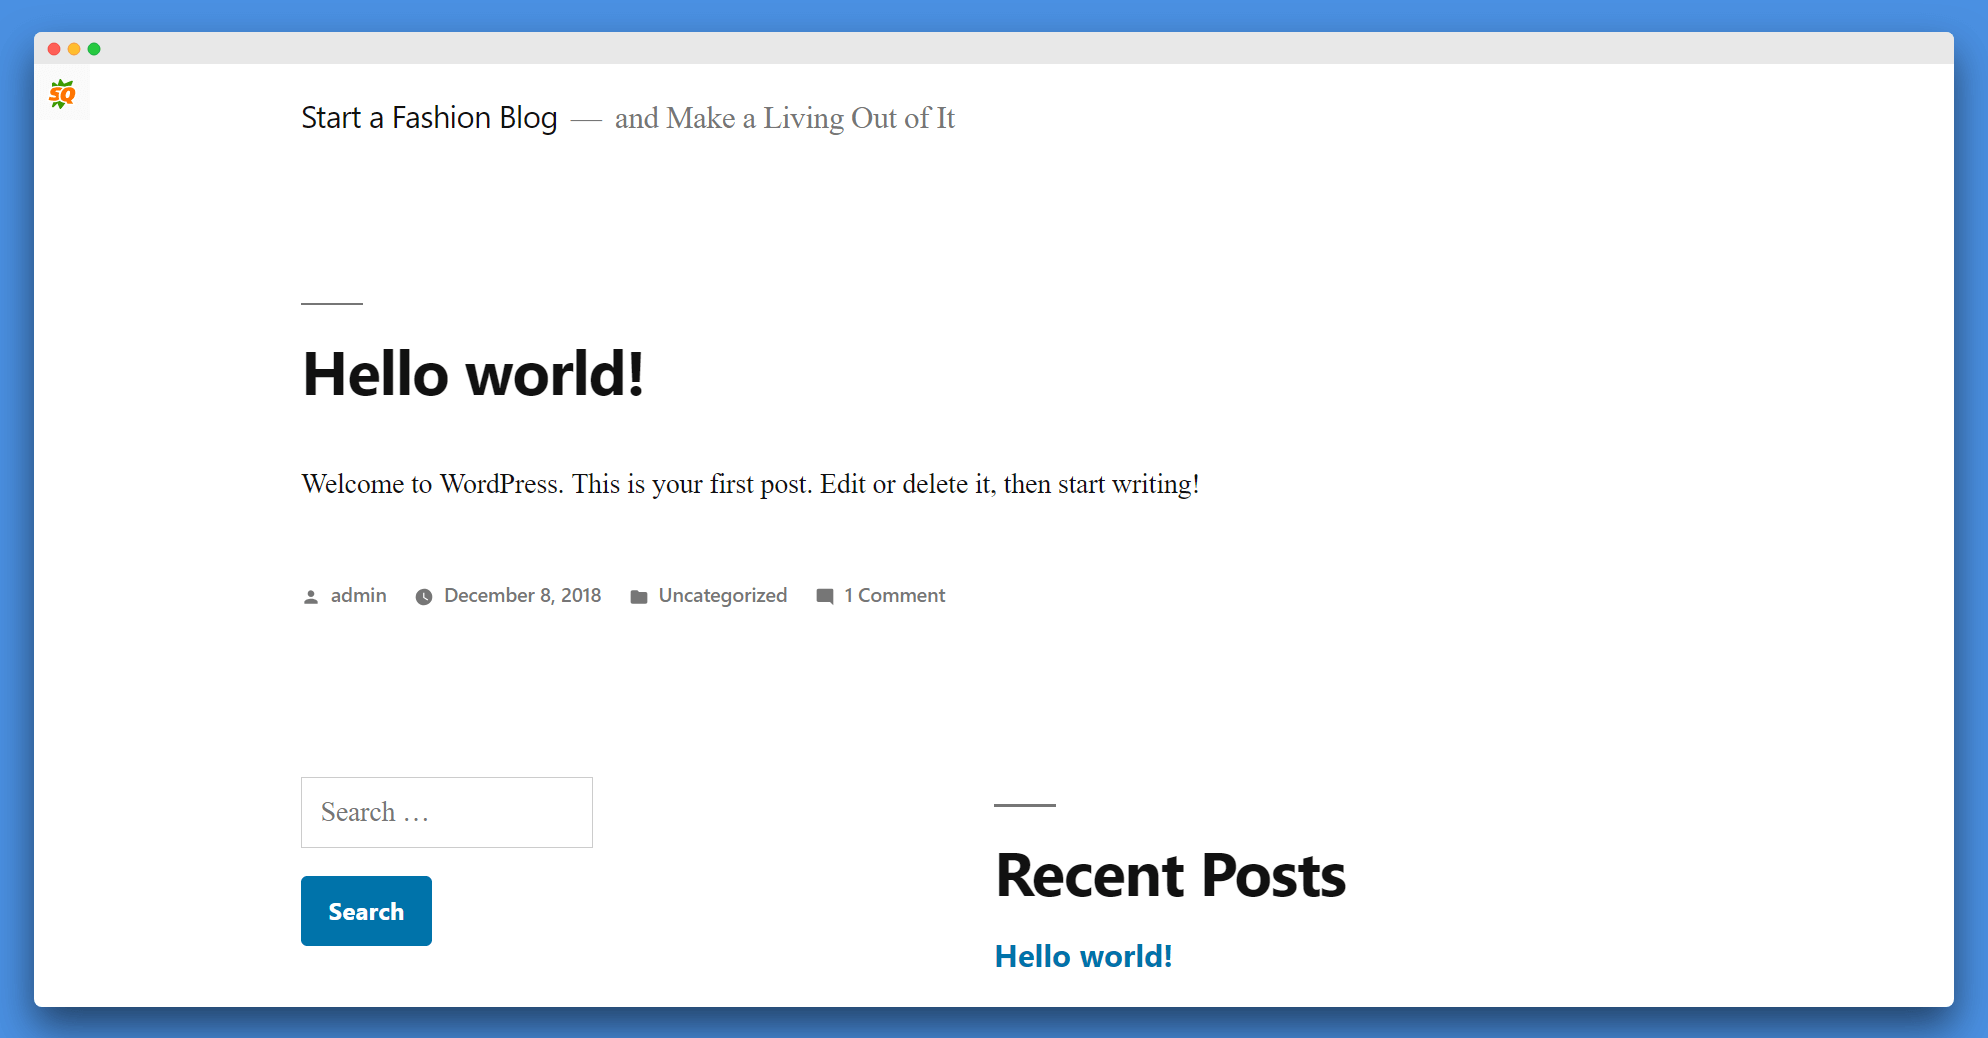
As you can see, the pre-installed theme is not suitable for a fashion blog. Therefore, you need to change the overall appearance of your website. You have two options: you can either purchase a WordPress theme from the premium theme marketplace I mentioned earlier, or you can choose to continue with a free theme. You will find free themes in your website’s admin dashboard.
To access your admin dashboard, simply add “/wp-admin” after your domain name in the URL bar. For example, if your domain is example.com, you would type in example.com/wp-admin. Then, log in to your admin account using the WordPress account you created previously.
Once you have successfully logged in, navigate to Appearance > Themes. You will find the pre-installed WordPress themes here. To add a new theme to your blog, click on the “Add New” button located at the top left corner.
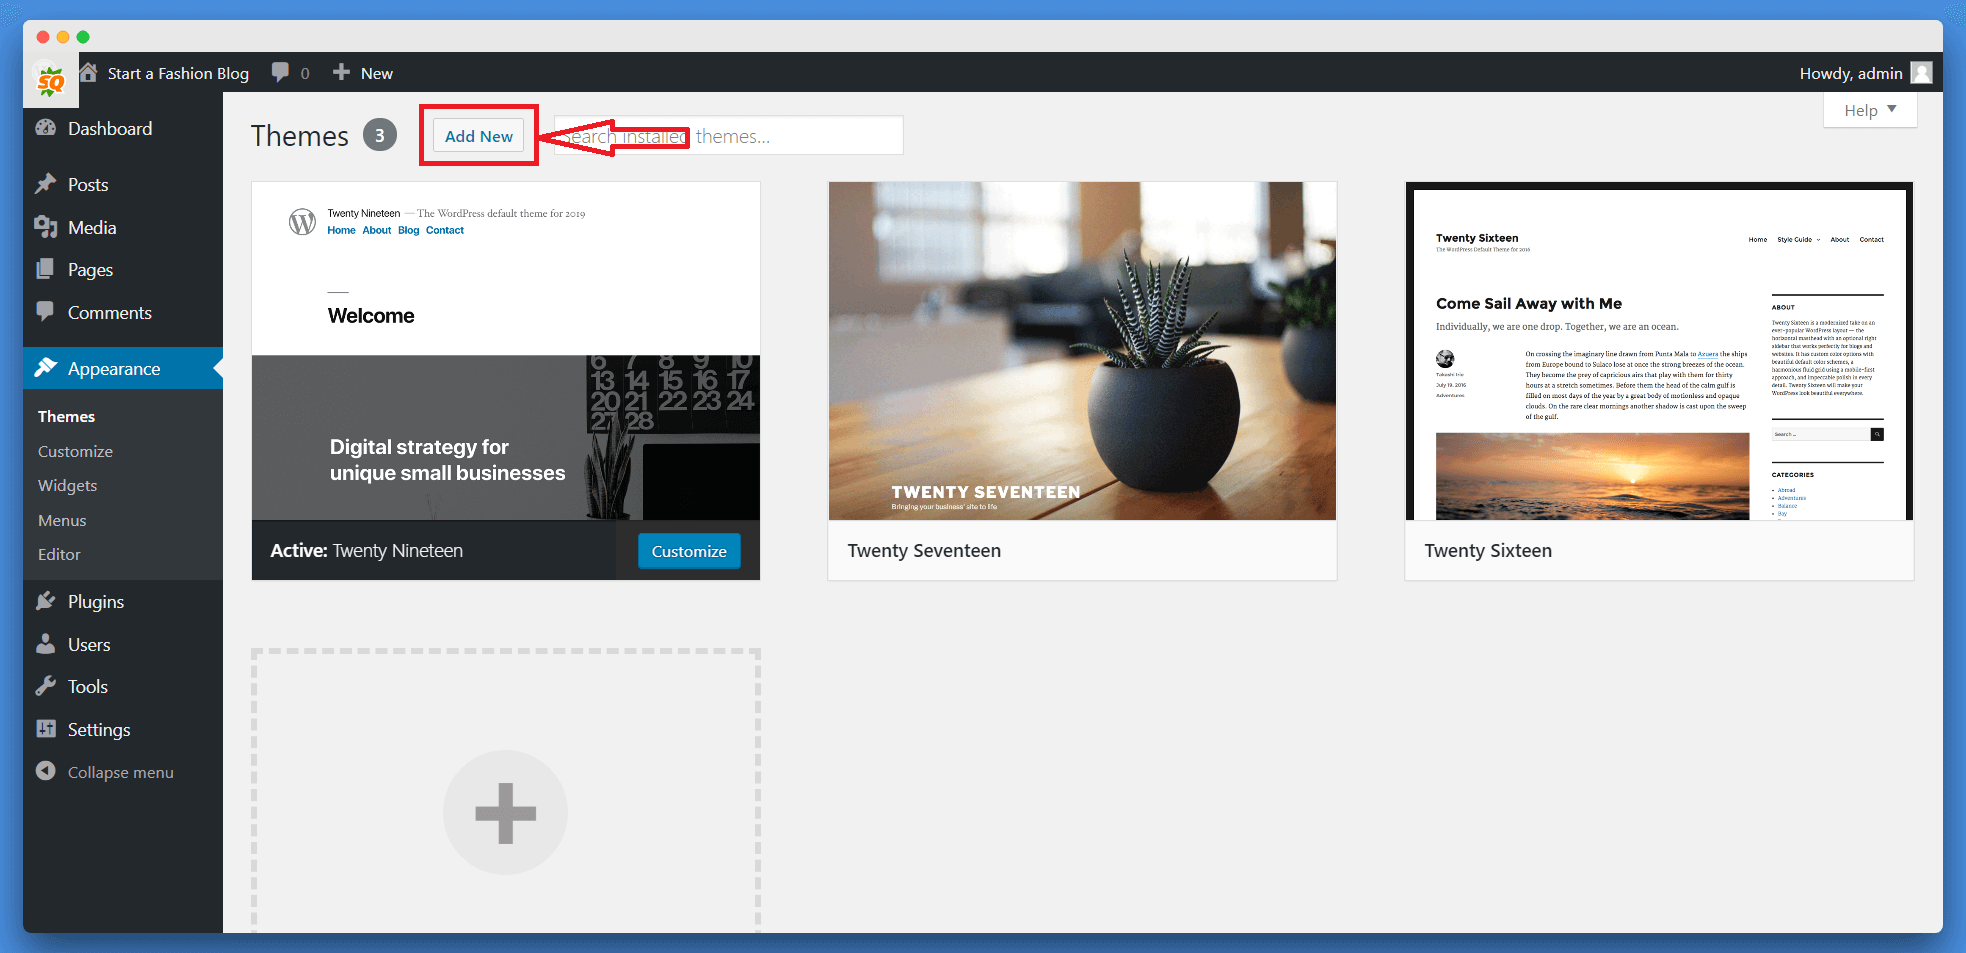
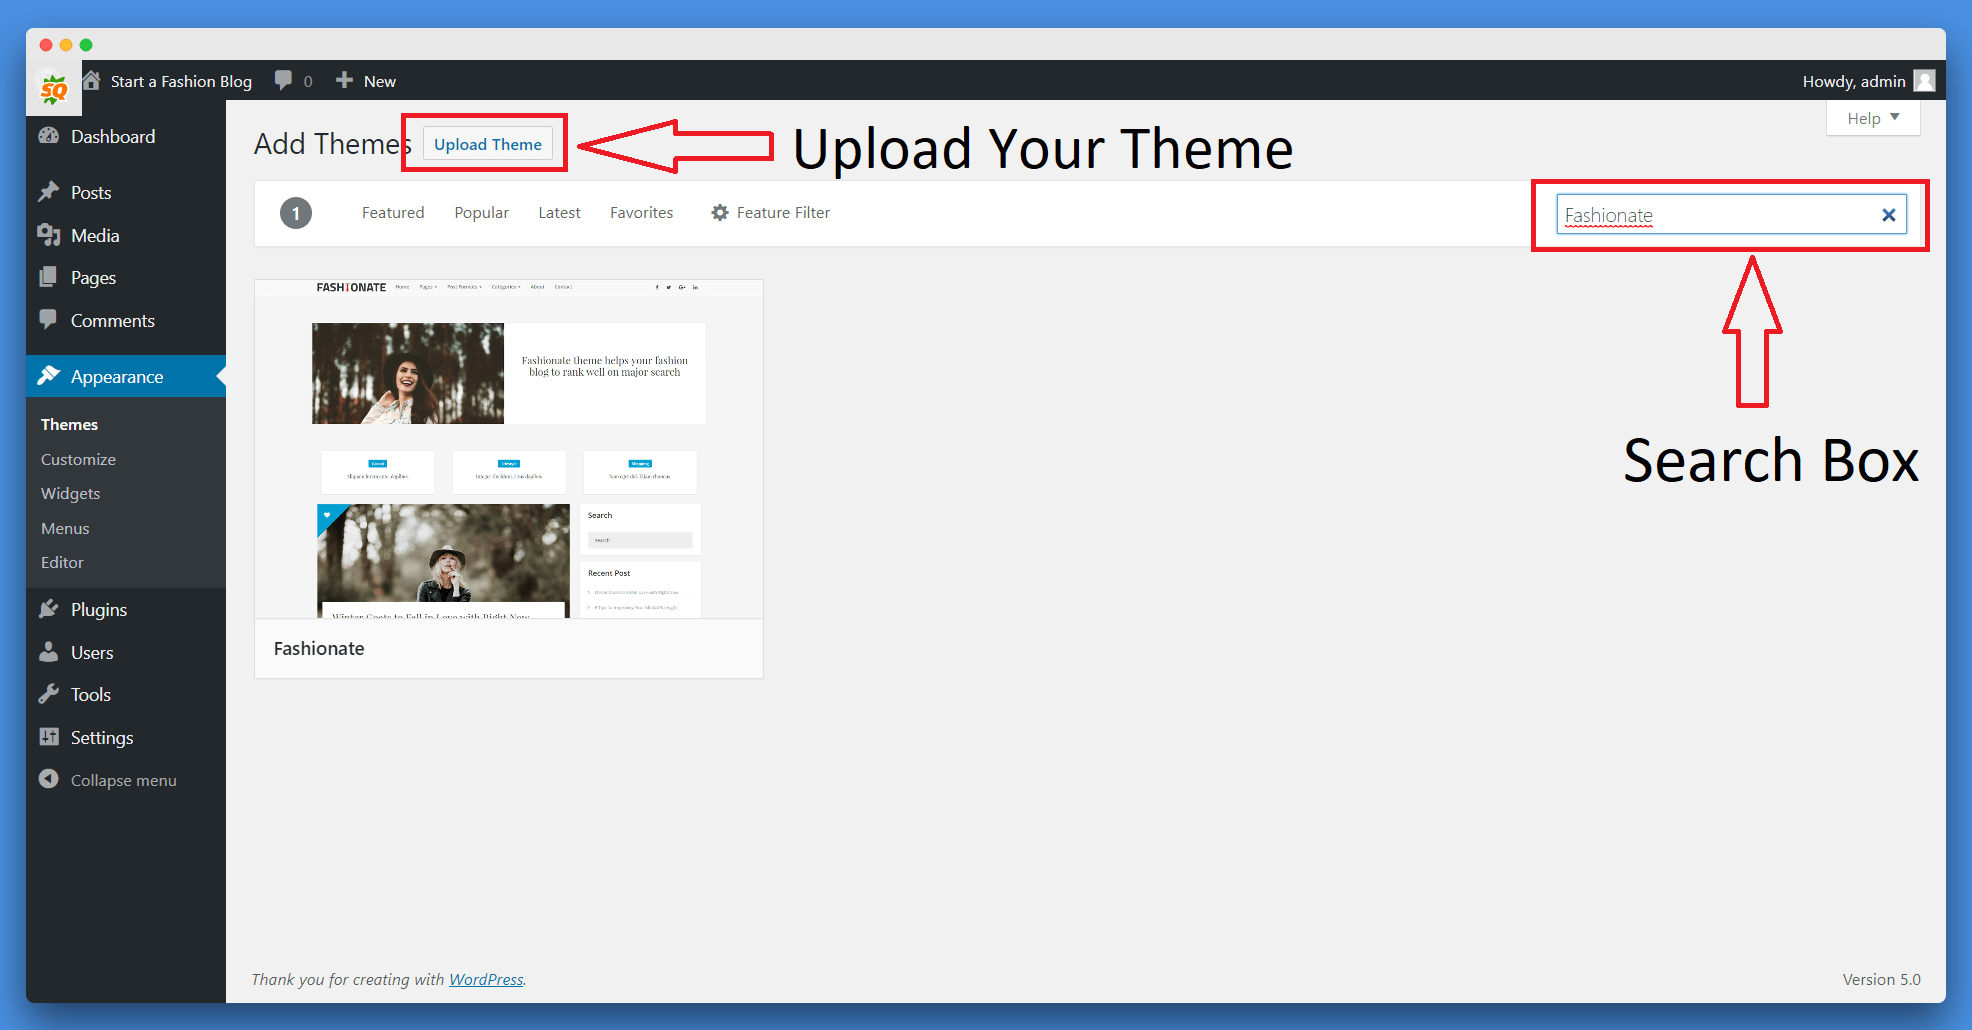
After clicking on the “Add New” button, you will be redirected to the WordPress Theme Marketplace, where you can choose and use any free WordPress theme.
Alternatively, you can click on the “Upload Theme” button above to upload a Premium WordPress theme that you have purchased from another marketplace.
For now, we will proceed with selecting a free WordPress theme. Click on the search box and enter the name of the desired WordPress theme. In this case, since we are creating a fashion blog, I will search for the “Fashionate” WordPress Theme.
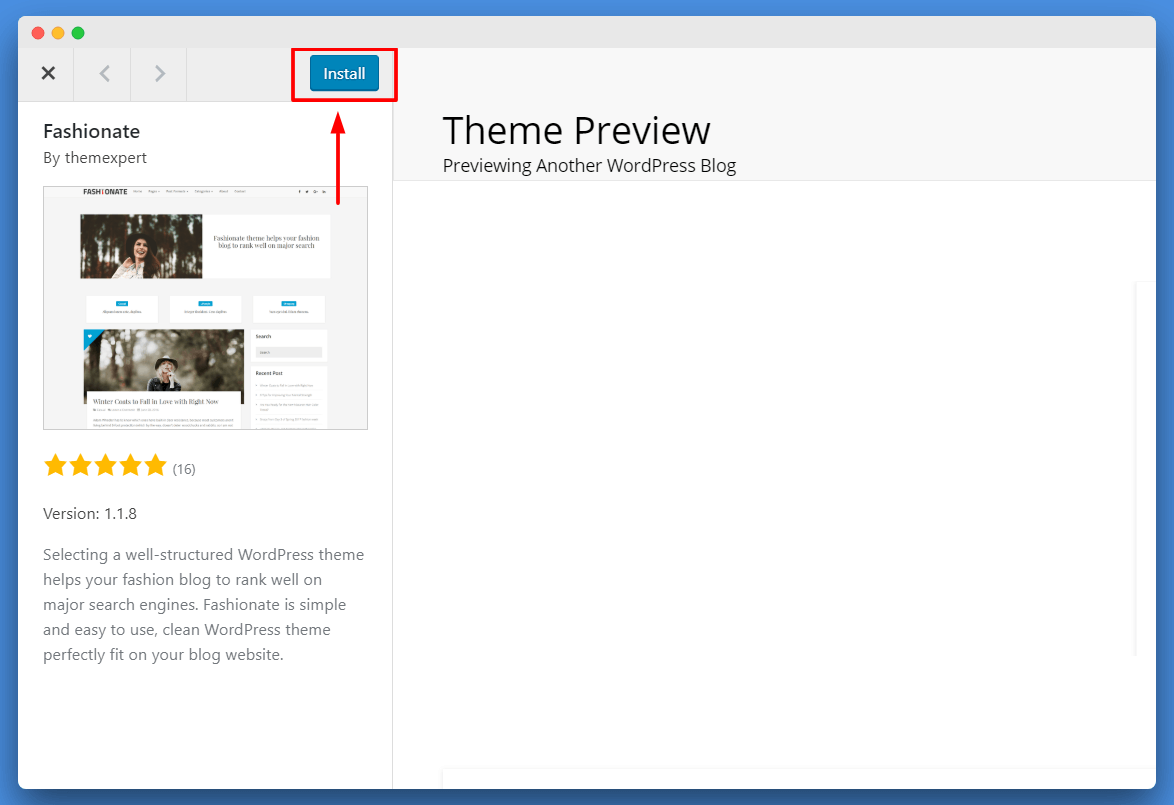
Click on the Fashionate theme, and a dialogue box will open displaying the live preview of the WordPress theme. You will also find an option to install it. Click on the “Install” button located in the top left to install this WordPress theme.
After installing the WordPress theme, you will find an option to activate it. Click on the “activate” button to activate the WordPress theme on your website.
Congratulations! You have successfully installed your WordPress theme. If you encounter any difficulties during the installation process, feel free to reach out to me on Facebook, Instagram, or via email at [email protected].
Step #4.1.1: Best Free WordPress Fashion Themes
- Fashionate,
- Cenote,
- StyleBlog, and
- SociallyViral.
Step #4.1.2: Best Paid WordPress Fashion Themes
- SociallyViral (Pro Version),
- Divi Theme by ElegantThemes,
- Schema by MyThemeShop,
- Feminine by MyThemeShop.
Step #4.2: Installing a WordPress Plugin.
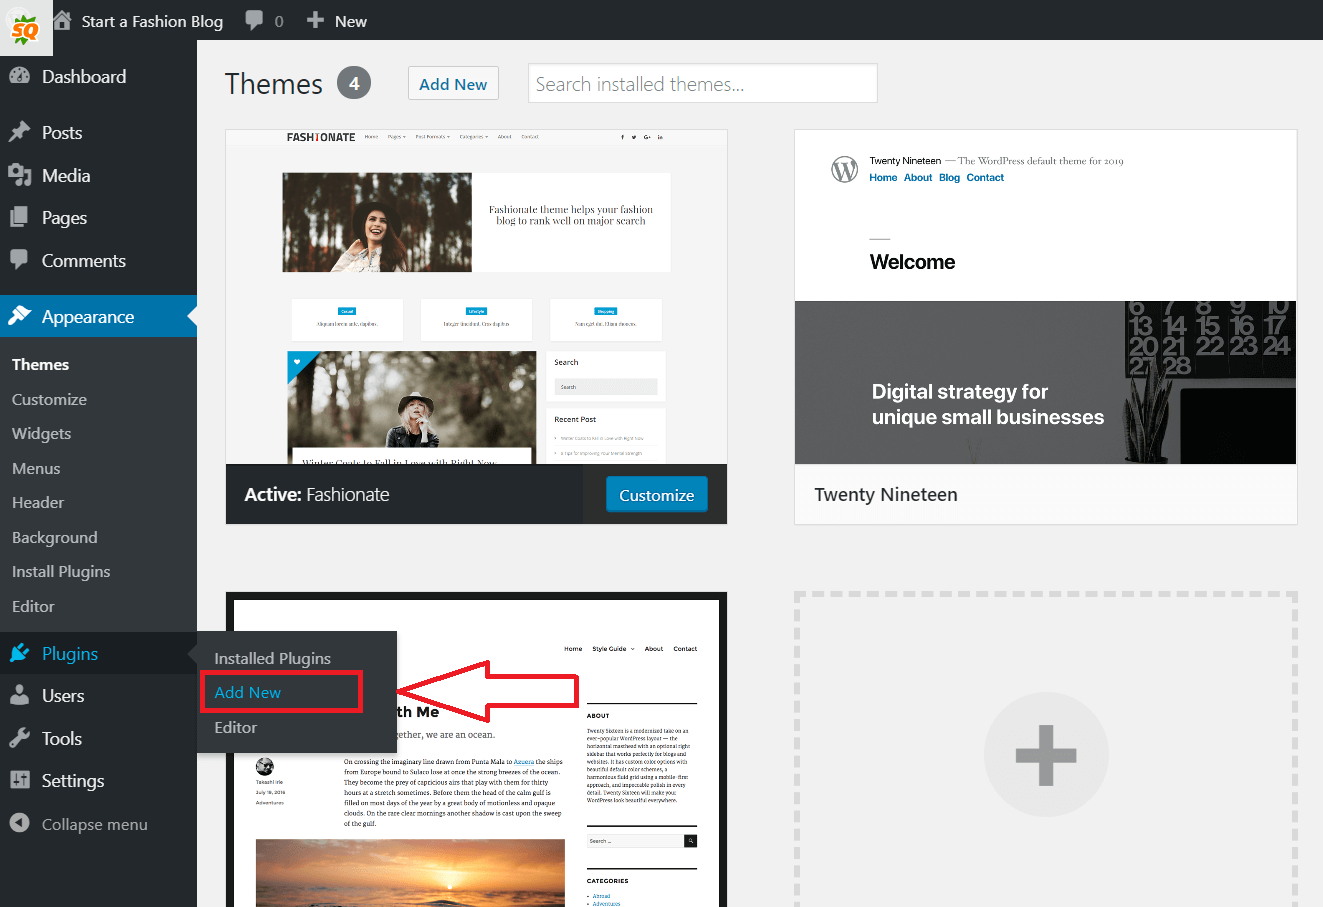
To install a WordPress plugin, the process is the same as installing a theme. Go to Dashboard > Plugins > Add New to install a plugin on your website. You can also browse your installed plugins by going to Plugins > Installed Plugins.
Step #4.2.2: Popular WordPress Themes
Most of the popular and commonly used plugins in WordPress are available for free. Simply click on the “Add New” plugin to search for the plugin by name and install it on your website.
Some popular plugins include…
- Rank Math – This plugin is used for SEO. You can follow this guide to install the Rank Math SEO plugin efficiently.
- WP Review – For Rich Snippets. (Click here to learn more about rich snippet results).
- Social Warfare – For social sharing of your content
- Updraft WordPress Backup – To keep a backup of your WordPress data.
- WP Rocket – This is one of the best WordPress cache plugins for increasing website performance. Click here to get up to 50% OFF on WP Rocket.
Once you have selected your WordPress theme, you are now ready to create your first blog post. But first, let’s connect Google Analytics with the website to keep track of all the data.
Step #5: Setting Up Google Analytics
To keep a record of all your website data, such as real-time visitors, traffic sources, and countries, it is necessary to add Google Analytics to your website.
Google Analytics allows you to view live traffic reports and provides information on the country of the visitor. Additionally, there are many more features available with Analytics.
First, you need to visit your Google Analytics account and log in using your Google Mail (formerly Gmail) credentials.
Once you are logged in, you can create a free Google Analytics account for your website.

Click on the “Sign-Up” button to obtain your tracking ID. Once you click on “Sign-Up,” you will need to provide your information and website URL. Subsequently, you will receive your Google Analytics tracking code.
Now, in your WordPress dashboard, install a plugin called MonsterInsights. It is a free plugin that enables you to add your Google Analytics code. After installing this plugin, go to Insights > Settings Page to configure your MonsterInsights plugin.
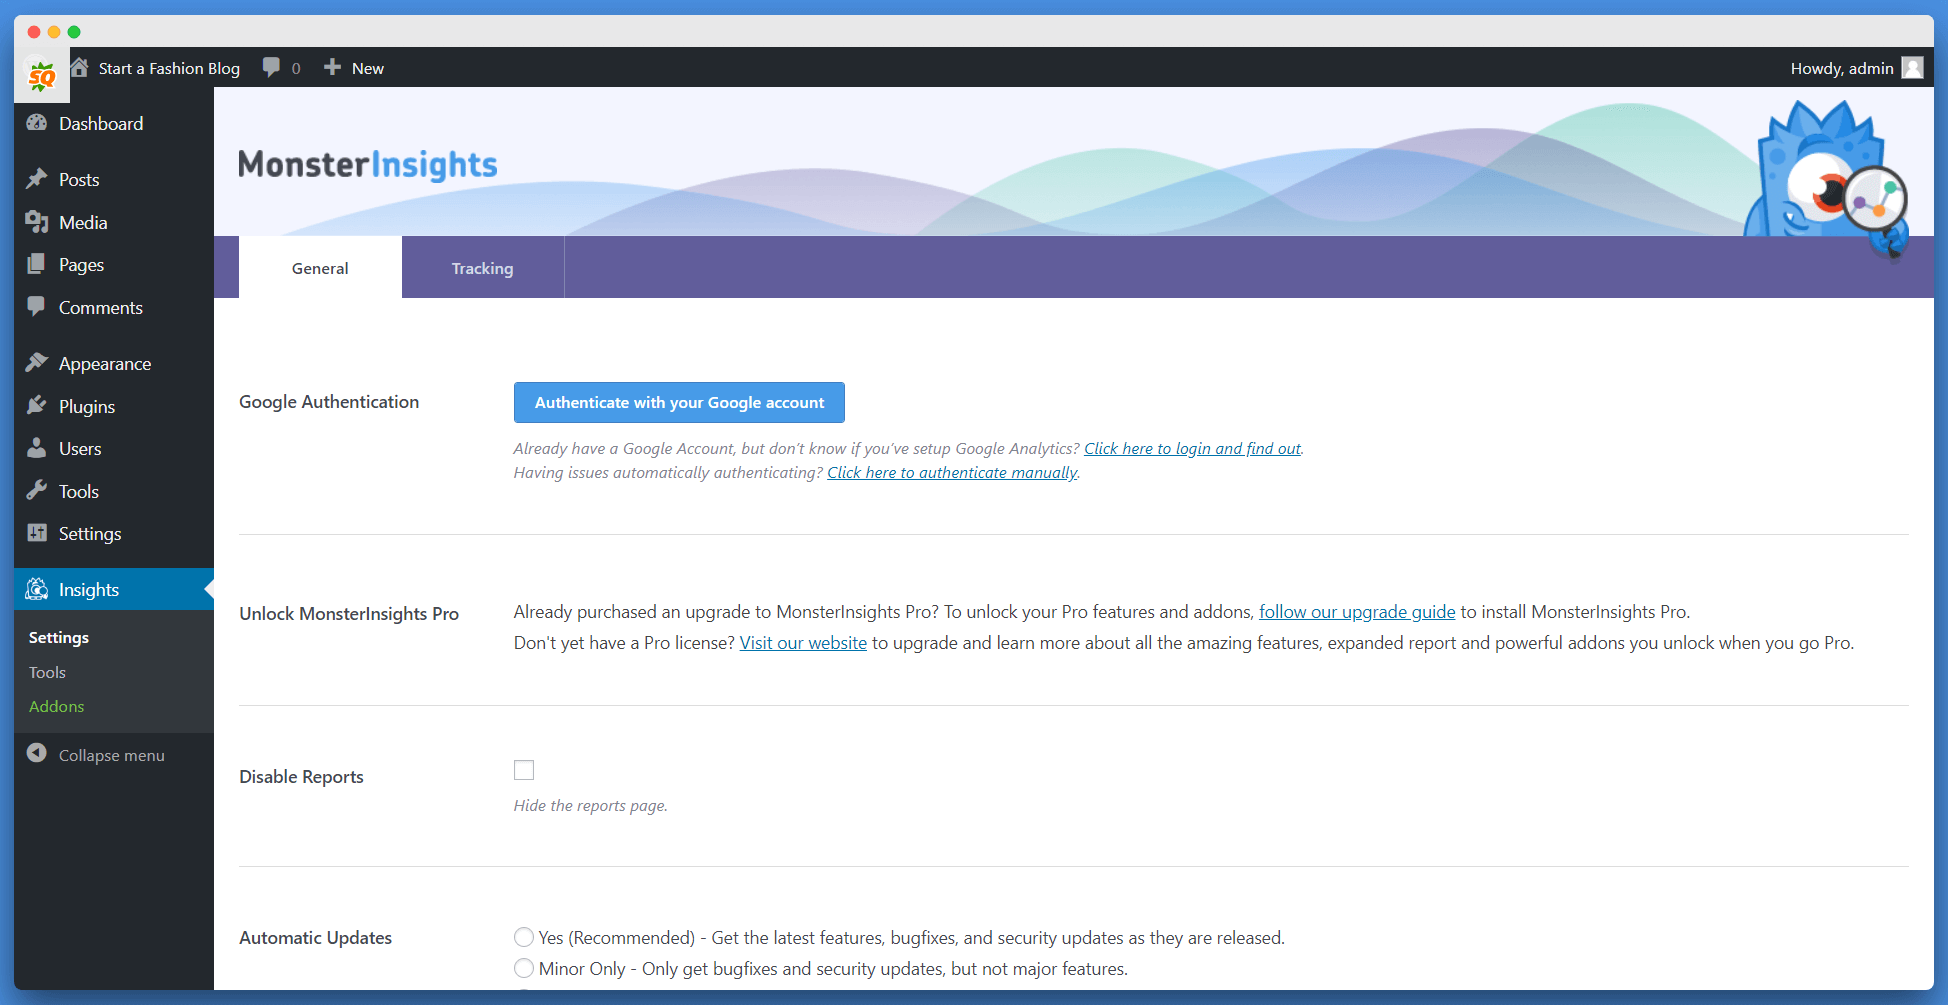
Click on “Authenticate with your Google account,” and it will redirect you to the Google Account page. Log in to the Google account that you used to create your analytics tracking code.
Next, it will request analytics permission. Click on the “Allow” button to grant access to your Google Analytics account. Once you have done that, it will further redirect you to choose your analytics tracking account.
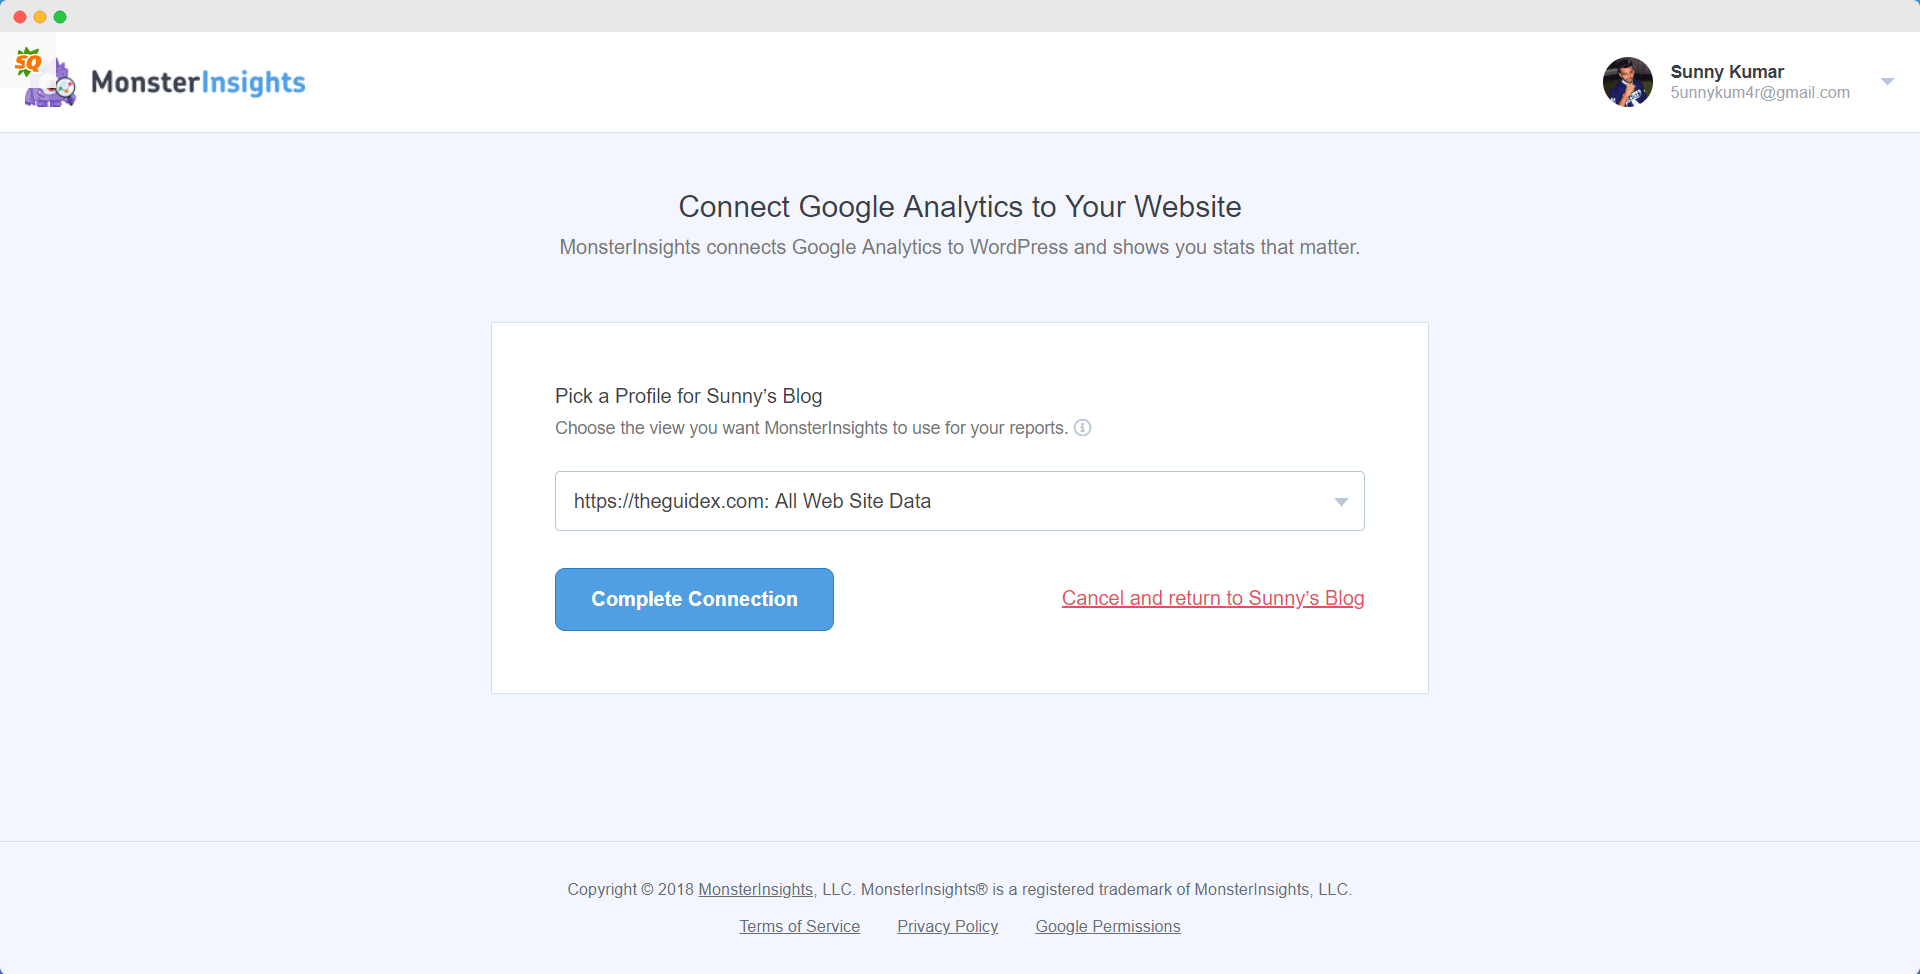
Select your website from the drop-down menu and click on the “Complete Connection” button. This will finalize the authentication process and redirect you to the WordPress admin dashboard.
Great! You have now finished setting up the Google Analytics account for your fashion website.
Step #6: Optimizing Your Blog Post for SEO (Search Engine Optimization)
Optimizing your blog post for SEO is one of the essential tasks in blogging. Since you are a novice, we won’t use complex terminology commonly used in blogging. In simple terms, SEO or Search Engine Optimization refers to optimizing your blog and posts to improve their ranking on Google and other search engines. This helps boost your website’s visibility on search engine results.
For instance, when you search for something on Google, it displays a list of results. Typically, users only click on the results that appear on the first and second page of Google’s search results. So, if your website is ranked on the fifth page of Google’s results, it is unlikely that anyone will visit that page to click on your website.
Thus, we need to optimize our posts to achieve first-page ranking on Google. By ranking our website on the first page, we can generate organic traffic. To achieve this ranking, we need to apply various techniques and work on on-page SEO.
You can refer to the guides on On-Page SEO and Off-Page SEO from Backlinko, as well as the Beginner’s Guide to SEO by MOZ, to quickly improve your website’s ranking. Additionally, you can follow my guide on “Off-Page SEO” to enhance your off-page SEO.
Step #7: Writing Your First Blog Post
To write a blog post, click on the “Posts > Add New” menu in your WordPress Dashboard. After clicking on the “Add New” post option, a WordPress Editor will open. Don’t be perplexed by the editor dashboard; it is as easy to use as MS Word (in fact, it’s even easier than MS-Word).
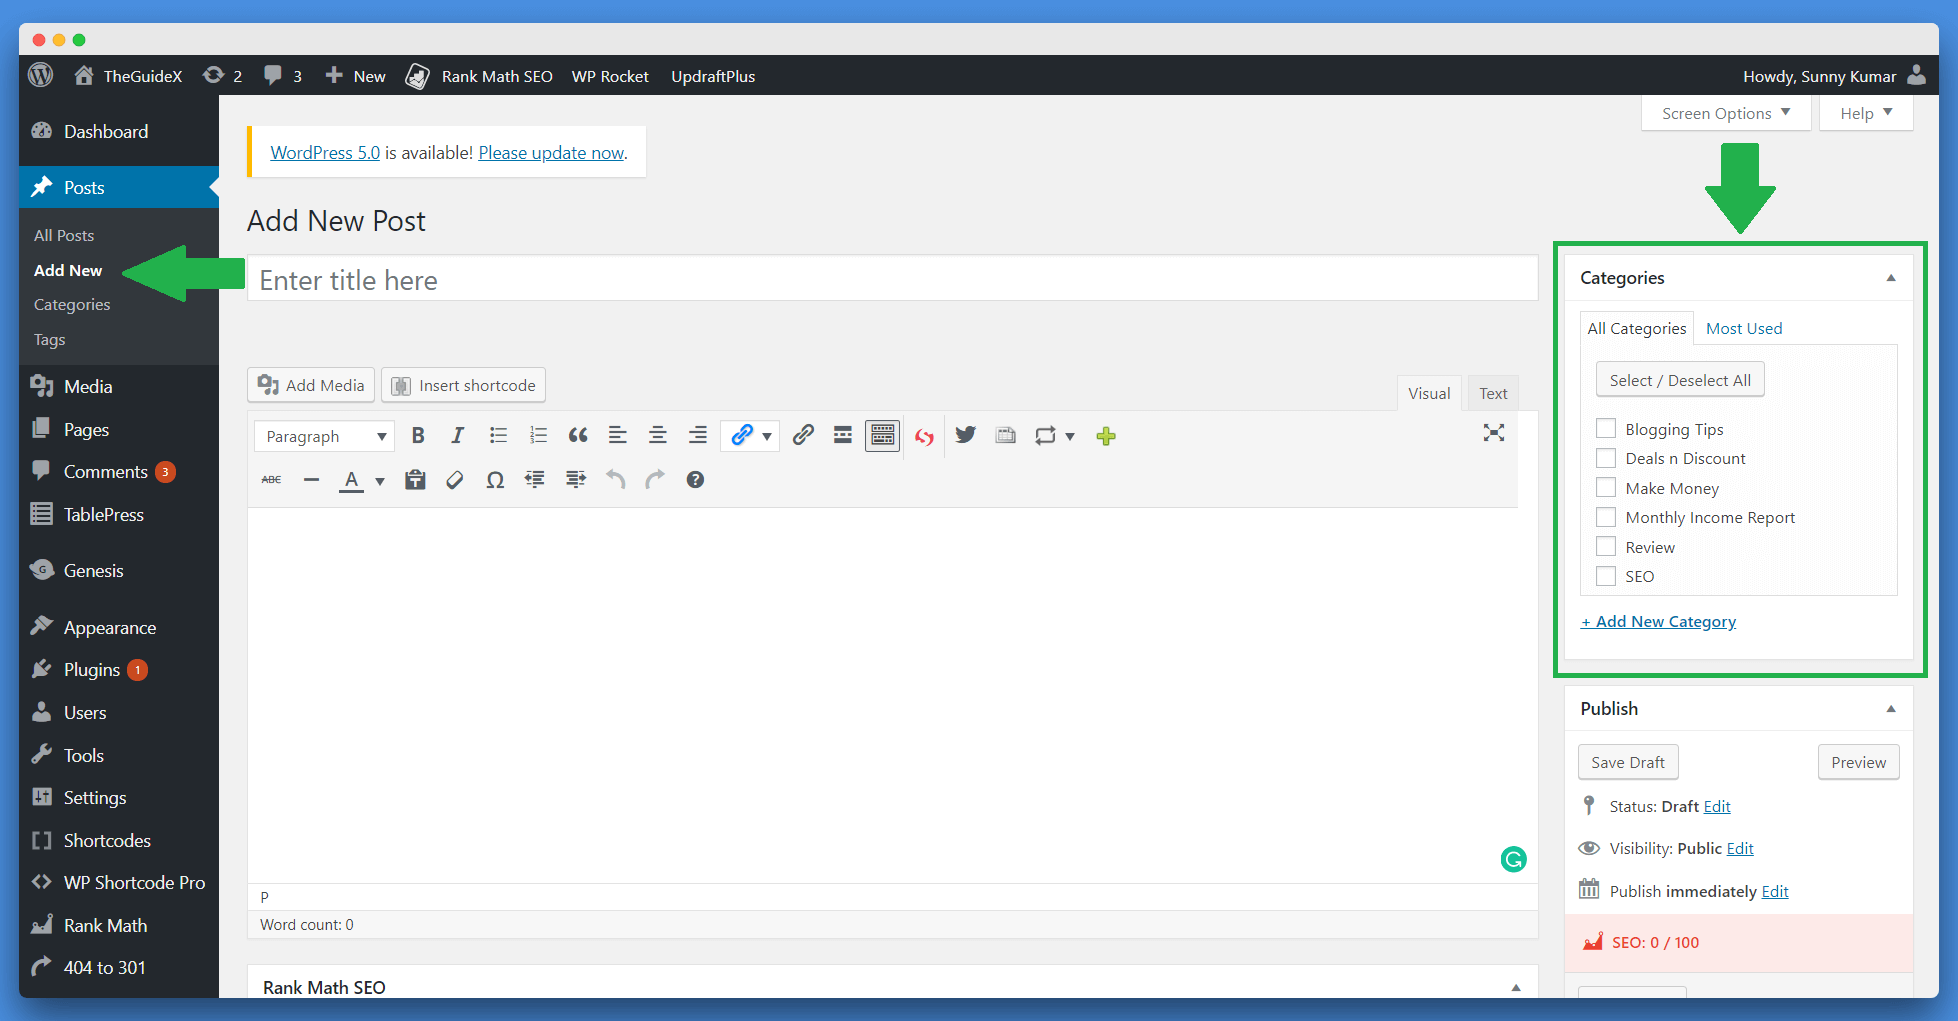
On the editor dashboard, you’ll notice the “Categories” tab. You can use pre-listed tags or create a new category for your blog post. The categories may be used to structure the posts in a suitable way.
You can use the “Add Media” option to add images and videos to your post, and in the “Enter Post Title” field, you have to enter the main heading for your blog post. For example, I selected the title “How to Start a Fashion Blog (and Make a Living Out of It) – Step by Step” for this fashion blog post.
It will look something like this:
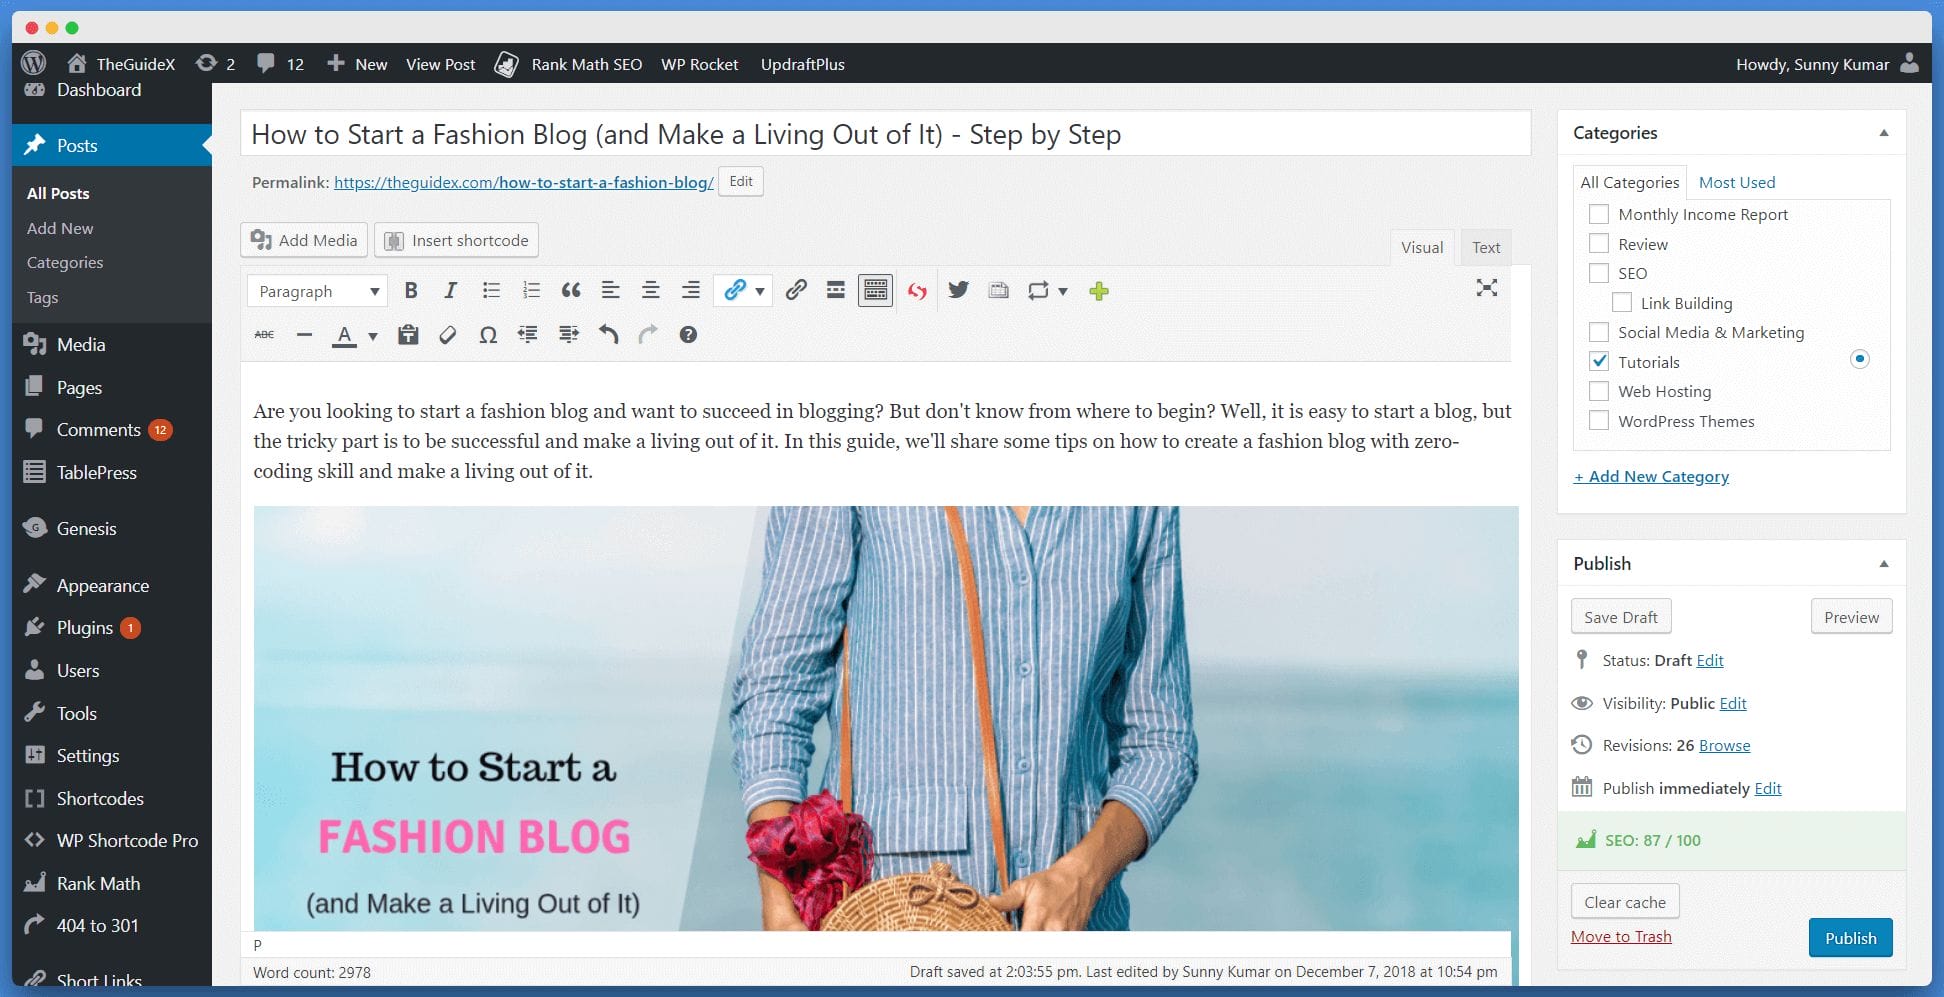
Once you finish adding your content, you can instantly publish it or save your post as a draft to add more content later. If you publish your content and wish to make changes, you can easily apply them by going to Posts > All Posts.
The publish option will appear like this:
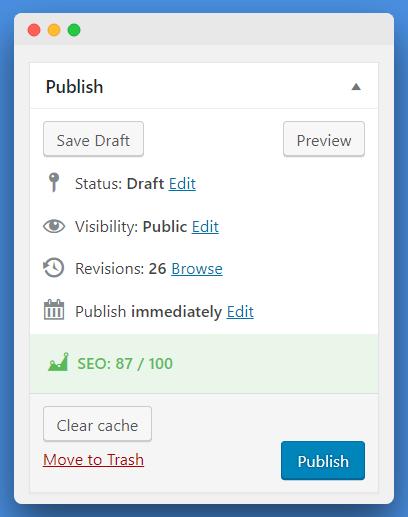
Here, you have the option to choose from various options. You can either post your article or save it as a draft. Additionally, you have the option to preview your article before publishing it.
The SEO Score will appear here if you have installed the “Rank Math” Plugin on your website.
Step #8: Making Money from Your Blog
So the main question here is: how can you earn money from your blog? Does the site succeed in blogging?
Creating a blog and generating passive income isn’t rocket science. We now live in a generation where everything is online. Even when we need an answer, we first search online instead of asking someone.
So, by following the tutorials on ON-Page and OFF-Page optimization in step #6, you can rank your website on Google. Ranking on Google will automatically increase your website traffic, allowing you to generate passive income.
In a simple manner, you can earn money through Google Adsense when visitors come to your website. Similarly, if you recommend products to your readers and they make a purchase, you will earn a commission. This is known as Affiliate Marketing.
There are many other ways to generate passive income through your blog today. We will discuss more ways shortly. But first, let me remind you that we offer free blog setup if you purchase your domain name and hosting from Bluehost. Simply purchase using the link below and contact us at [email protected].
You can also connect with me on Facebook and Instagram, or join our “Blogging for Beginners – TheGuideX” group on Facebook.
Ways to Generate Passive Income Using Your Blog…
Step #8.1: Display Ads using Google Adsense
This is the easiest way to earn money online. When you visit any website, you may have noticed that they display ads on their site. Similarly, you can also display ads using Google Adsense. Google Adsense is a widely known program for serving ads on your website.
For instance, if you serve Google Ads through your blog and assume your website has a daily traffic of around 10K visitors, you could make anywhere from $30-80 per day with these statistics.
Once you have published about 30 posts on your blog, you can follow these steps to fully activate your Google Adsense account.
Step #8.2: Make Money with Affiliate Marketing
Affiliate marketing is one of the best ways to generate passive income through your blog. Here at TheGuideX, I am also engaged in affiliate marketing.
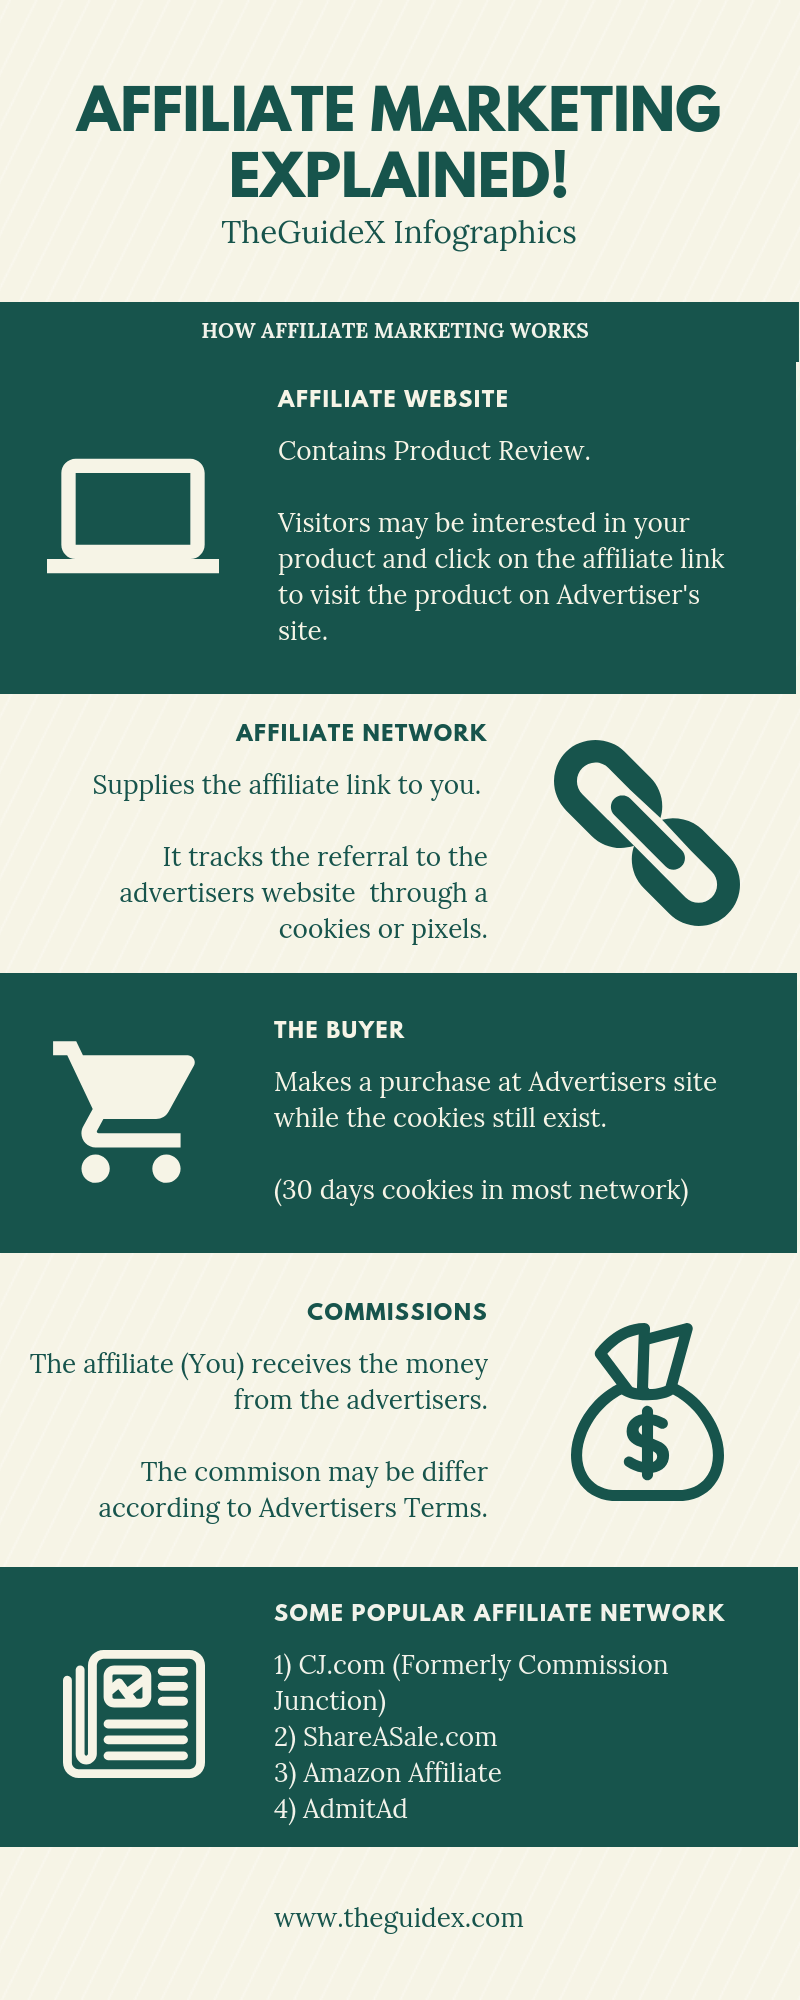
In Affiliate Marketing, you receive a commission for every sale you make. For example, I am recommending BlueHost hosting (including all other hosting plans). The main reason we mention Bluehost is that they are the best hosting option for beginners. Furthermore, WordPress itself recommends Bluehost. If you purchase using our link, we receive a commission and you can also save a flat 60% OFF on your hosting plan with a free domain name. This is a transparent and mutually beneficial deal.
Similarly, you can write and recommend products to your readers (if the products are beneficial for them) and generate passive income. For instance, since your blog is about fashion, you can write a post titled “Top 15 Winter Fashion Essentials for Men” and recommend the best products from affiliate programs on Amazon, Myntra, and other stores.
To learn more about Affiliate Marketing, you can follow this step-by-step guide by Neil Patel.
Step #8.3: Brand Promotion.
Brand promotion is one of the best ways to generate passive income. Reach out to popular brands and startups to promote them on your blog. You can also follow top fashion bloggers on Instagram and observe their posts to identify relevant companies.
For cold email, you can utilize various templates available on NinjaOutreach. This tool can also help you find influencers and major brands. Additionally, if you don’t have a budget for outreach tools, you can manually obtain email addresses from famous brands’ websites and use your Gmail account for outreach. Before reaching out, make sure to verify the email addresses using tools like Hunter, Findymail, Smartlead, or Tomba.
Step #8.4: Building an Instagram Following
Instagram is one of the biggest social media platforms today. It is also the best network for connecting with top influencers and fashion bloggers. One simple way to grow your business on Instagram is to start following these influential bloggers. By following and analyzing their descriptions, photos, and tags, you can replicate their success.
In addition, using hashtags is crucial for reaching the right audience on Instagram. Stay active on the platform and frequently update your posts with relevant hashtags to engage more users and increase your number of followers.
I’m currently testing another method to gain more followers on Instagram. I follow a lot of people every day and then unfollow them after 2-3 days. This trick has helped me gain around 100 followers. You can try this method to increase your follower count.
Step #8.5: Online Store
Many bloggers sell products and services directly through their blogs, including ebooks, physical and virtual products, music, artworks, and more, to generate passive income. You can also use your blog to sell products, and the recommended method for doing so is by using WooCommerce. WooCommerce is a WordPress Plugin that allows you to build an e-commerce website on your blog.
With WooCommerce, you can create a store on your blog and sell or resell products.
Step #8.6: Sell Sponsored Blog Posts
Many bloggers sell sponsored blog posts on their blogs. I also offer sponsored posts on my blog from various brands. This allows brands to reach a more specific and targeted audience through my blog and increase their visibility. Last month, I made around $300 just from selling sponsored posts on my website.
You can also check out my “Write for Us” and “Advertising Opportunity” pages. Many brands and influencers use these pages to reach out to you. Simply create these two pages on your website, improve the SEO of your blog, and start making money through it.
FAQ’s (Frequently Asked Questions)
Q. Can I Create a Blog Without WordPress?
Yes, you can create a blog without WordPress. There are many other CMS options available in the market. You can also choose Drupal, Ghost CMS, or some custom-made CMS.
Q. How Much Does it Cost to Create a Blog?
The cost depends on the add-ons you select at the checkout page. To create a blog, it costs anywhere from $50 to $100. You can get a 60% discount on Bluehost hosting with a free domain name using our exclusive Bluehost link.
Q. Can I Create a Blog Without Hosting?
No, to create a blog, you need a hosting plan. You can host a website on any hosting platform, but I suggest you choose Bluehost as your hosting provider.
Q. How Can I Do Blog SEO?
Doing SEO for your blog and blog posts isn’t rocket science. You can follow our On-Page SEO guide to improve the SEO of your blog.
Q. How Can I Avail of TheGuideX Free Website Offer?
Simply purchase Bluehost hosting using our exclusive hosting deal link and email us your domain name and details to the following email address: [email protected].
Wrapping Up!
Anyone can start a fashion blog, but the real success lies in making it profitable. If you work hard and target the right audience, then it is easy for you to earn some passive income. Without targeting the right audience, you cannot make a successful fashion blog.
Get a professional domain name, hosting plan, and website design to launch your first WordPress website. As you know, the first impression is the last impression, so make your website catchy and use well-formatted content with great design to attract users.
Also, to succeed, be active on Instagram and other social media accounts.
Making money from your fashion blog isn’t hard if you know the right audience and the right products to target for your readers.
Let me know if you have any other questions and queries in the comment section below or you can also email me at [email protected].
