If you are monetizing your WordPress website with ad networks like Google Adsense, Media.net, Propeller Ads, etc., you would definitely need to add an ads.txt file to your WordPress website or blog.
Ad fraud may easily happen in your WordPress blog and probably, and you may have to face the heat in your WordPress website advertising revenue.
To increase the revenue from ads and to prevent publishers from Ad fraud activities, the ads.txt file can be the better choice.
In this detailed blog guide, I will explain to you how to add ads.txt files in WordPress in just three simple steps. But before getting started, you should understand the definition of an ads.txt file as well as the importance of the file to any WordPress website that is monetizing with ad networks.
So, let’s get started…
Ads.txt File – A Basic Definition
Ads in the ads.txt file stand for Authorized Digital Sellers.
The concept ads.txt file was first created by IAB (Interactive Advertising Bureau) Tech Lab, a non-profit consortium established in the year 2014, especially to prevent the safety of digital brands and ad frauds.
The concept is supported by most digital advertising networks, including Google Adsense. Distributors like you and publishers like big companies both of you will get benefits from the ads.txt project.
Why is Ads.txt File to be Added in WordPress?
According to trusted sources, it is reported that WordPress websites and blogs that are affected by ad fraud are supposed to lose millions of dollars every year.
The possible ad fraud processes are:
- Clicking ads with fake accounts
- Increasing ad impressions with fake intention
- Ad frauds by spoofing domain
- And many more
For financial gain, people with intentions of scamming use bots to click ads on a fake basis and convert the earnings from your WordPress to their accounts. Because of the ad fraud with bots, both the advertising networks and publishers will possibly be affected.
So, it is highly recommended that WordPress websites that are monetized with ad networks declare they are allowing ads from particular networks. And to declare the same, you need an ads.txt file to be added to your WordPress.
The process behind creating and adding the ads.txt file to your WordPress blog or website is easy. Fortunately, no technical knowledge is required.
How to Add Ads.txt File in WordPress using a Plugin
As you already know, WordPress is one of the best-in-class content management systems in the universe to create websites seamlessly without a lot of coding work. And with the pre-built WordPress plugins, you can add extra functionalities to your website.
Similarly, instead of manually adding the ads.txt file to our website, we’ll use a WordPress plugin to create the file for us.
And to do so, you need to log in to your WordPress dashboard. Once you’re logged in, click on the “Plugins > Add New” option, which is available on the left side of the dashboard panel.
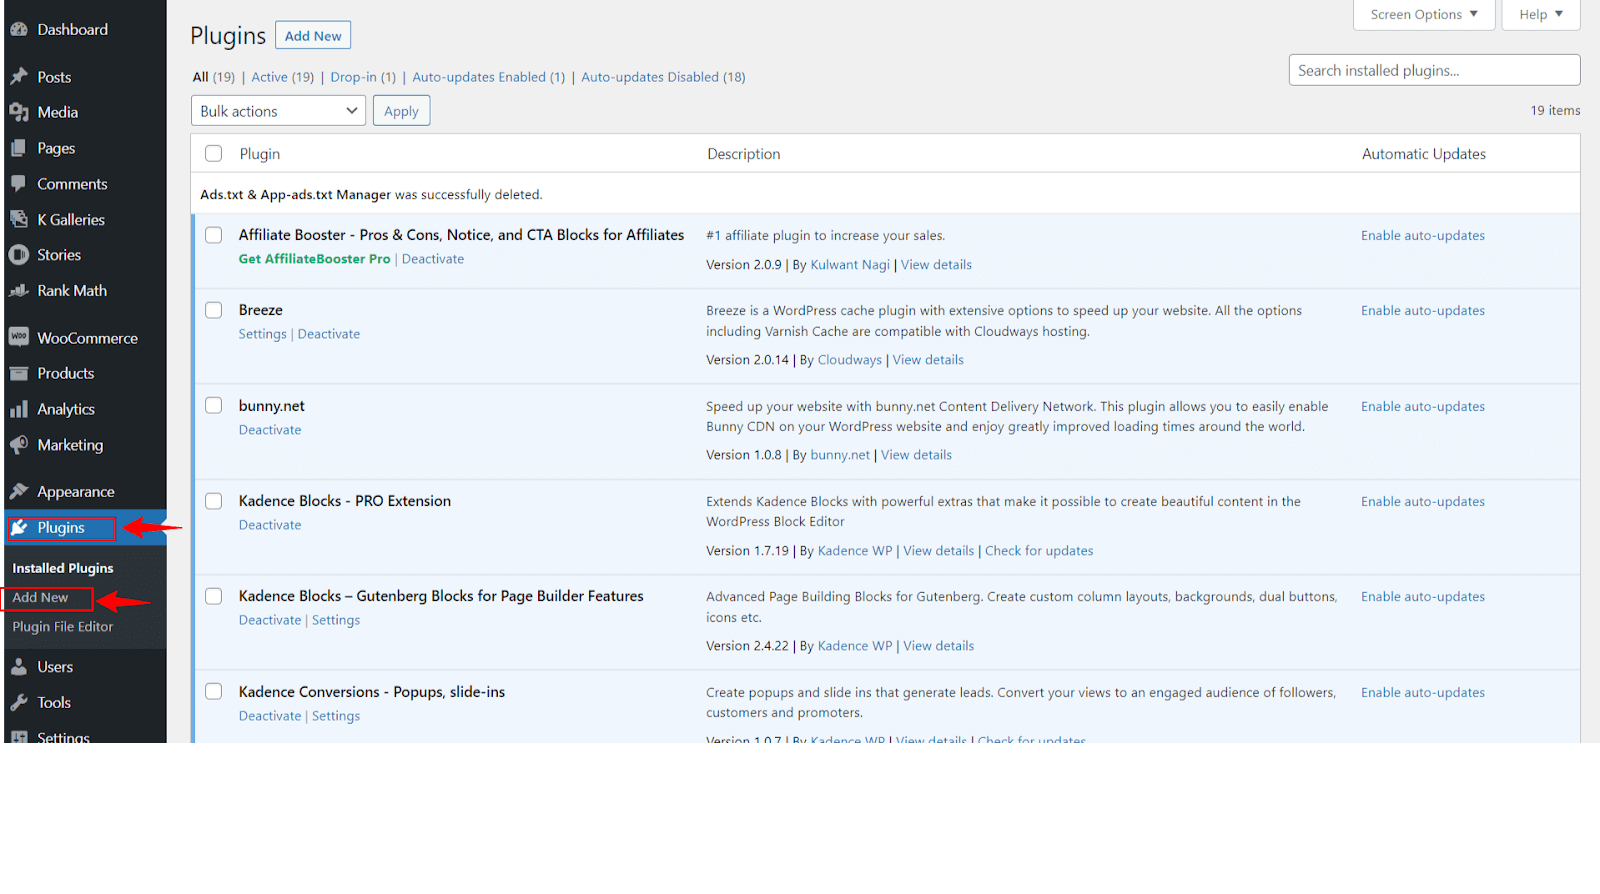
Once you’ve clicked on the “Plugins > Add New” option, you’ll be redirected to the plugin installation page. Here you need to search for the “Ads.txt Manager“.
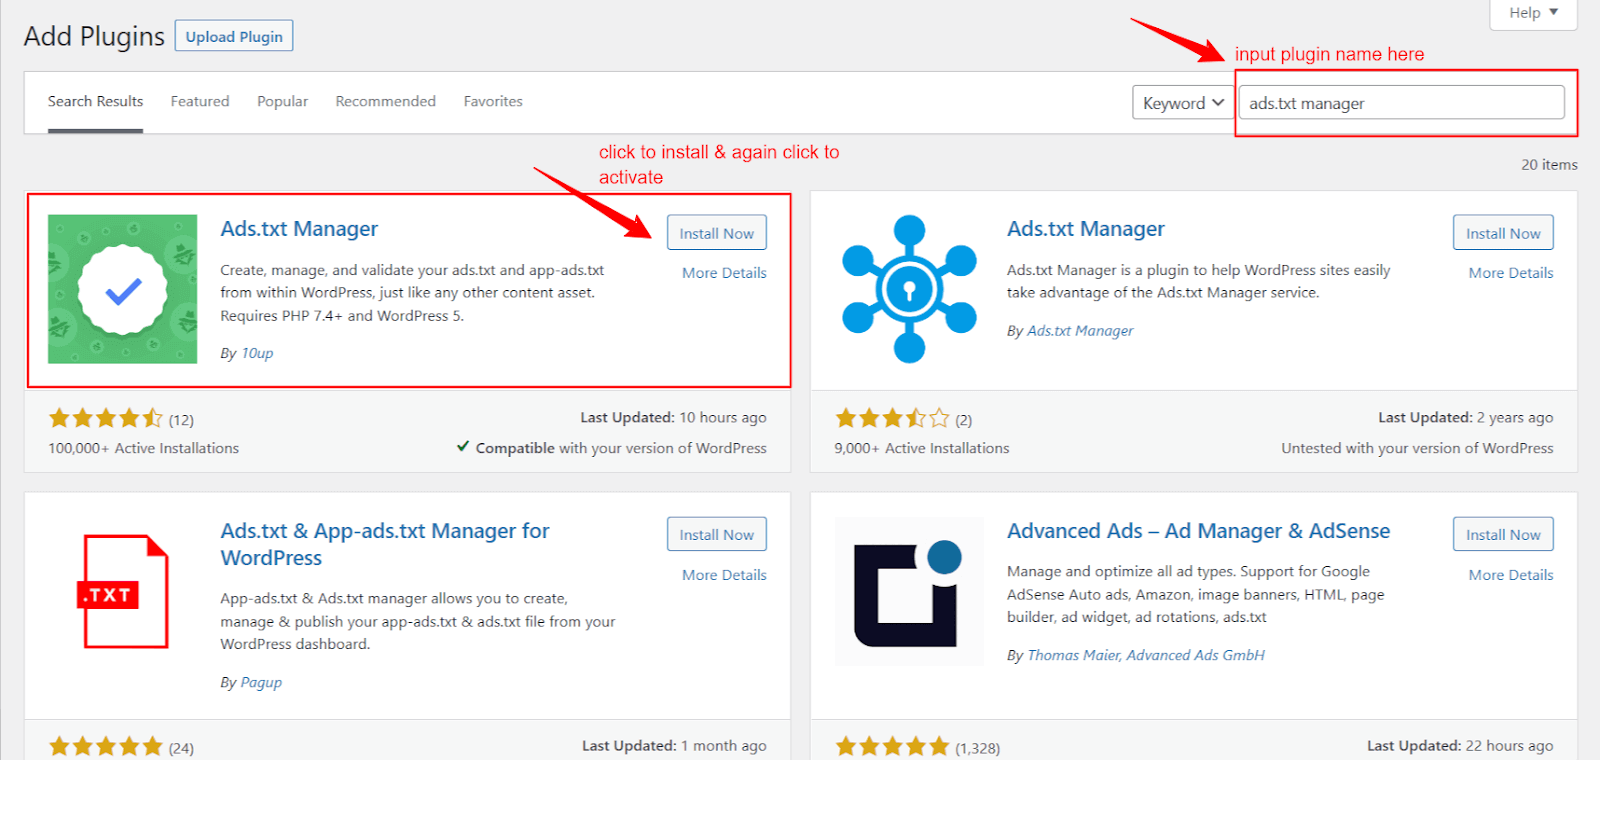
Now you need to download the plugin and install it to your website. To download, click on the “Install Now” and then click on the “Activate” button to activate the plugin.
Now, the plugin is successfully installed on your website.
Step 2: Ads.txt Manager WordPress Plugin Setting Configuration
Once the ads.txt plugin has been installed on your WordPress, you should now configure the settings.
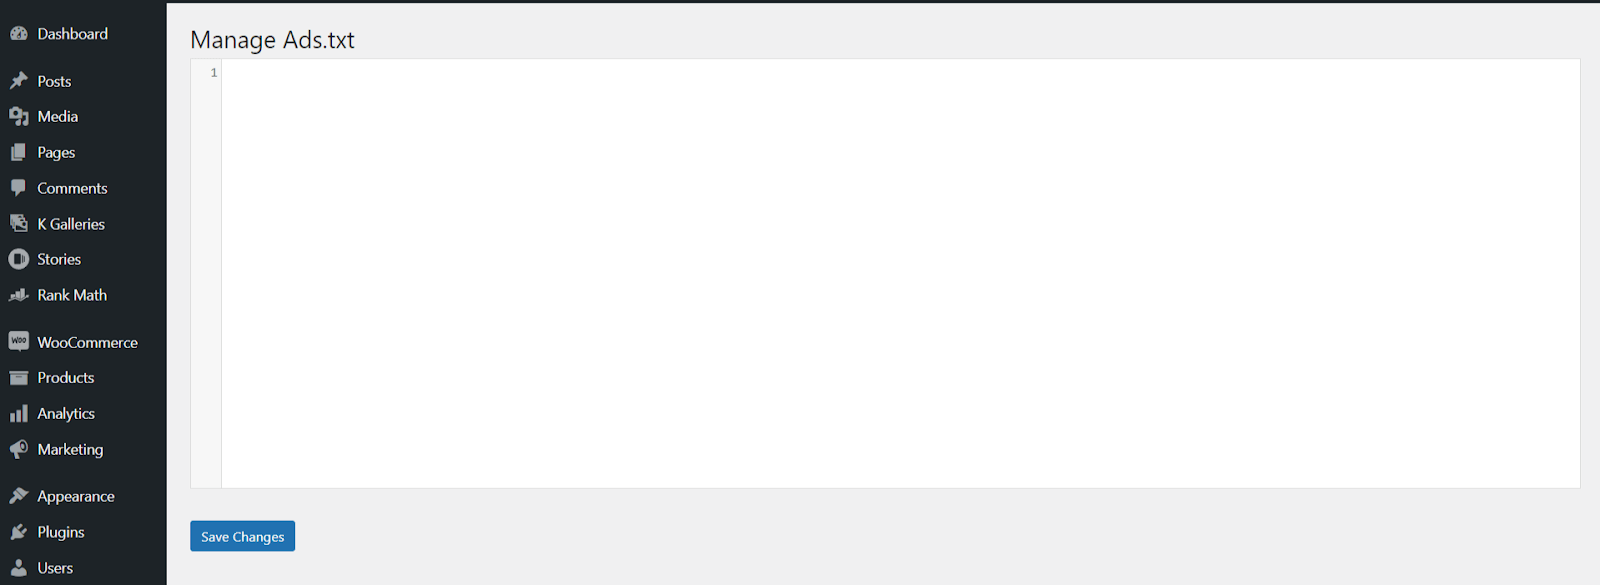
To do so, you need to visit the “Settings > Ads.txt” option inside your dashboard. Once you’re there, you’ll see an empty textarea, as seen in the image above.
Step 3: Declare with a Line of Code
One last step is that you should write a line of code to declare that advertisements displayed on your website are allowed by yourself.
Into the plugin text area, copy and paste the below-written line of code.
google.com, pub-0000000000000000, DIRECT, f08c47fec0942fa0
The line of code is what you should copy and paste in the text area of the plugin when you monetize with Google Adsense.
You need to replace the pub-0000000000000000 with your Google Adsense account Publisher ID, which you can find in your Adsense Account under the account information section.
Depending on the advertisement networks you want to declare in the ads.txt file, you can change the code. As I have declared for Google Adsense and so the code seems to be in the format.
Here, as you may have noticed, there are four different things mentioned in the line of code.
- Google.com – Domain name of your advertising network
- Pub-0000000000000000 – Your Adsense account publisher ID
- DIRECT – Your relationship status with the advertising network. You should declare it whether Direct or Reseller.
- F08c47fec0942fa0 – It’s an optional field. The field is nothing but your ad network’s unique ID. f08c47fec0942fa0 is Google Adsense’s unique ID which is not mandatory to add.
See the image shared below; that is how it looks when you add your line of declaration code to the ads.txt plugin text area. You can add as many lines of code as you want for different advertisement networks.
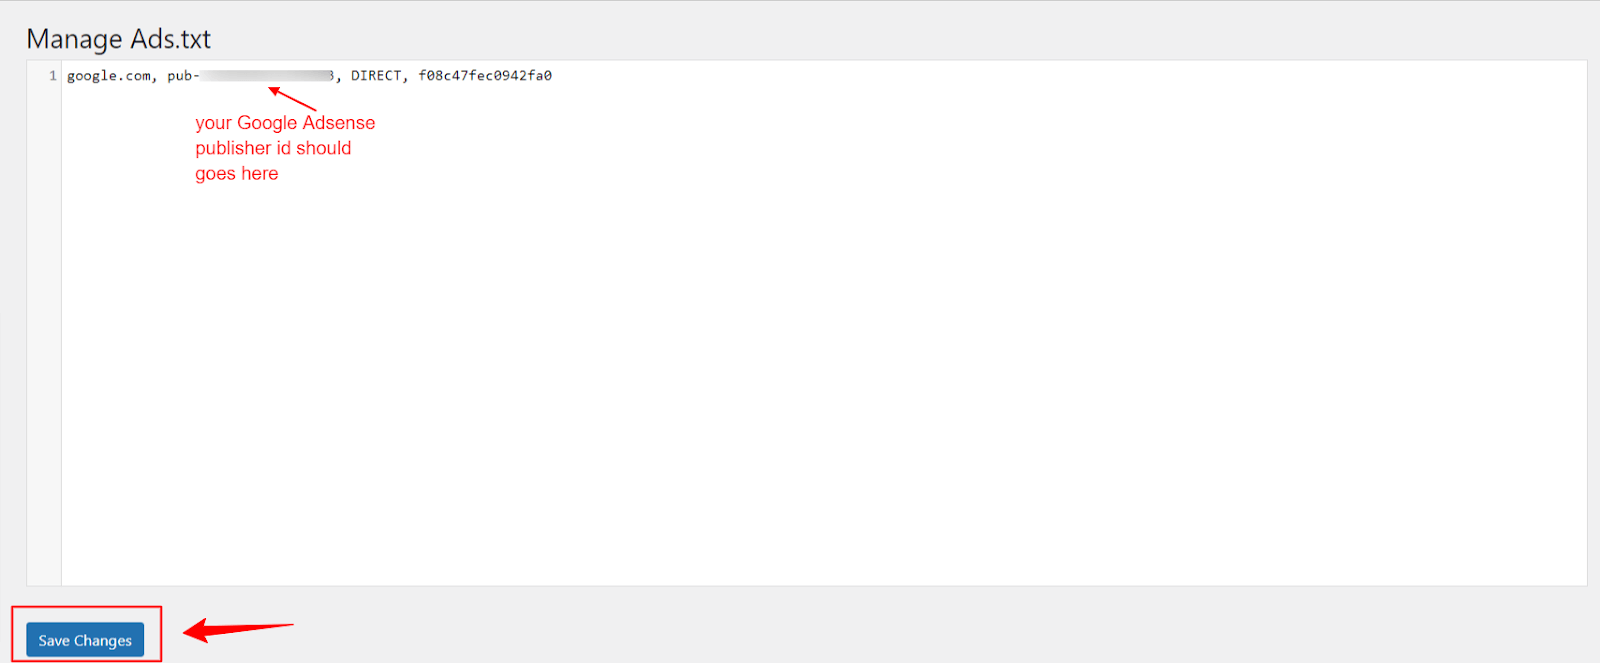
Once the code has been added with your pub ID for Google Adsense, click save changes.
Whenever you want to add a new code of line for different advertising networks, you can get back to the plugin text area via settings, add codes, and then click save changes.
Frequently Asked Questions (FAQs)
Some of the useful Q&A that you may have in your mind to get clarified.
Q. What happens if I do not add the ads.txt file in WordPress?
If you display ads on your WordPress website, possibly, fake ad clicks may frequently happen in your WordPress website, which leads you to face the disapproval of ad accounts.
Advertising networks never continue with publishers who send fake ad clicks and fake ad impressions. So, it is recommended to add an ads.txt file in WordPress.
Q. Do I need to pay anything to install the ads.txt WordPress plugin?
Absolutely, No. The plugin is free to download, install and activate on your WordPress website. While there are other plugins that offer the same functionality, still, ads.txt Manager is free and better than all plugins.
Q. What if I installed the plugin on the WordPress subdomains?
The plugin is supposed to work only on the main domains. So, there is no point in installing the plugin to the subdomains or even subdirectories.
Q. Does installing the ads.txt Manager plugin slow down my website?
Undoubtedly not, as the ads.txt Manager WordPress plugin is lightweight and does not slow down your website as it has developed with very minimal coding.
Wrapping Up!
In this blog post, I have discussed how to add an ads.txt file in WordPress using a plugin ads.txt Manager. Adding the ads.txt file to your WP website helps you get rid of ad fraud.
Most of the WordPress website admins are not aware of the existence of the concept as they simply skip the ads.txt file without understanding the benefits of adding the file.
The process is just simple, but the advantage is huge. By following the 3 simple steps explained in the blog post, you can easily add an add.txt file to your WordPress in less than a minute.
I am here to reply if you have any doubts about this topic. So, let me know in the comment section if you want to clarify anything related to this blog post.
Until then, let’s meet you in the next interesting article.
This guide provides a clear process for adding an ads.txt file in WordPress. The step-by-step instructions, along with the explanation of why this file is essential, are very helpful. It’s great to see such detailed content on protecting website revenue and reducing ad fraud.
Your post on adding an ads.txt file to WordPress is very informative and easy to follow. The importance of ads.txt for ad fraud prevention was clarified effectively. The step-by-step guide is perfect for beginners.