Not sure how to increase the overall speed of your website?
The website speed is the fundamental part of modern SEO, and trust me; It has an immediate and significant effect on rankings.
If you have ever visited my website TheGuideX, you’ll notice that my site loads under 1 second (I’ve also attached the GTmertix result below).
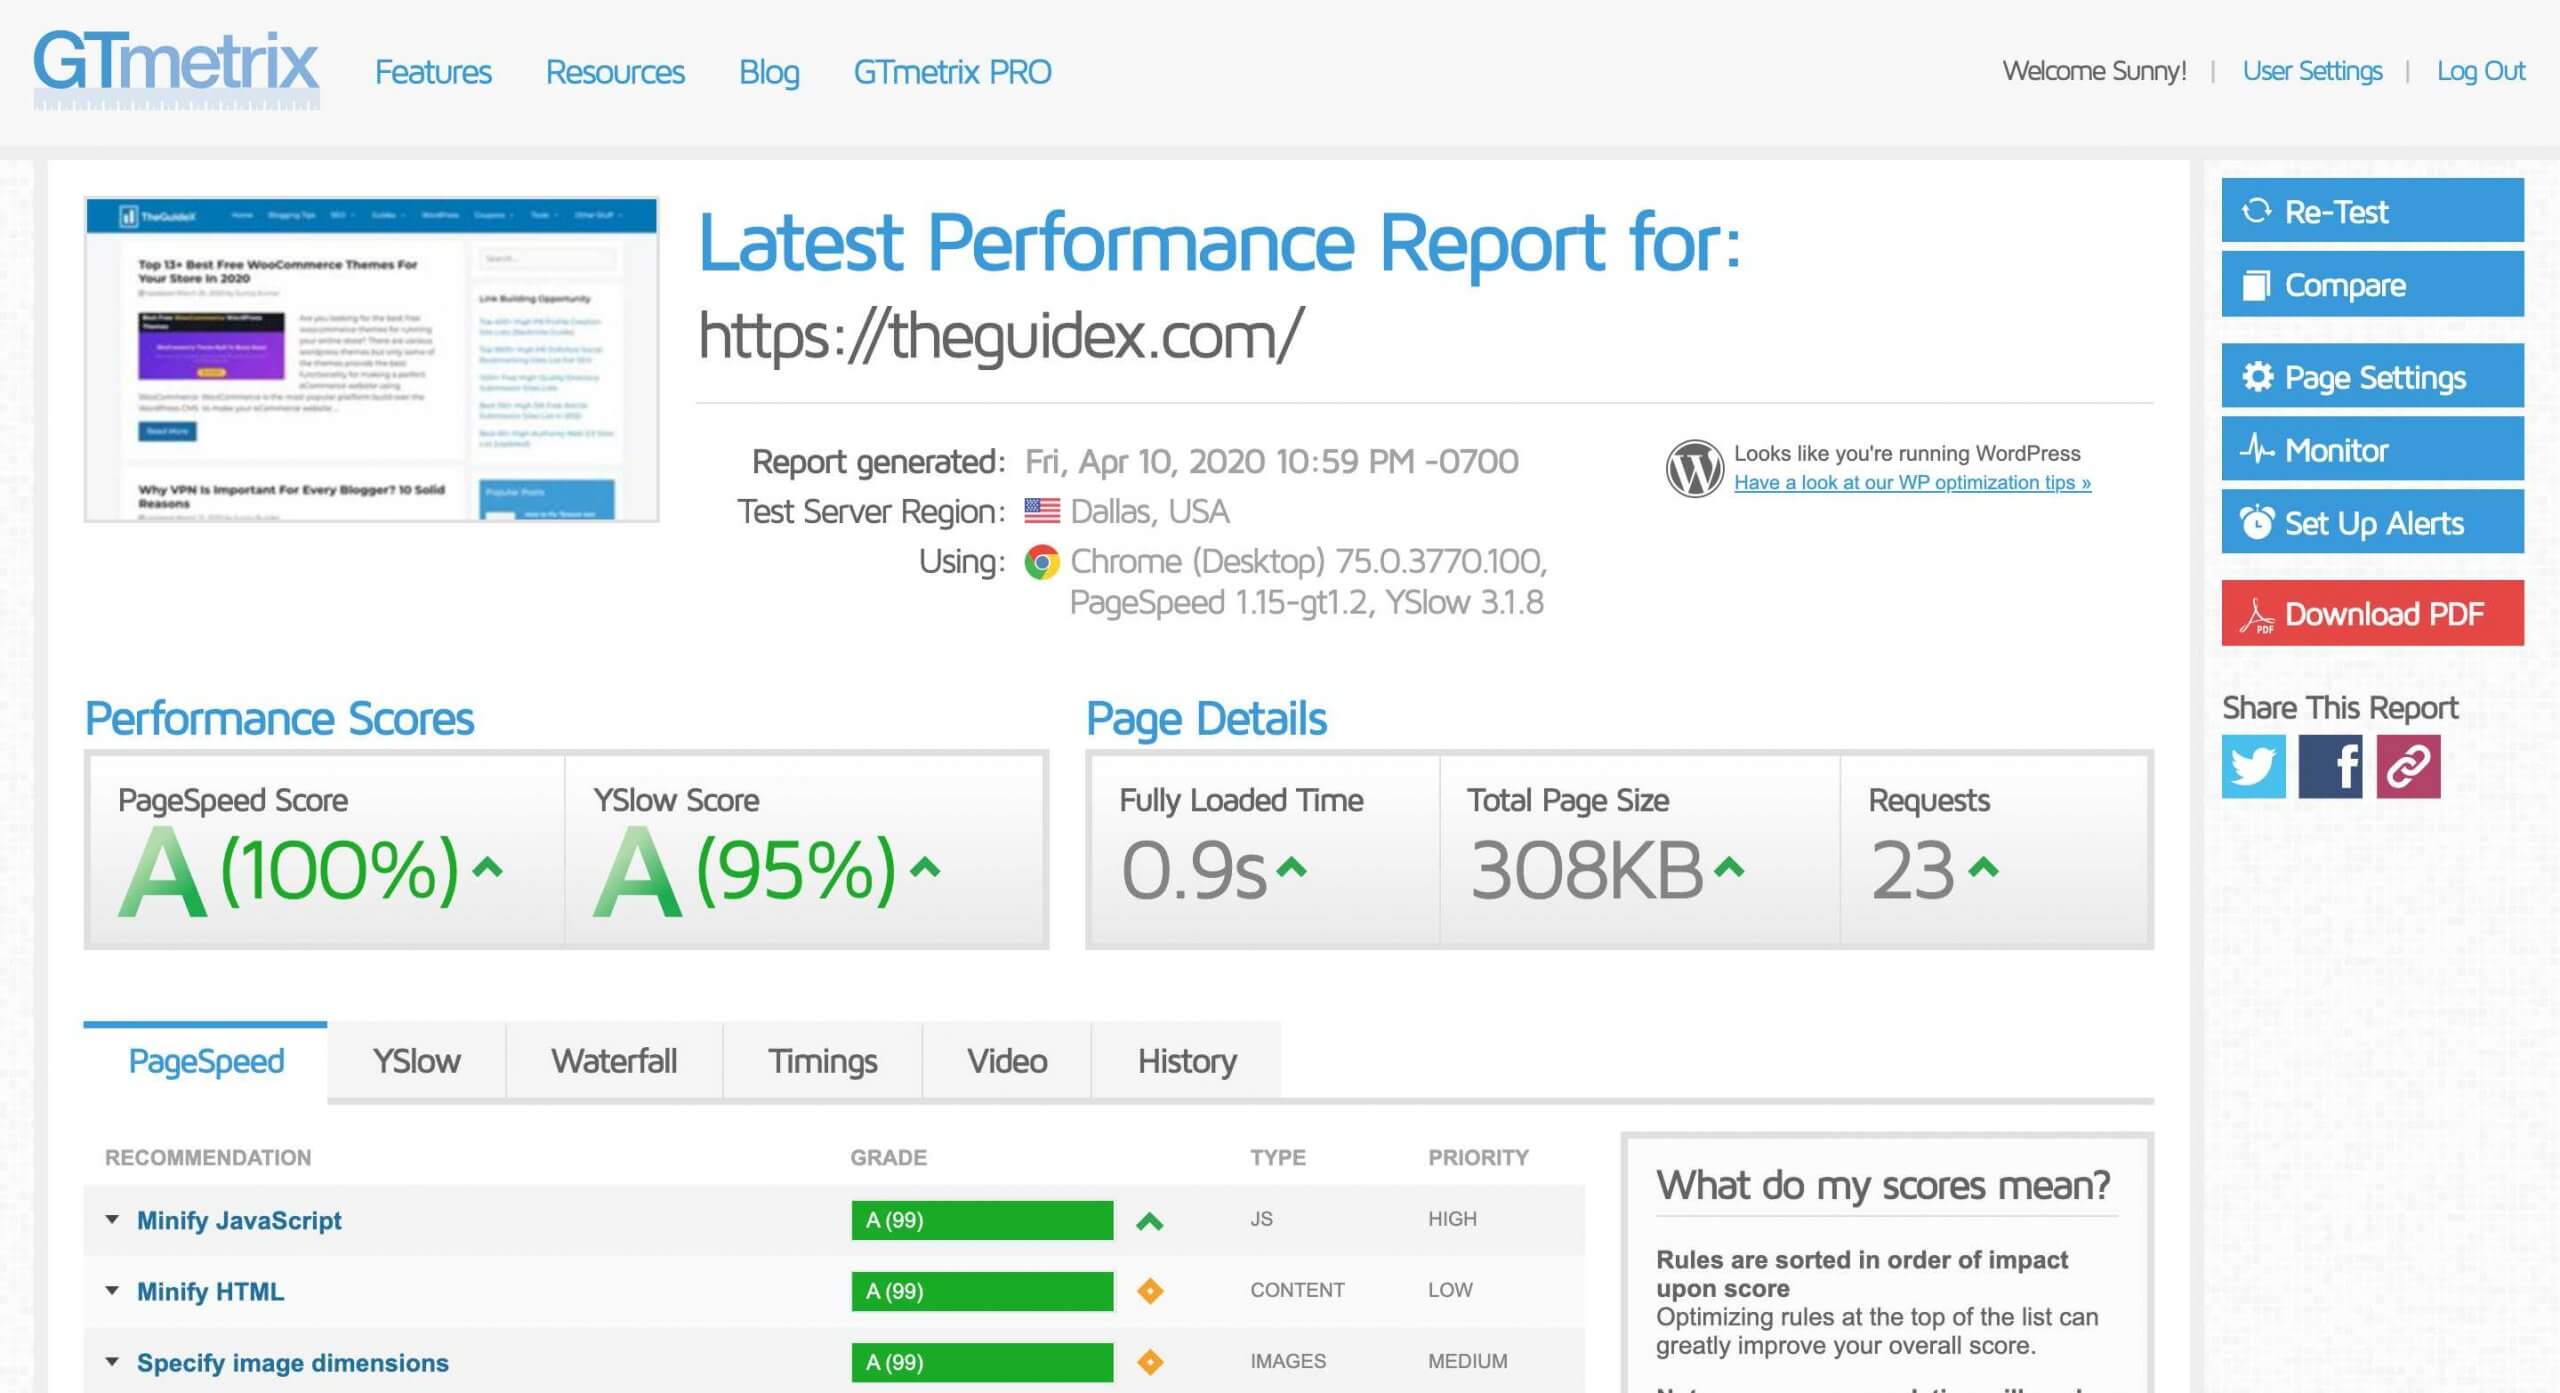
According to GTmetrix, the PageSpeed score of TheGuideX.com is 100% & the YSlow Score is around 95% with 0.9-second load time and only 23 HTTP requests. That is amazing.
…and here is another report of TheVPNCoupon.com, where I blog about VPNs.
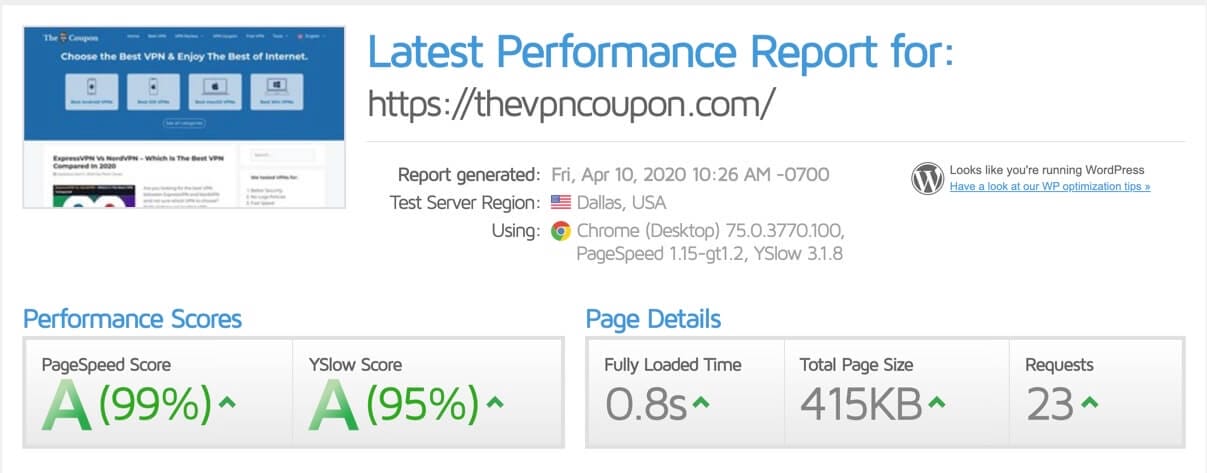
And according to GTmetrix, the PageSpeed Score of my other blog (TheVPNCoupon.com) is around 99% & the YSlow Score is 95% with 23-HTTP requests and this website too loads under 1 second (Although it takes only 800ms to load this website).
A website which loads under 2 second is considered an acceptable load speed. But we always recommend you to optimize your site as far as you can for a better loading speed.
So what I do to optimize my website speed? And do it need any technical or development skills to optimize your site?
The answer is No; you don’t need any technical or development skills to optimize your website. You can easily do it using a few WordPress plugins and CDN. And to optimize your site, first, you need a better web hosting plan.
Most of the amateur bloggers failed here, When they ask me to optimize their site, I notice that they were using cheap shared hosting plans on their site, and using a cheap hosting plan can never make a website fast.
If you have a basic knowledge about VPS, I would recommend you to first shift your website to DigitalOcean or Cloudways, and if you want a cPanel based hosting, you can change to SiteGround.
Also, make sure to use a CDN on your website. If you’re looking for a free CDN provider, then I will recommend you Cloudflare. You can also use ImageKit for Image CDN (I’m using this on my website, and it helps me to optimize images in real-time).
Before we dig deeper into speed optimization techniques, first we learn
Why Speed Matters?
So how long do you wait for a website to get load?
Well, according to the statics, half of us and even when it comes to me, I don’t want to wait two seconds for a website to get load.
That’s why I wanted to make sure my website loads within one second or as fast as possible. And today, I will share exactly the same method, which I use on my website to optimize its speed.
But why the speed of a website matter? And what difference does a fraction of seconds make?
The answer? It makes a big difference!
But how it makes a big difference? Let’s see a detailed report to learn more about why speed matters.
1. Slow Websites Kill Conversions:
A slow website can kill your website conversions.
Let’s imagine if you’re an eCommerce website, and your website takes around four seconds to load. And according to various reports, 40% of people can leave your site if it takes over three seconds to load.
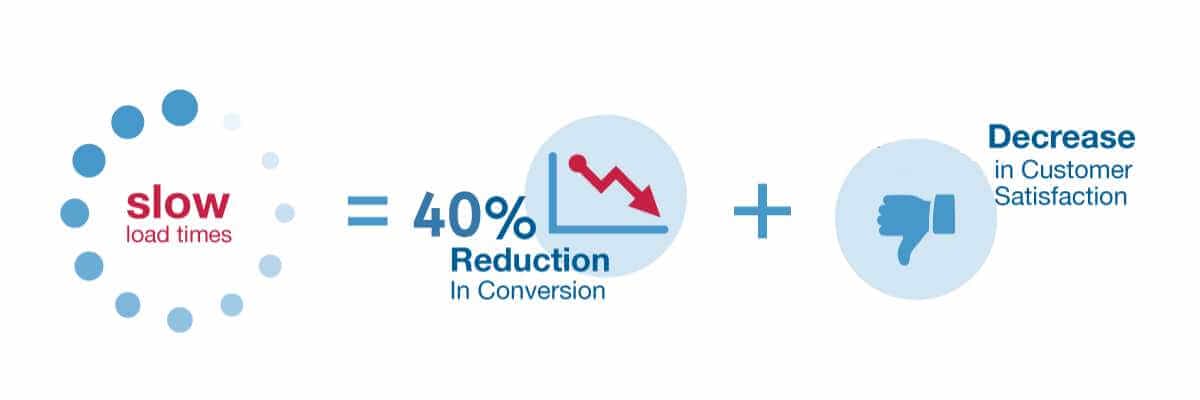
So in this sense, if your website receives around 1,00,000 traffic monthly and it takes approximately four seconds to load your website, then there are many chances that up to 40,000 peoples can abandon your site.
And this way, you’ll lose 40% of peoples, and thus it also takes a hit on overall website conversion. This way, website speed matters a lot for increasing conversions.
2. We Expect Speed & User Experience:
As I already mentioned above, 40% of people leave your website if it takes over three seconds to load. And when it comes to me, I always leave the site, which takes two or more seconds to load.
WTH wait for the two seconds to load the website?
If I can’t wait for two seconds, then I can’t expect my readers to remain for so long.
There are two primary factors involved in good user experience:
- Giving visitors what they’re looking for, and
- Giving it to them fast.

Here are some more ranking factors on Google’s new page experience which you can consider optimizing on your website.
And as soon as visitors are confused and frustrated, it means we have done something wrong, and there is nothing more frustrated than a slow loading time.
If you really want to improve your overall website performance, then website loading speed should be your top-most priority.
3. Website Speed Affect Your Google Rank:
Last but not least point is, it dominates the google ranking.
Google has already confessed that they’re striving to make the whole web fast. They are on the mission to make the website super speedy, more reliable, and useful.
It can’t be possible without a good loading speed, and they’re giving priority to sites having fast loading speed. And as per my knowledge, they’ve announced in 2010 that they’re giving slightly more preference to websites having fast loading speed.

And according to a report by SERoundtable, If your website takes over 2 seconds to load content, then Google may limit the number of crawlers it sends to your site.
If it is a case with your site, then Google will be less likely to prefer and fetch your latest blog post or notice any recent update. And it will surely harm your website.
So speed matters, It impacts your website conversion; it affects user experience, and it also affects the search engine ranking.
As of now, I’m sure that you’ve learned how important a fast loading website is.
And now, before we move on to specific techniques to help you in optimizing the overall speed of your web site, let us take a moment to review tools that will help you in analyzing the speed of your web pages.
Website Speed Testing Tools
Okay, so website speed optimization matters! Now, how do you tell where are you at?
That is, is your website slow? Is it in the middle, or is it lightning fast (Congrats then, you can probably stop reading!).
The only way to know is by testing your website. There are plenty of sites to measure our website Speed, but here in this guide, I’ll only share a few tools that I personally prefer using.
1. GTmetrix
GTmetrix is one of the best tools for checking the website performance. This tool is a good option for casual users and developers.
GTmetrix offers user-friendly design with a bunch of useful and in-depth optimizations. To use this tool, just put a website link and click on the “Analyze” button.

When you click on the “Analyze” button, it will take a few seconds or sometimes a minute to spit back with a detailed analysis of your web site.
You’ll get the nice summary, including;
- Fully Loaded Time
- HTTP Requests
- Total Page Size
- PageSpeed Score
- YSlow Score
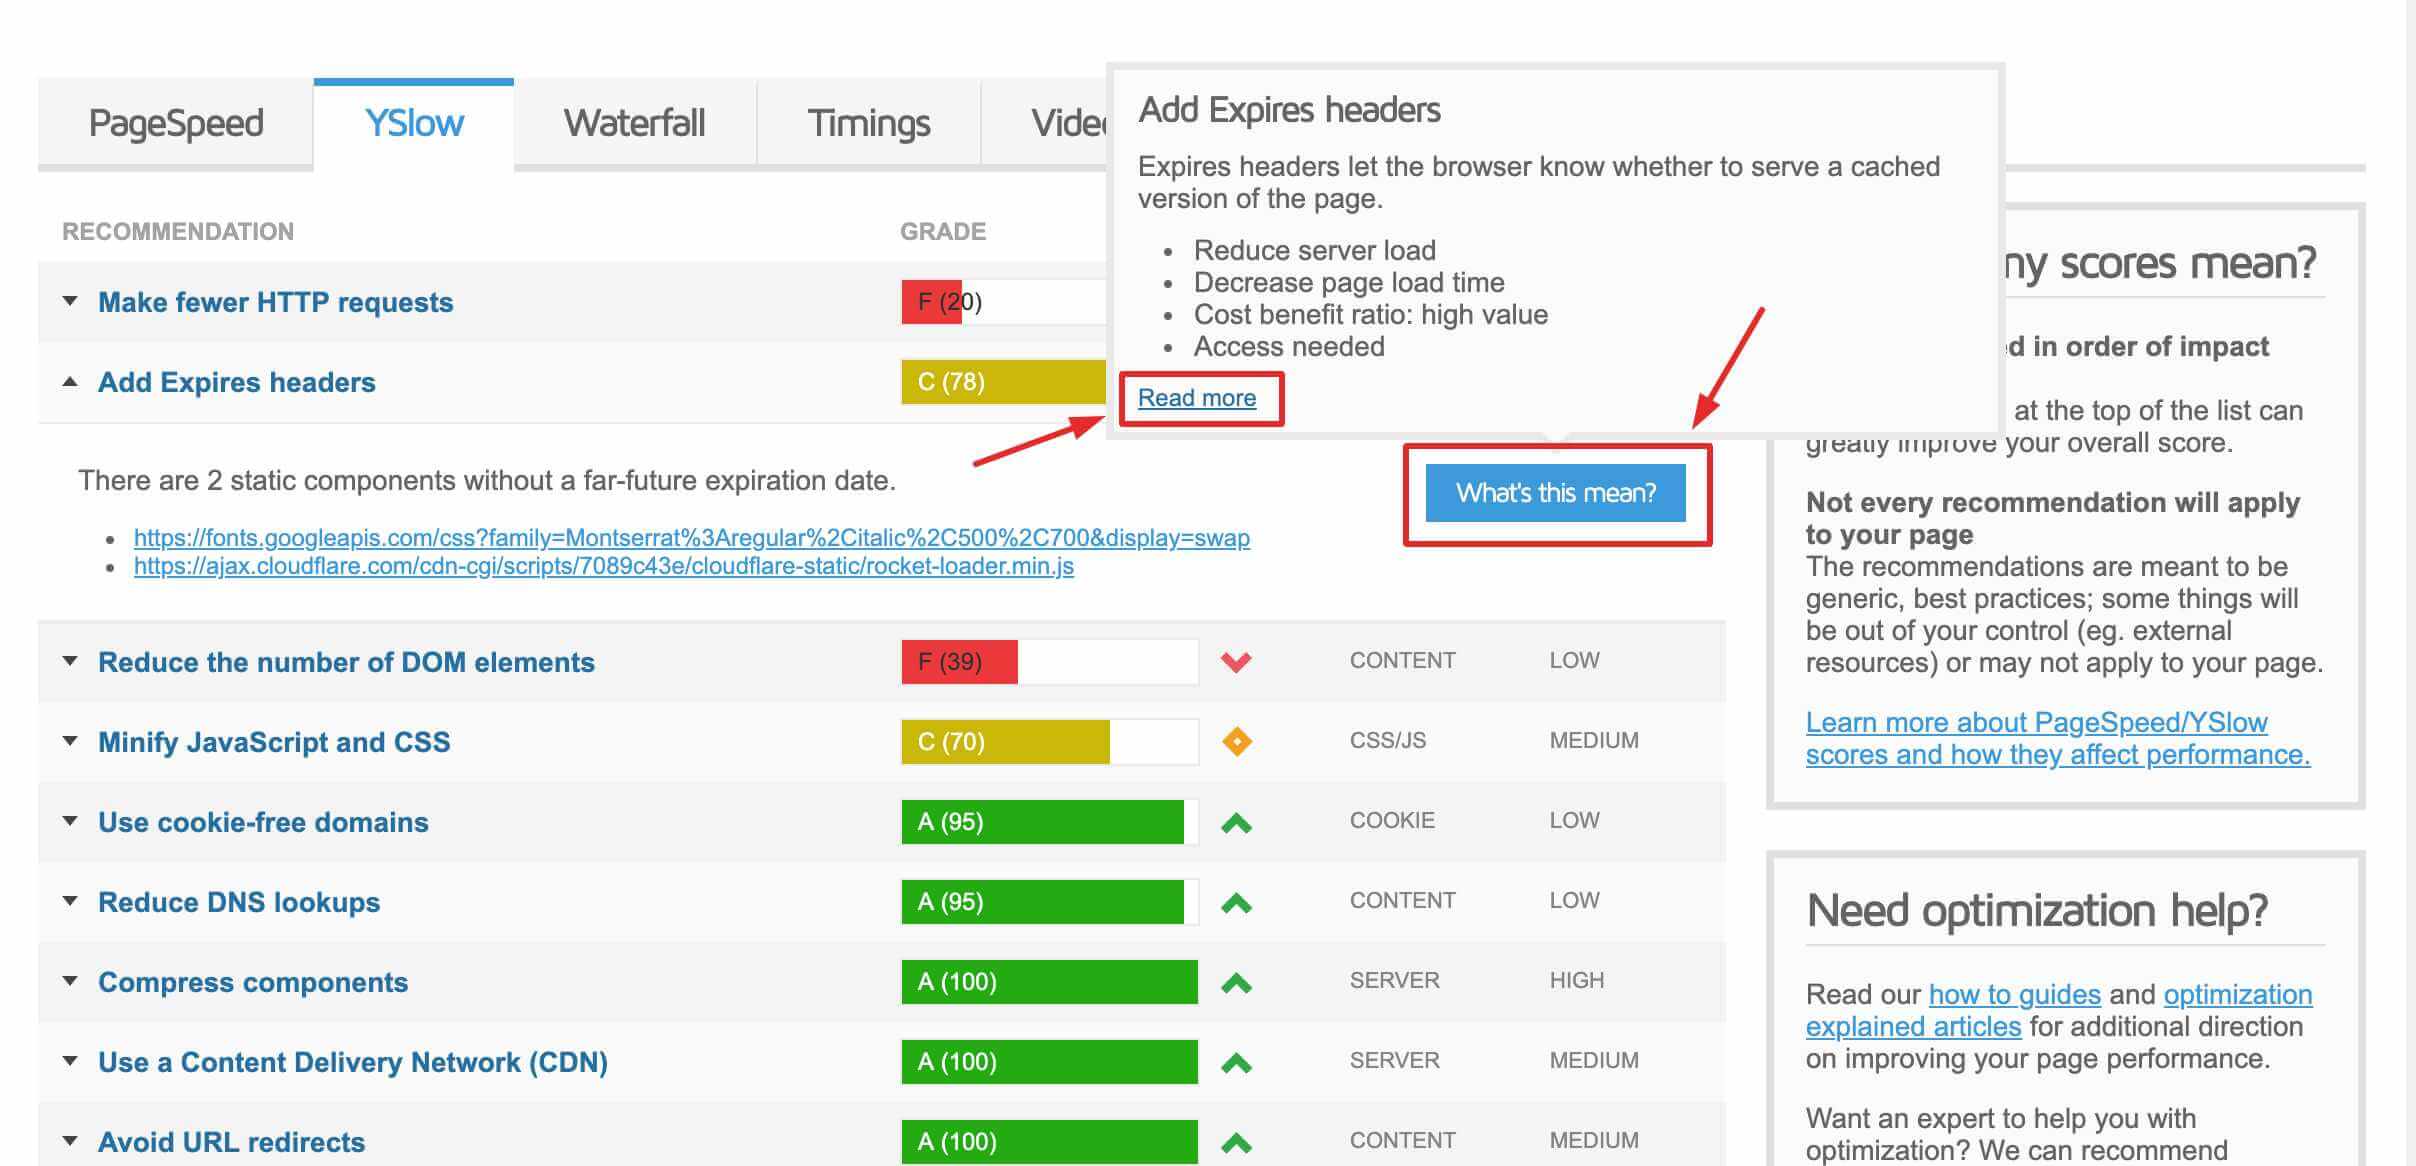
And if you dig deeper into the GTmetrix result and expand the “recommendation” section, It will show recommendations specific for your website. You can also click on the “What’s this mean?” to learn more about those errors and optimizations.
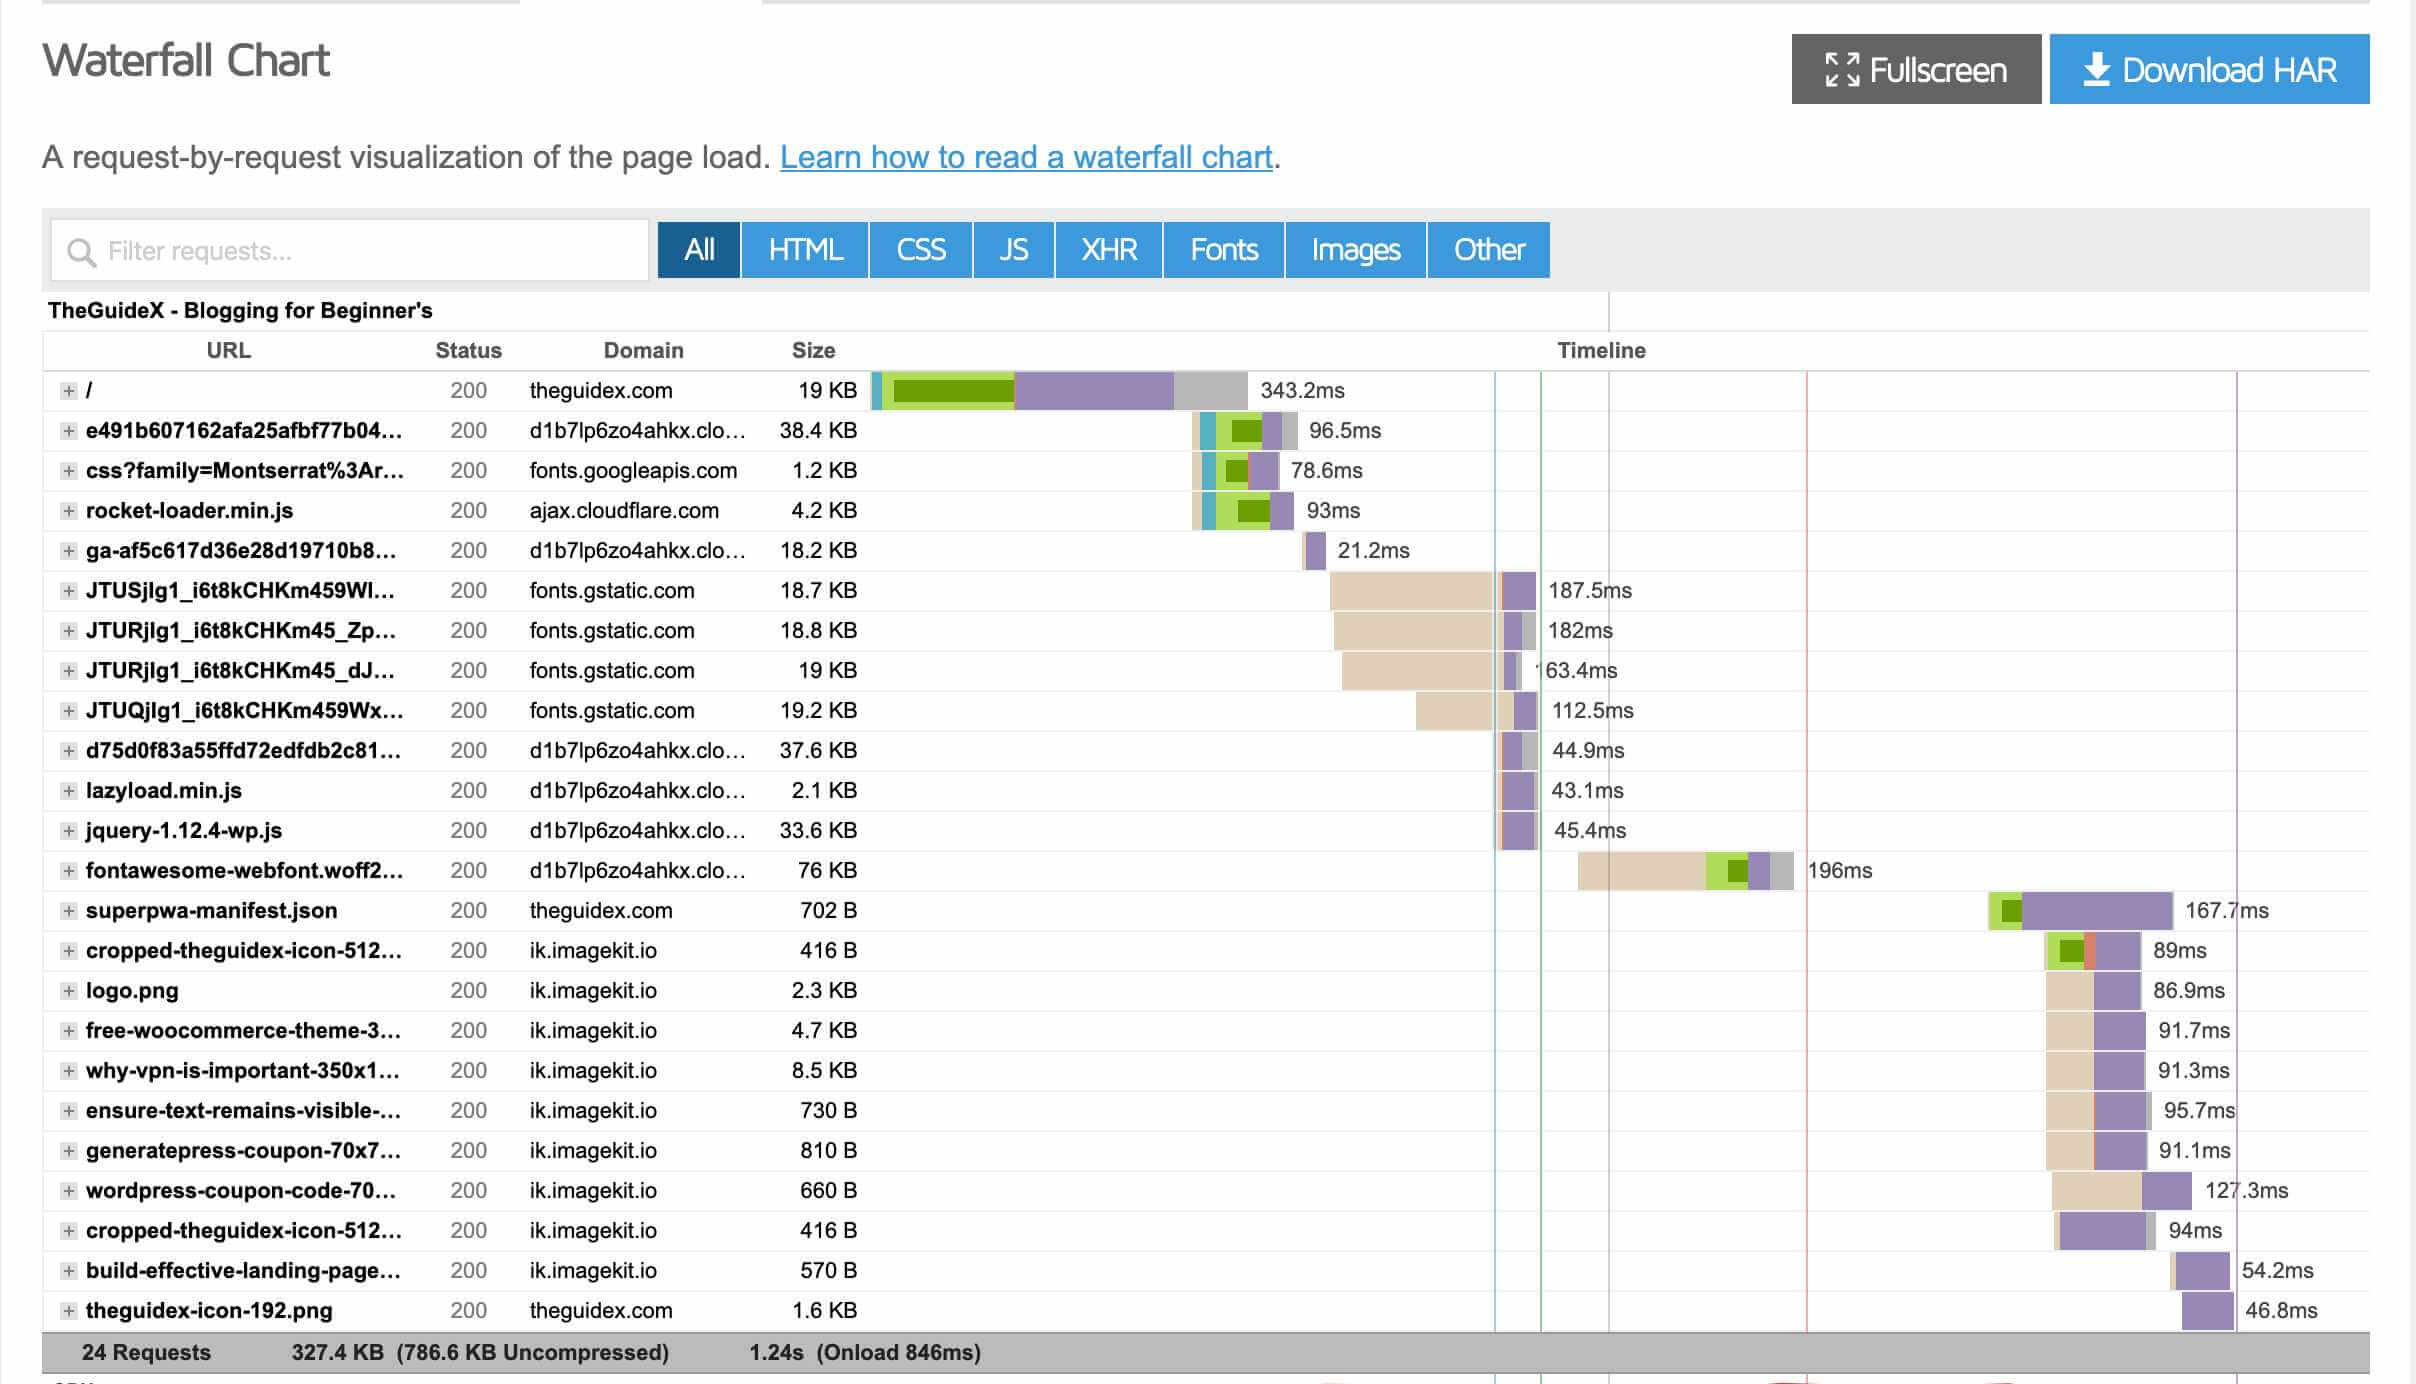
Apart from the ‘recommendations”, it also shows the DNS lookup time of every external and internal file your website uses. If you’re a developer or have technical skills, It will help you optimize your site further.
2. Pingdom
Pingdom is another most efficient and great tool for WordPress speed optimization. If you’re a beginner or a developer, this tool will help you to efficiently test your website and help you with the recommendations to optimize your site.
To use this tool, Enter your website address and then select the “testing location.” Once you choose the testing location, click on the “Start Test” button, and it will start analyzing the page.
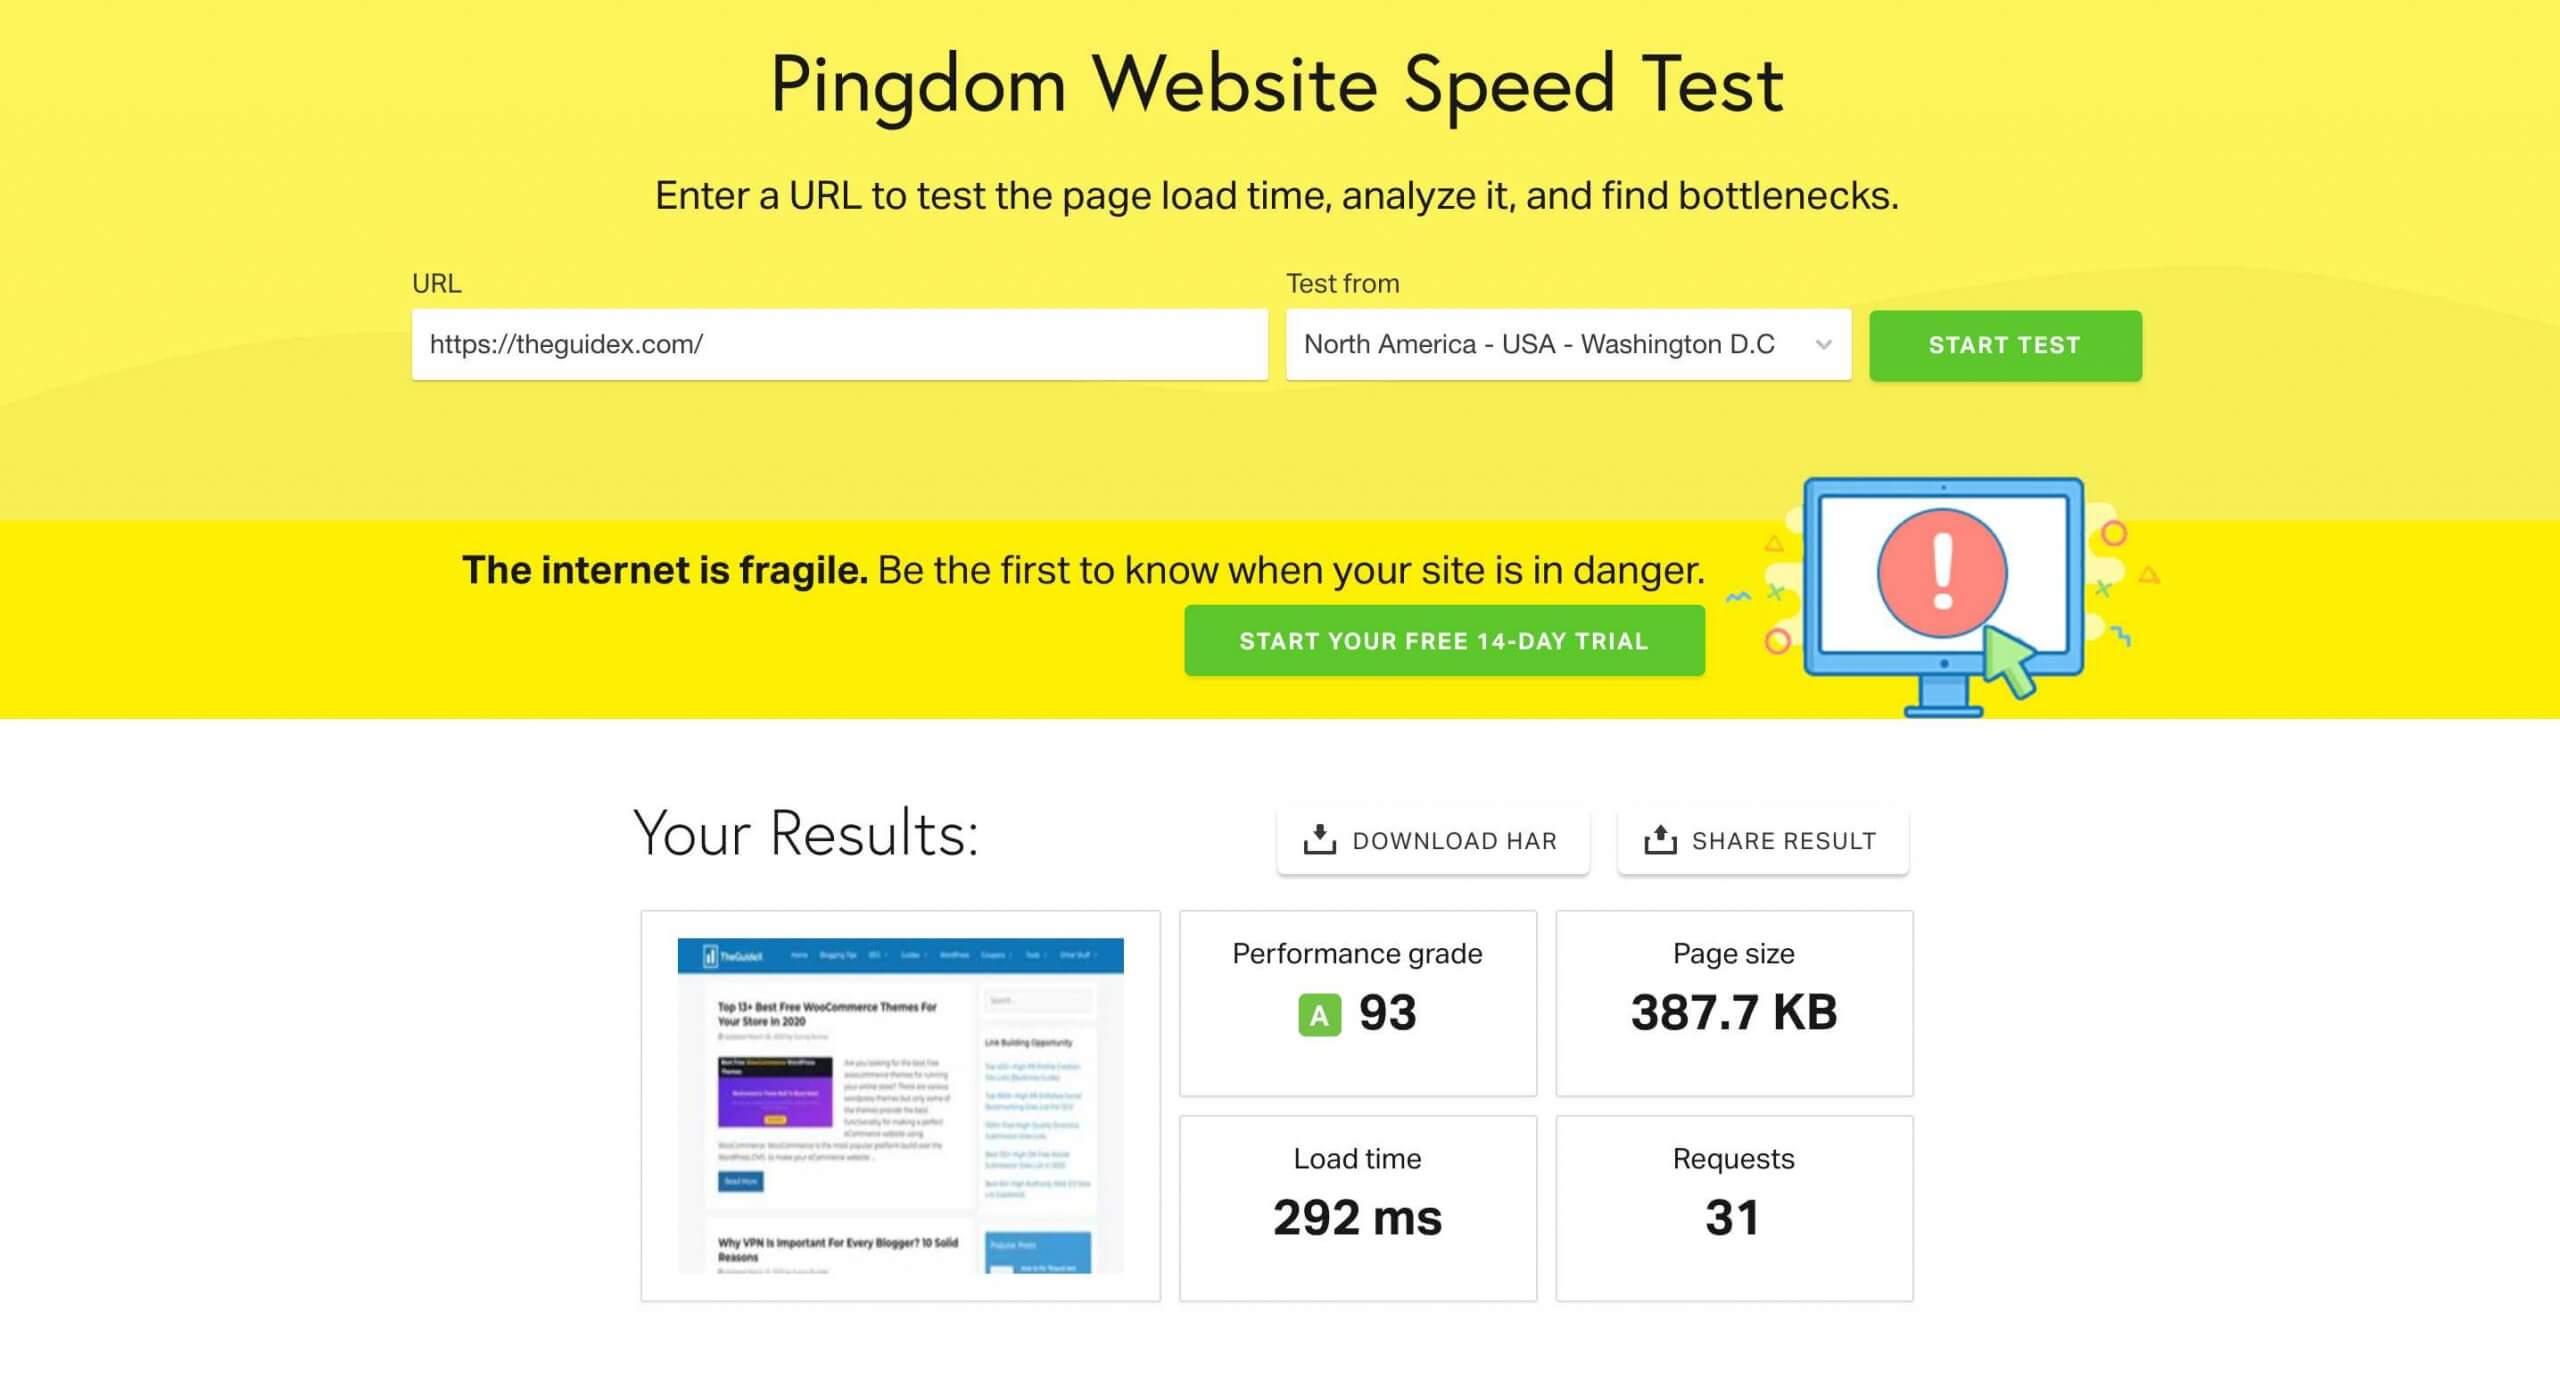
And similar to GTmetrix, if you dig deeper, it shows you various recommendations to optimize your website. And further down, you can find information about the specific requests on your site, and waterfall analysis.
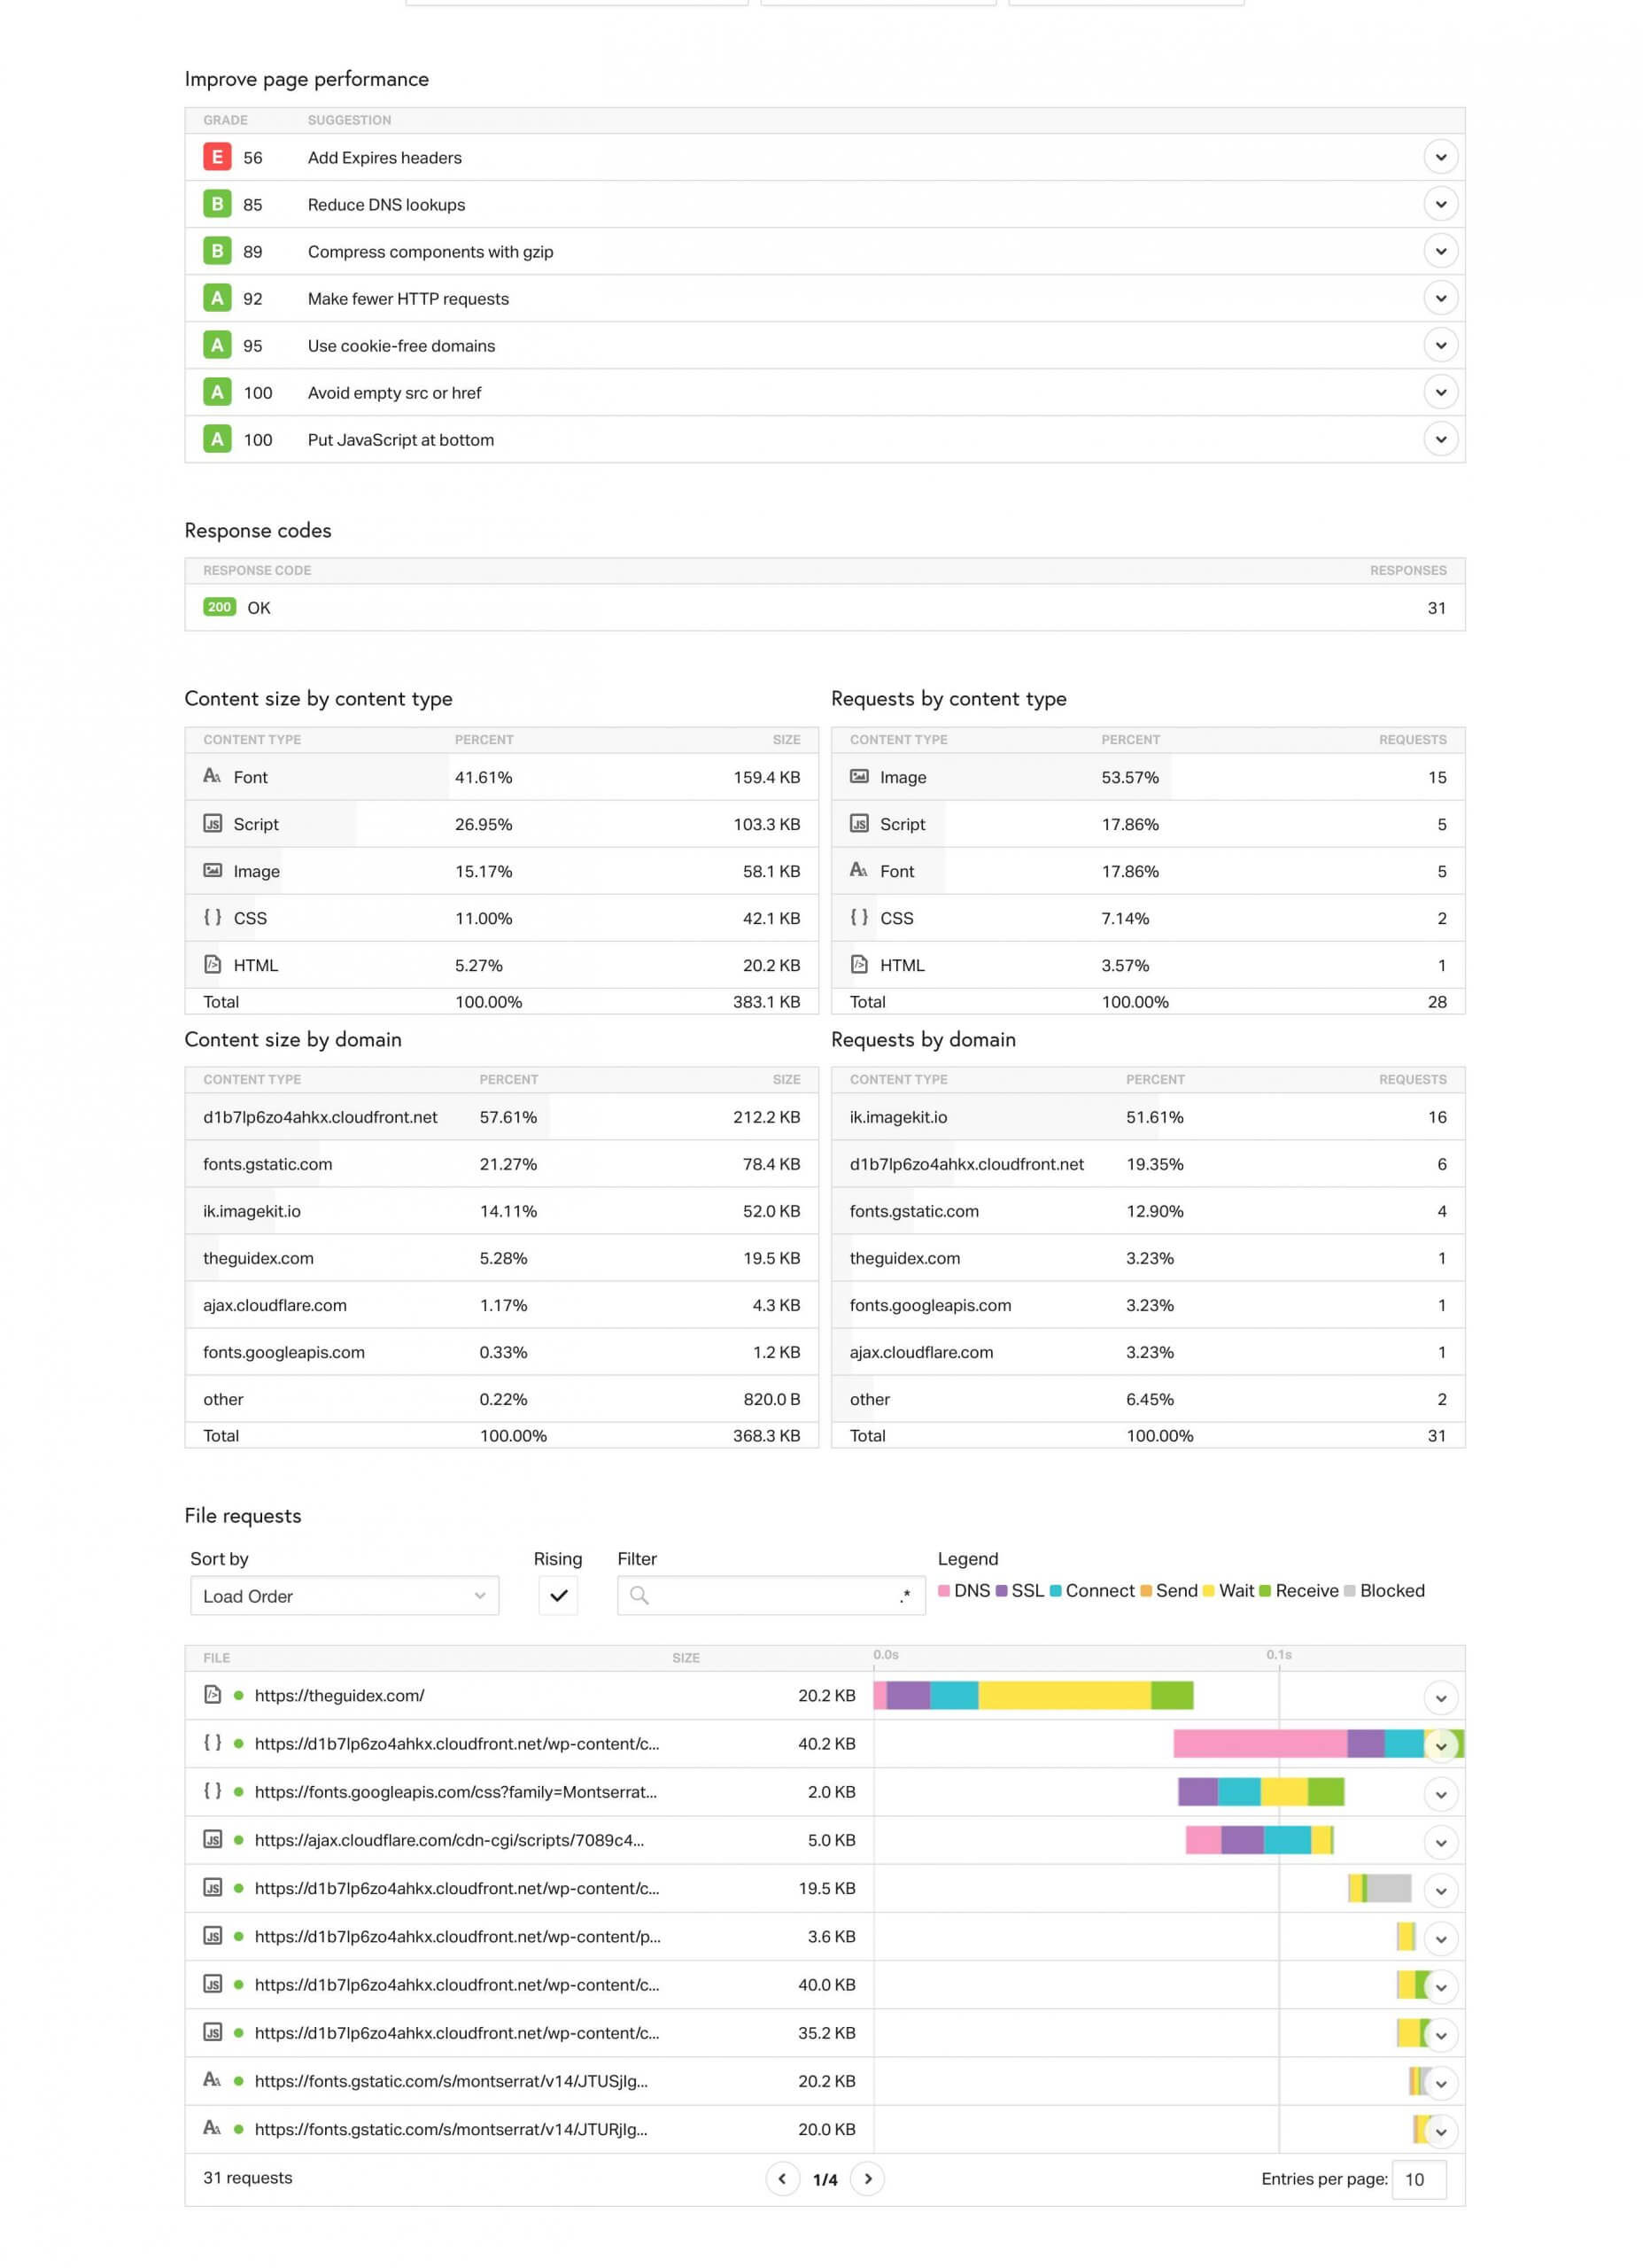
This tool is really helpful for improvising your website Speed – But it requires some advanced knowledge to benefit from. You can also read a post on Waterfall analysis by KeyCDN to learn more about it.
3. Google PageSpeed Insights
Another best tool for testing your website is Google’s PageSpeed Insight. This tool just gives you suggestions through which you can optimize your website, but it wouldn’t share the speed test result of your website.
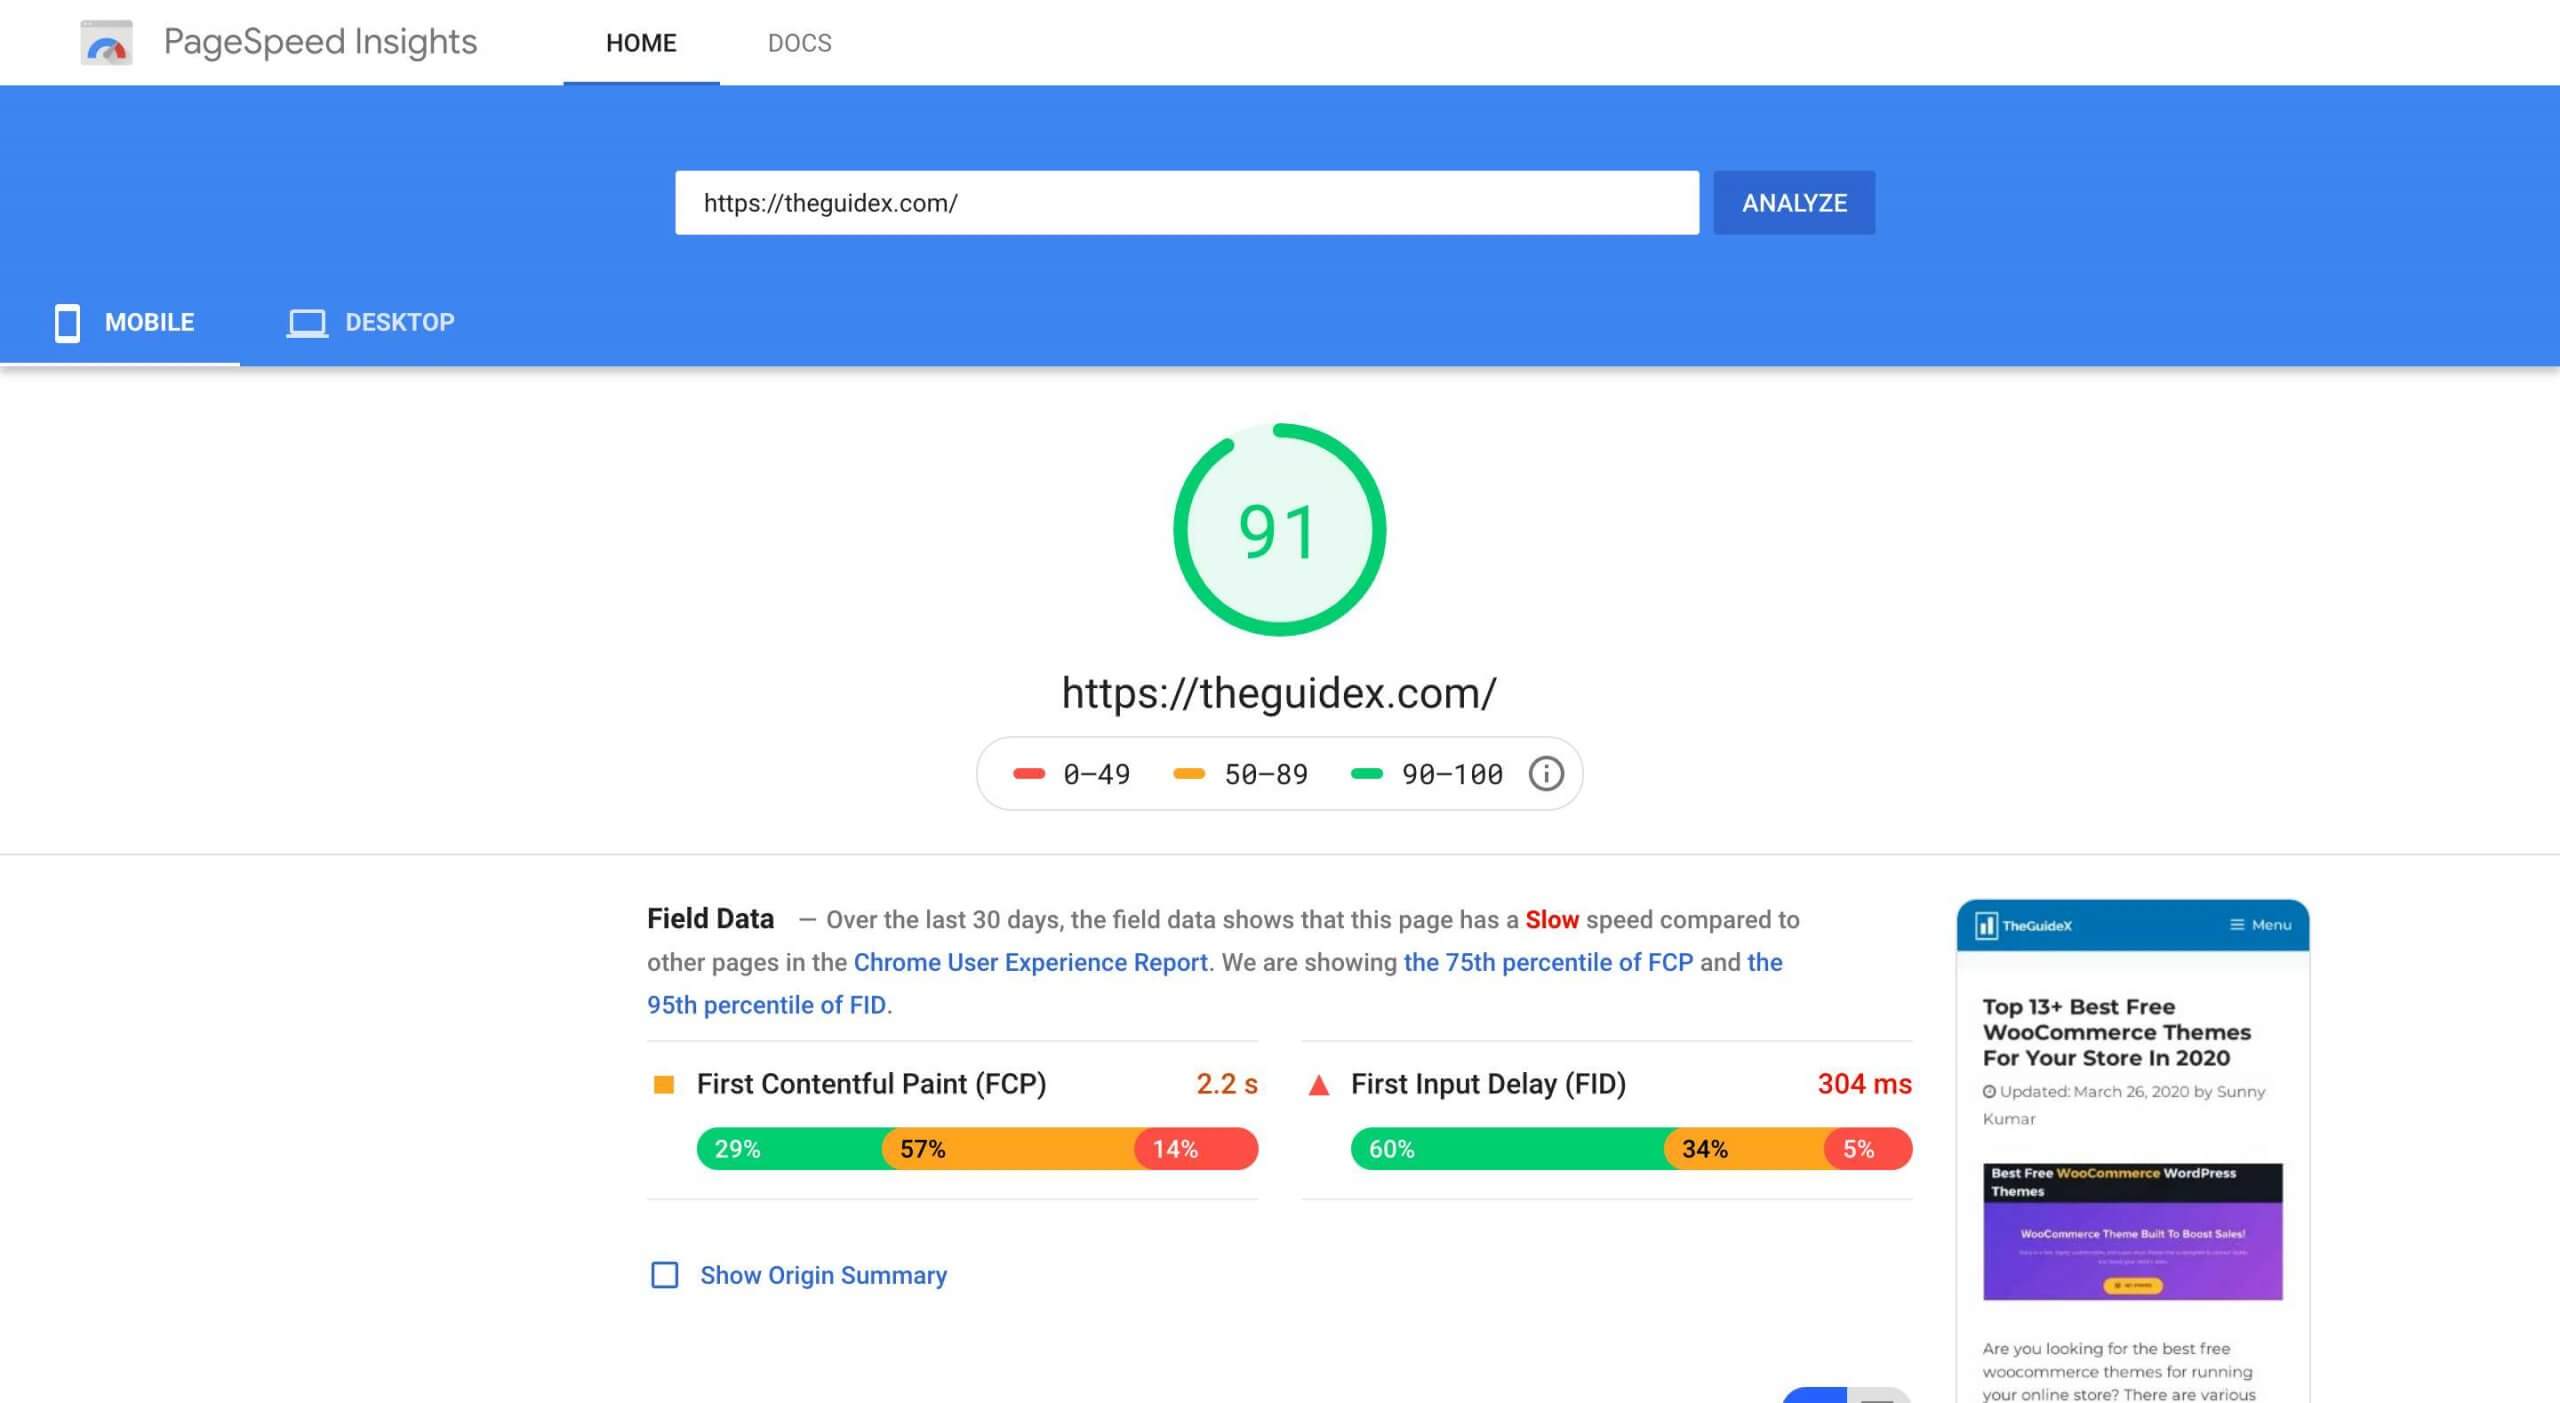
That’s changed, though. Now, Google will share the page load time for both First Contentful Paint (FCP) and DOM Content Loaded (DCL). You can learn more about these speed metrics on Google’s official developer page here.
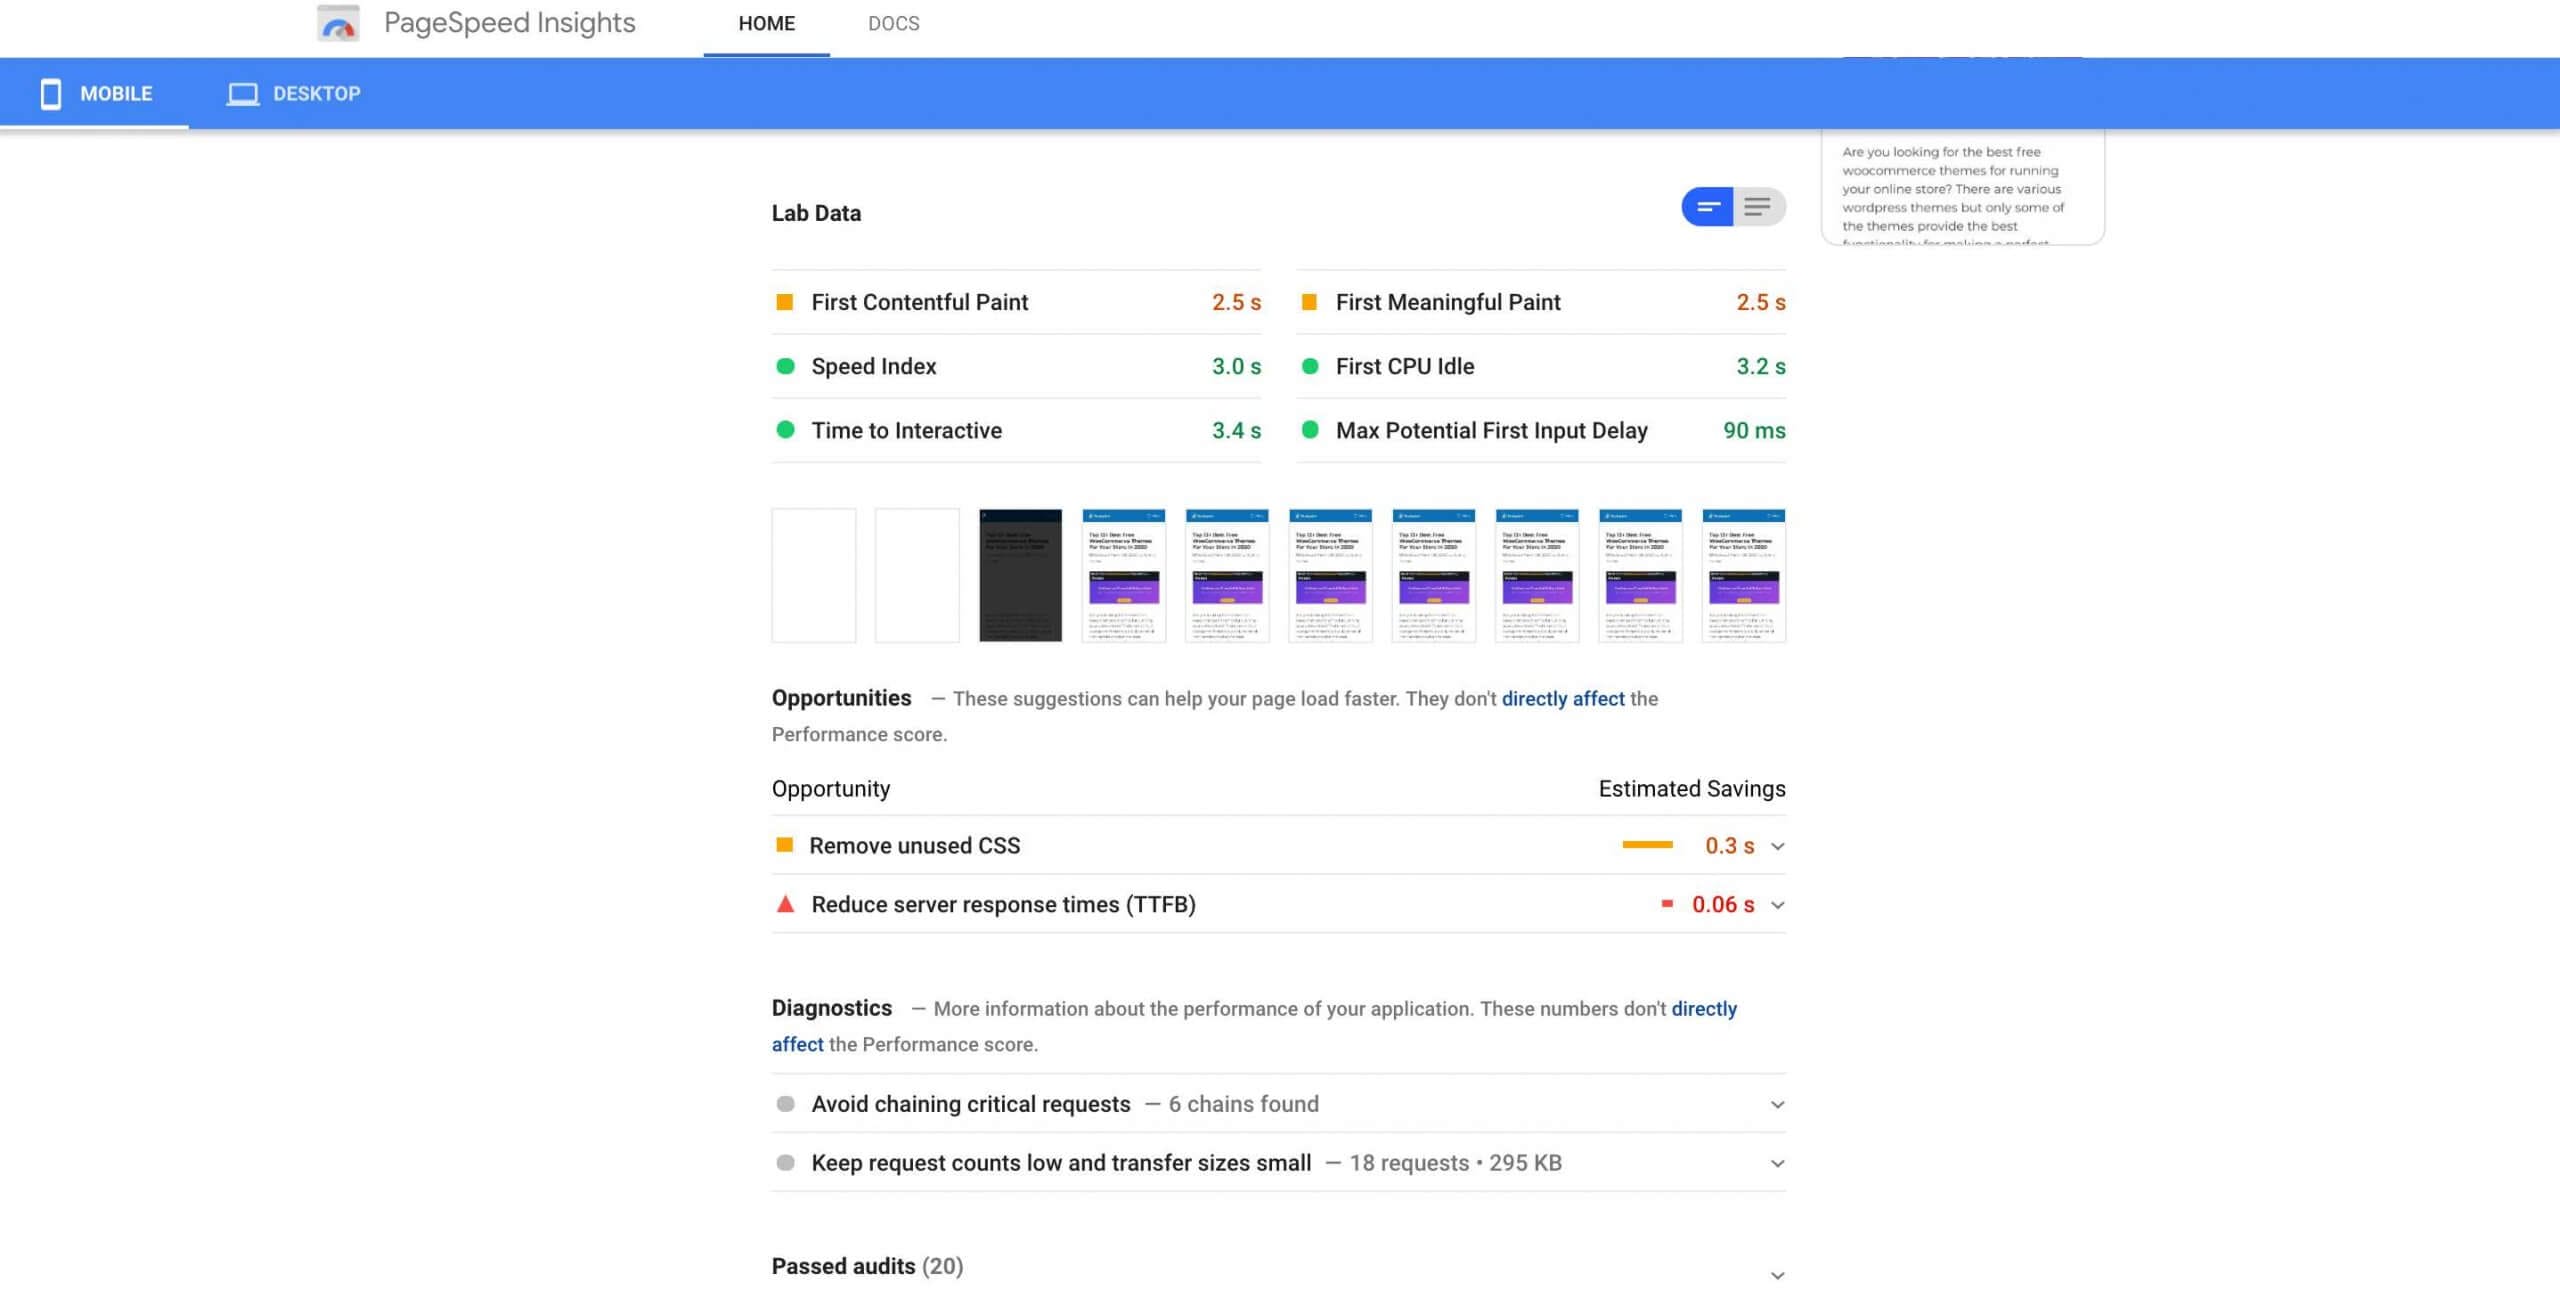
If you have got a low page speed score and along with poor loading time, then this guide is for you! You can read this guide till the end to properly optimize your website on Google PageSpeed Insight and other websites.
You can also check our other guide on solving Flash of Invisible Text (FOIT) to optimize the fonts of your website.
4. WebPageTest
Last but not the least tool used for checking website speed is WebPageTest. This tool is one of the most advanced WordPress speed testing tools in terms of depth of functionality and the data it provides.
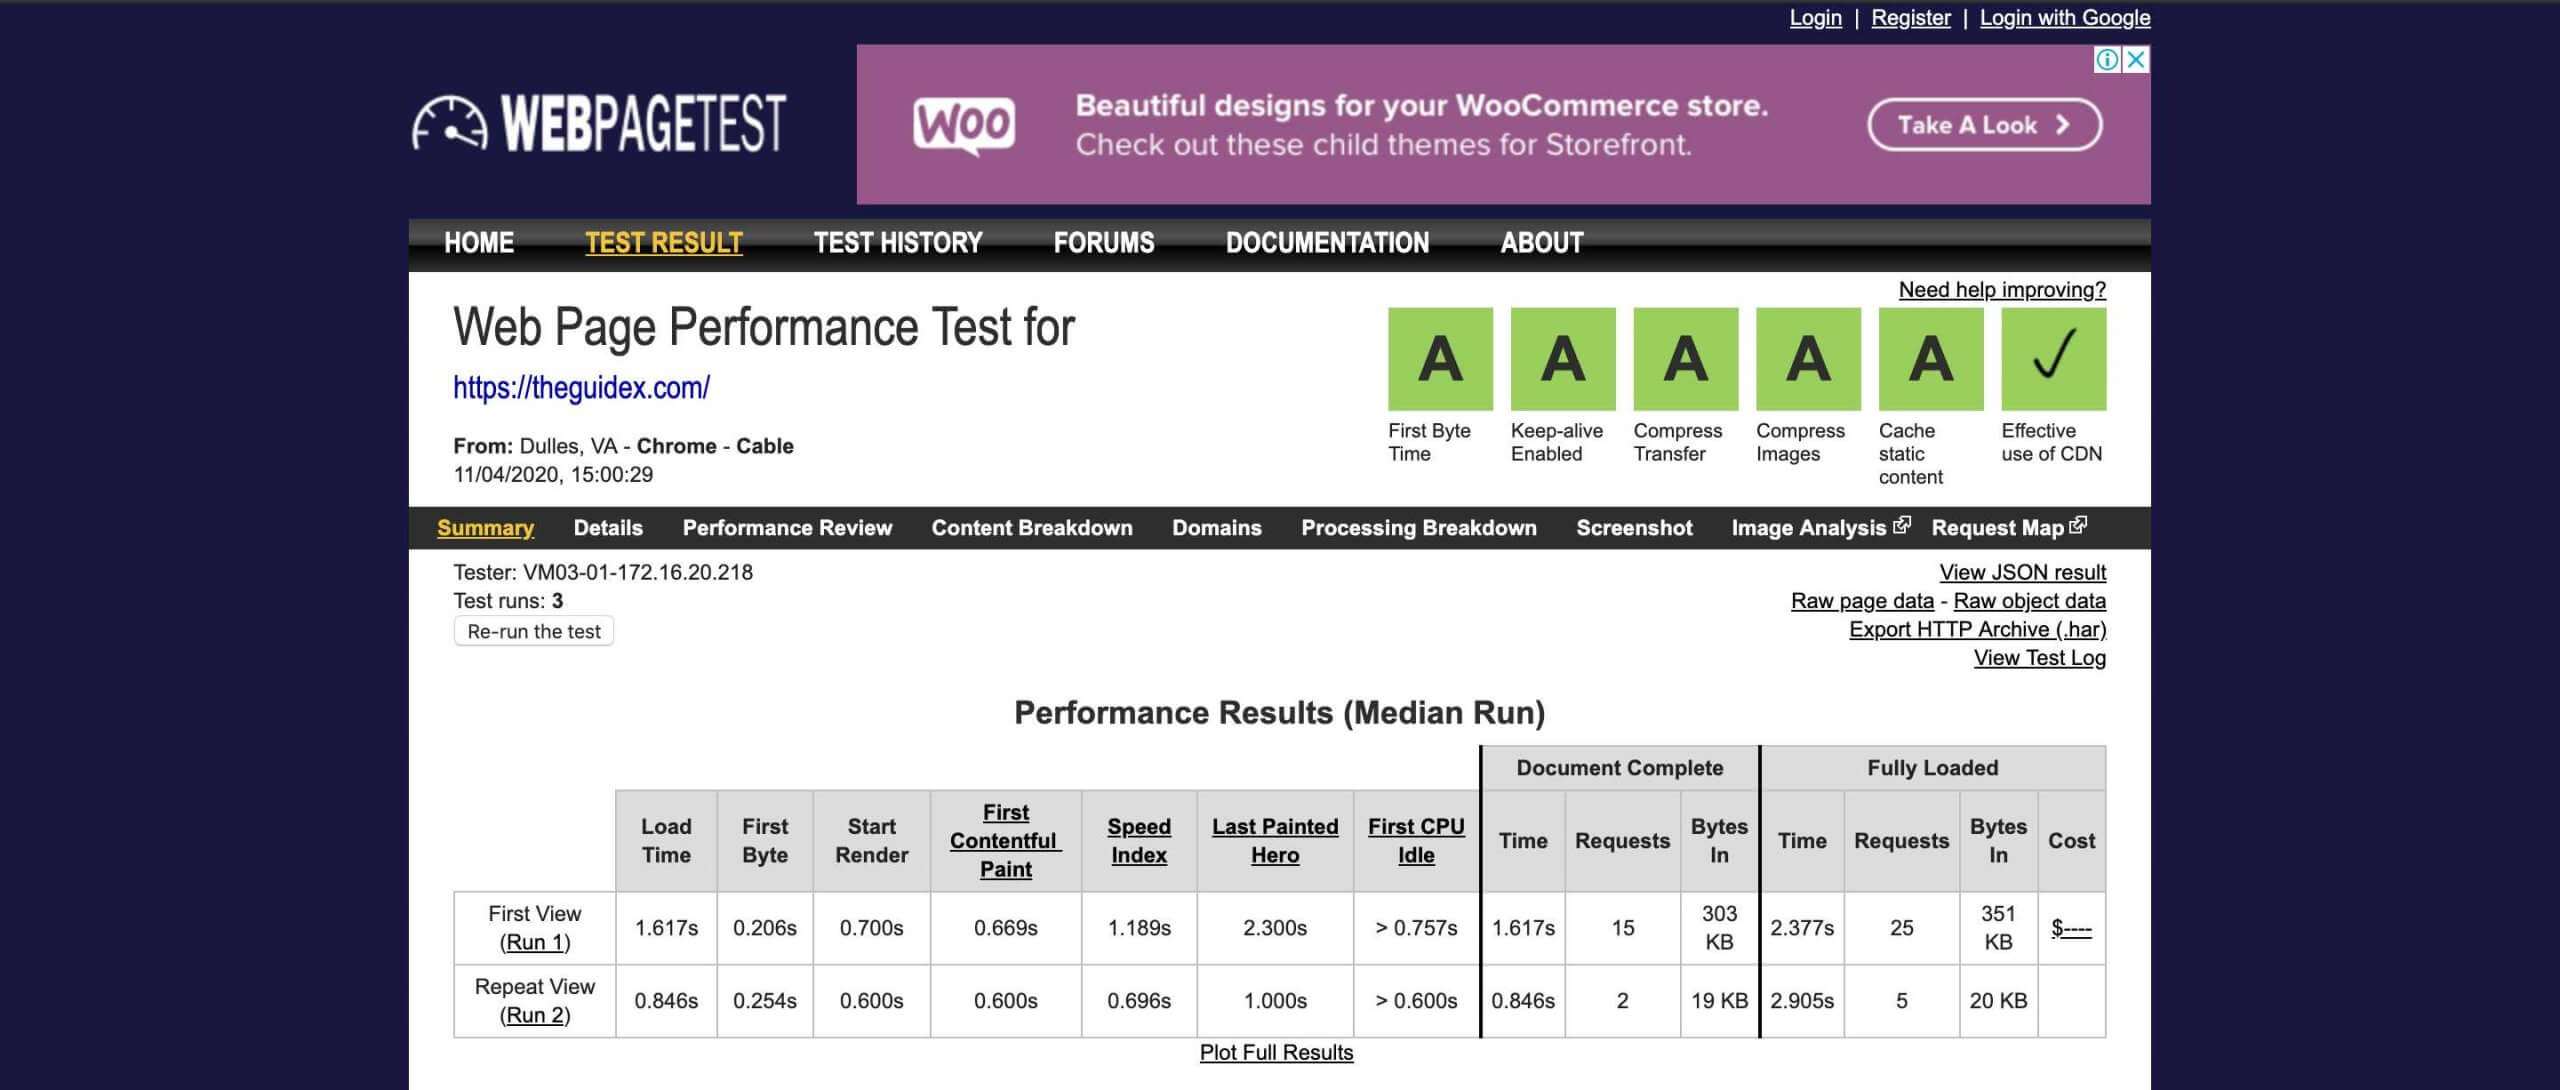
When you check your website speed using WebPageTest tool, you can use a few Advanced Settings to analyze your website. You can use these advance settings to;
- Simulate a Slow Connection
- Choose Device Type & Browser
- …configure a whole lot more
If you check this tweet by John Mueller from Google Search, he also recommends the WebPageTest tool for checking website loading speed.

If you’re confused with these options, I would recommend you to try the “Simple Testing” tab. Overall, this tool is best for testing the speed of your website, and if you’re a developer, it will help you a lot to fix your website.
Till now, we have learned the importance of having a fast-loading website and the tools for checking the website speed.
Now, it’s time to share the techniques to optimize your website correctly.
Here in this tutorial, I’ll not just share the steps to use a cache plugin to optimize CSS, JS, HTML, or to use CDN as others do, but I’ll share the most accessible way through which you can do these optimizations correctly.
These methods are simple and simplest with examples;
But before proceeding with these methods, I recommend you first to take a backup of your WordPress website using the Updraft Backup plugin, which is available for free at the WordPress repo.
Once you’ve taken the backup of your WordPress website, we can continue with optimizing the site.
So how to…
Optimize Your Website
Now the wait is over!
Here I’m sharing the methods I always use on my website to optimize it. You can follow the same techniques to optimize your blog, micro-niche, and also your eCommerce store.
1. Choosing Fast and Trusted Web Hosting
So the very first step is to choose a trusted and fast web hosting provider.
As I already mentioned, when people ask me to optimize their website, I notice that they were using cheap shared hosting plans on their site, and using a cheap hosting plan can never make a website fast.
So if you’re using any cheap shared hosting plan, then I will definitely recommend you to first move from your current web hosting provider to any trusted provider.
If you ask me for the fast and best web hosting platform, I will always recommend DigitalOcean – But it requires a few technical skills to manage your DigitalOcean droplet. Although it is easy, and to make it more convenient, you can use any control panel on your server (I personally use DigitalOcean on all my projects).
These panels can include ServerPilot, VestaCP, and many more – But I always recommend using ServerPilot as it is one of the easiest control panels for installing WordPress (You can click here to get $10 free credit on ServerPilot).
And if you’re a beginner and want a cPanel-based hosting, then you can also go with SiteGround. SiteGround is one of the best and most trusted web hosting providers for small businesses and websites.
1.1 Recommended Hosting
DigitalOcean
When it comes to the fastest and most reliable web hosting provider, then no one can beat DigitalOcean. They’re one of the best for hosting your WordPress blog.
Although you have to use a few panels to manage your server easily, it can include ServerPilot, ServerAvatar, EasyEngine, VestaCP, and many more. You can use any of them, but I recommend you to try ServerPilot.
Cloudways
I believe that DigitalOcean is sometimes a bit harder to manage, especially when you’re a beginner. So instead of DigitalOcean, you can also try Cloudways, which is another amazing web hosting provider in the market.
They offer managed web hosting plans at an amazing price with a free SSL certificate, free website migration, and 24/7/365 Support. You can also use the “TheGuideX” coupon to get 3 months of free managed hosting plan.
SiteGround
SiteGround is as close as any perfect web hosting, and you can get – speed, uptimes, support, features, and pricing were all phenomenal. I’m using them on a few of my micro niche blogs, and I’ve <200ms server response time, and perfect GTMetrix and Pingdom report.
SiteGround is the best hosting when you purchase it for 1-3 years of promo plan, but it’s expensive because it doesn’t want to overcrowd its servers like EIG hosting.
1.2 Not recommended Hosting
Cheap Shared Hosting
If you want your website to be fast and optimized, then never use cheap and shared hosting plans. Most of the cheap web hosting providers aren’t properly optimized, and they just overcrowd their servers to earn a few bucks.
So they’ll never make your site fast. If you want a fast-loading website, I will always recommend you to keep a six-feet distance from cheap hosting providers.
…and all EIG Host
Endurance International Ground, Inc. (EIG) is one of the big names in the web hosting industry. They are operating over 75+ hosting companies under their management.
It can include some of the most popular web hosting brands like HostGator, iPage, and so on – But I would never suggest you to try these web hosting platforms.
2. Choosing Optimized WordPress Theme
When selecting a theme for your WordPress website, it is essential to select a theme that is optimized for speed. Some beautiful and impressive-looking themes are poorly coded and can make your website really slow.
And if you’re not using an optimized theme on your website, then there are fewer chances that these methods for speed optimizations work for you.
I usually prefer to go with a theme that has a simple and clean UI rather than preferring some flashy, huge animation and a theme with a complex layout. You can always add those features using a reliable and quality WordPress plugin.
If you need any theme recommendations, I would suggest you to prefer premium WordPress themes from StudioPress, MyThemeShop, and GeneratePress. The themes from these marketplaces are optimized and well coded for both speed and SEO. (I personally prefer using the GeneratePress theme on my websites)
You can also check Astra, which is another theme optimized for speed and SEO. Similar to GeneratePress, this theme also comes with a lot of customization options and is one of the most downloaded themes in WordPress repo with over 700K+ active installations.
2.1 Recommended Themes
GeneratePress
GeneratePress is one of the best, most lightweight, and SEO-friendly themes which is available for free in the WordPress marketplace.
The theme is highly customizable, and you can create any type of website, whether it is a blog site, an Amazon affiliate site, or a business website. With the help of its premium add-ons, you can customize anything on your website.
According to WordPress.org, the GeneratePress theme is active on more than 2,00,000+ sites, and the size of the entire theme is less than 30kb. I highly recommend this theme for any kind of website.
Astra
Similar to GeneratePress, Astra is another best theme which is available for free on the WordPress marketplace. The theme has over 700K+ active installations, and this theme can work with every page builder, including Elementor, Thrive Architect, and more.
Astra is one of the easy setup themes; it also comes with various pre-built templates to choose from and further gives you the power to customize them as well to make yourself a unique design. You can do a lot more using their premium add-on.
The size of the theme is only 50KB, and instead of JQuery, it is only built on vanilla JS, so no more render-blocking issues of any type.
StudioPress (Genesis)
StudioPress is one of the most popular premium WordPress theme marketplace. All StudioPress themes are mobile responsive and have clean, lightweight code that ensure that your site is optimized for speed.
They build the Genesis framework for speed and you immediately notice this when you use it.
Till now we have discussed about a trusted and fast web hosting providers and a fast and reliable WordPress theme.
These two things are essential to moving to the third step, which is about optimizing your blog/website using a few WordPress plugins.
3. Optimization Using WordPress Plugins
So before we discuss about optimizing your WordPress website using a few plugins, we assume that you’re already taken care of two things;
- You’re on a sufficiently fast host.
- You’re using a fast, optimized, and clean coded WordPress theme
If you tick these two boxes, you may proceed to the WordPress optimization using various Plugins and explore comprehensive ways to speed up your website loading speed.
3.1 Optimize Your Site with WP Rocket
So the very first plugin we use for WordPress speed optimization is WP Rocket.
WP Rocket is one of the best WordPress cache plugins, which helps to make your website loads faster. It is a beginner-friendly tool with lots of customization to increase the performance of your website in just a few clicks.

The plugin can help you optimize;
- Optimizing the Web Page,
- Creating the Page Cache,
- Compressing the HTML, CSS, JS of website,
- Combining CSS & JS Files,
- Enabling the LazyLoad for Images and Videos,
- and many more optimization tweaks.
So now, we have understood the basics of using this plugin. Now we will show you how to optimize your website correctly using the WP-Rocket cache plugin.
If you’re using any other cache plugin, I will hardly recommend you to shift to WP-Rocket.
It is one of the easiest yet best plugin for cache, and even you don’t need to mess-up with their settings like you do with other cache plugins. Just a simple click, and you’re ready to go.
So…
How to Use WP-Rocket Effectively?
You’ll find numerous features in WP-Rocket plugin, and have you ever wondered which settings you’ve to activate on your website to make it blazing fast?
Once you installed and activated the WP-Rocket plugin in your WordPress website, Go to “Settings” > “WP Rocket” to open the configuration page.
Now, click on the “Cache” Settings to set the website cache using the WP-Rocket plugin. (It will show something like this)
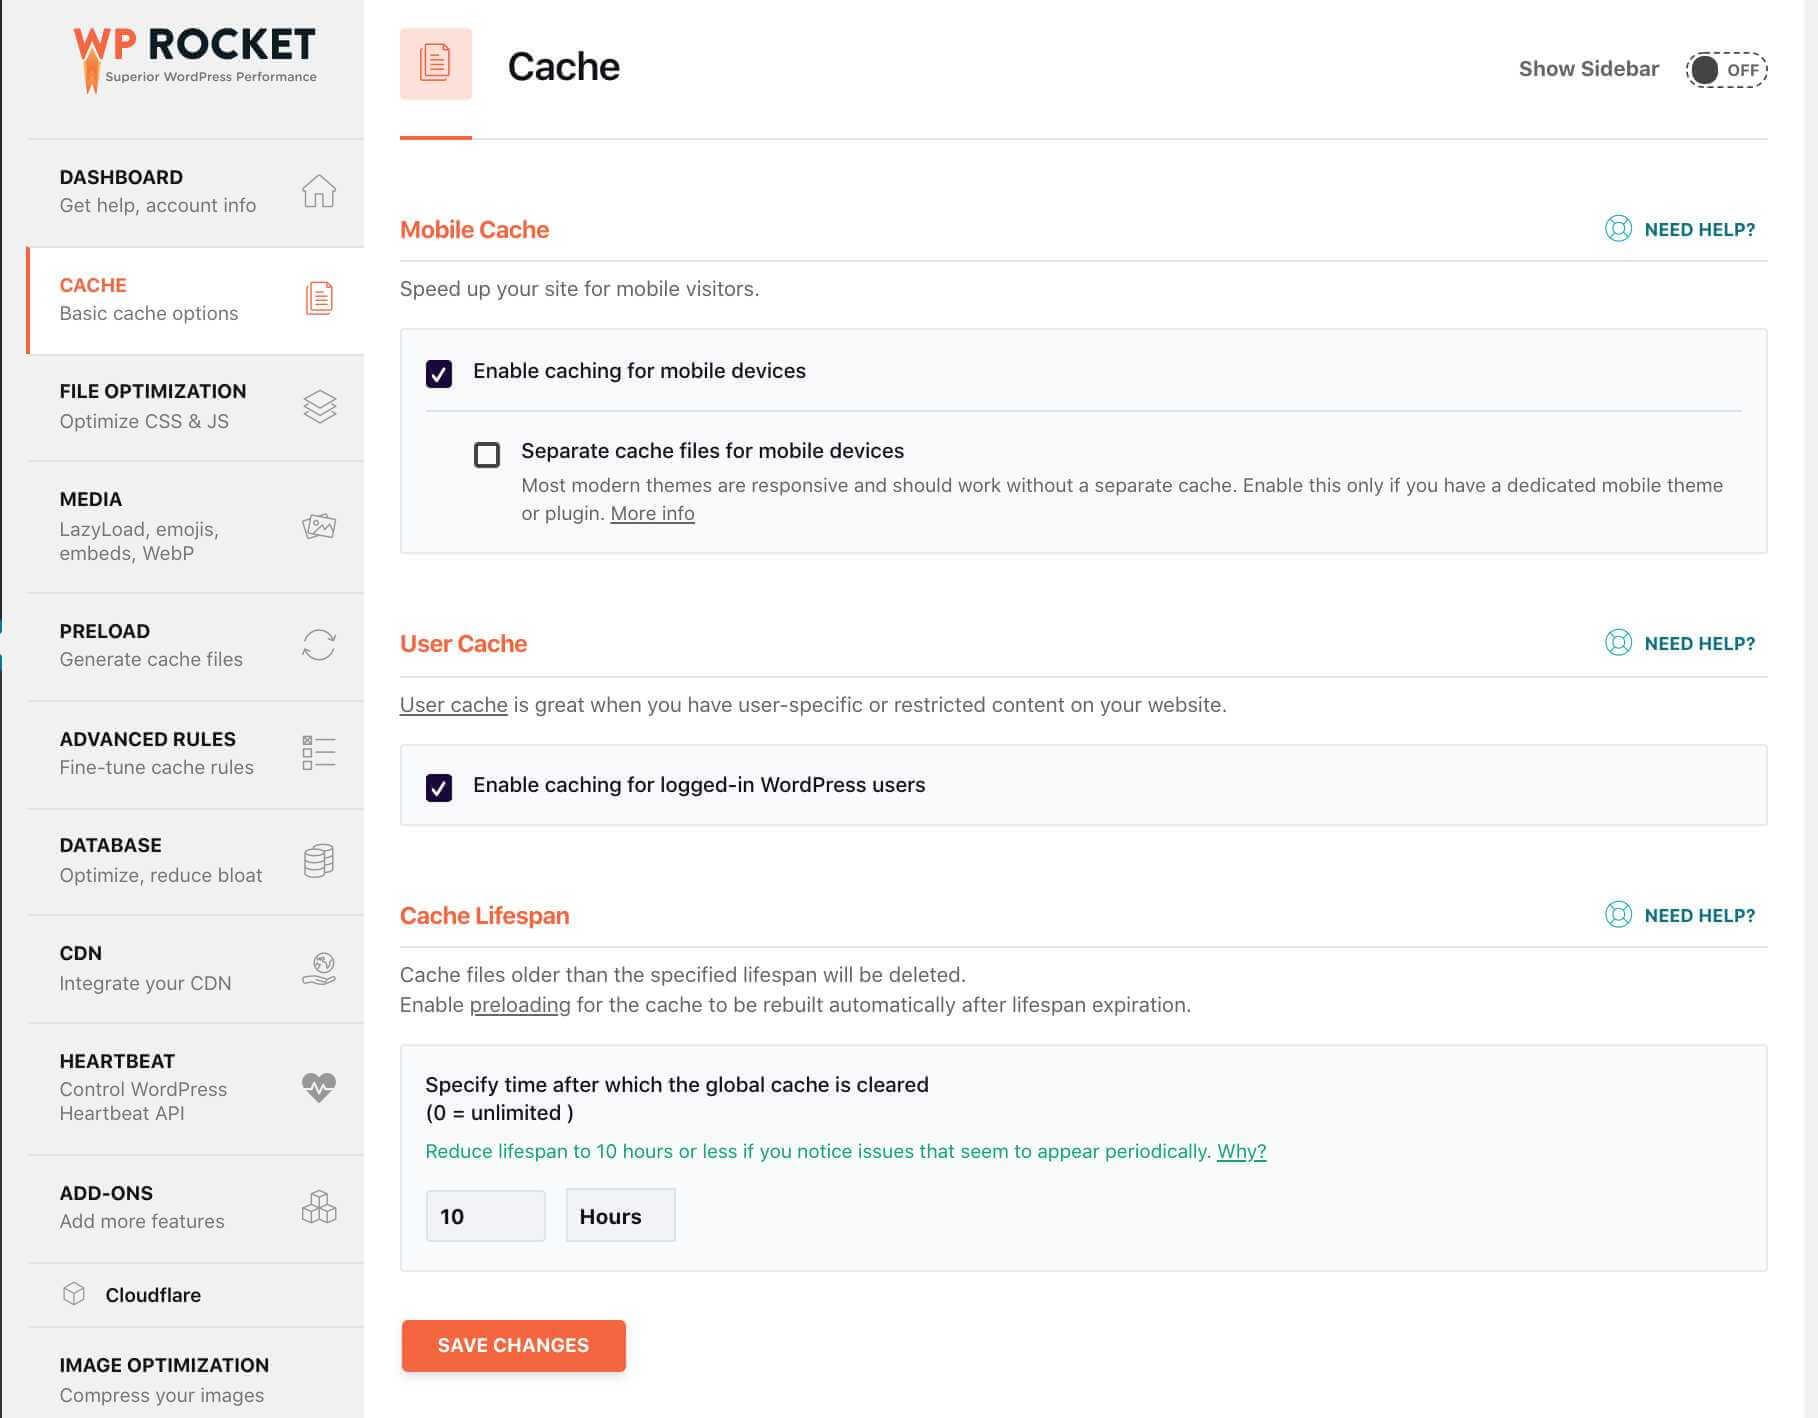
First of all, you’ve to enable the “Mobile Cache,” and if you’re setting up the cache for eCommerce, then enabled the “Logged-In User Cache” settings.
Note: Most of the modern themes support responsive design, so you don’t need to enable the “Separate Mobile Cache” option in the “Cache” page
And then set the “Cache Lifespan” to “10 hours“.
Once we have done with the cache settings, we will move to the “File Optimization” from where we can minify HTML, CSS, JS, Defer JS, and Combine CSS & JS.
These settings are one of the most important settings of WP-Rocket. It will also help you to decrease the HTTP request by combining CSS & JS of your site.
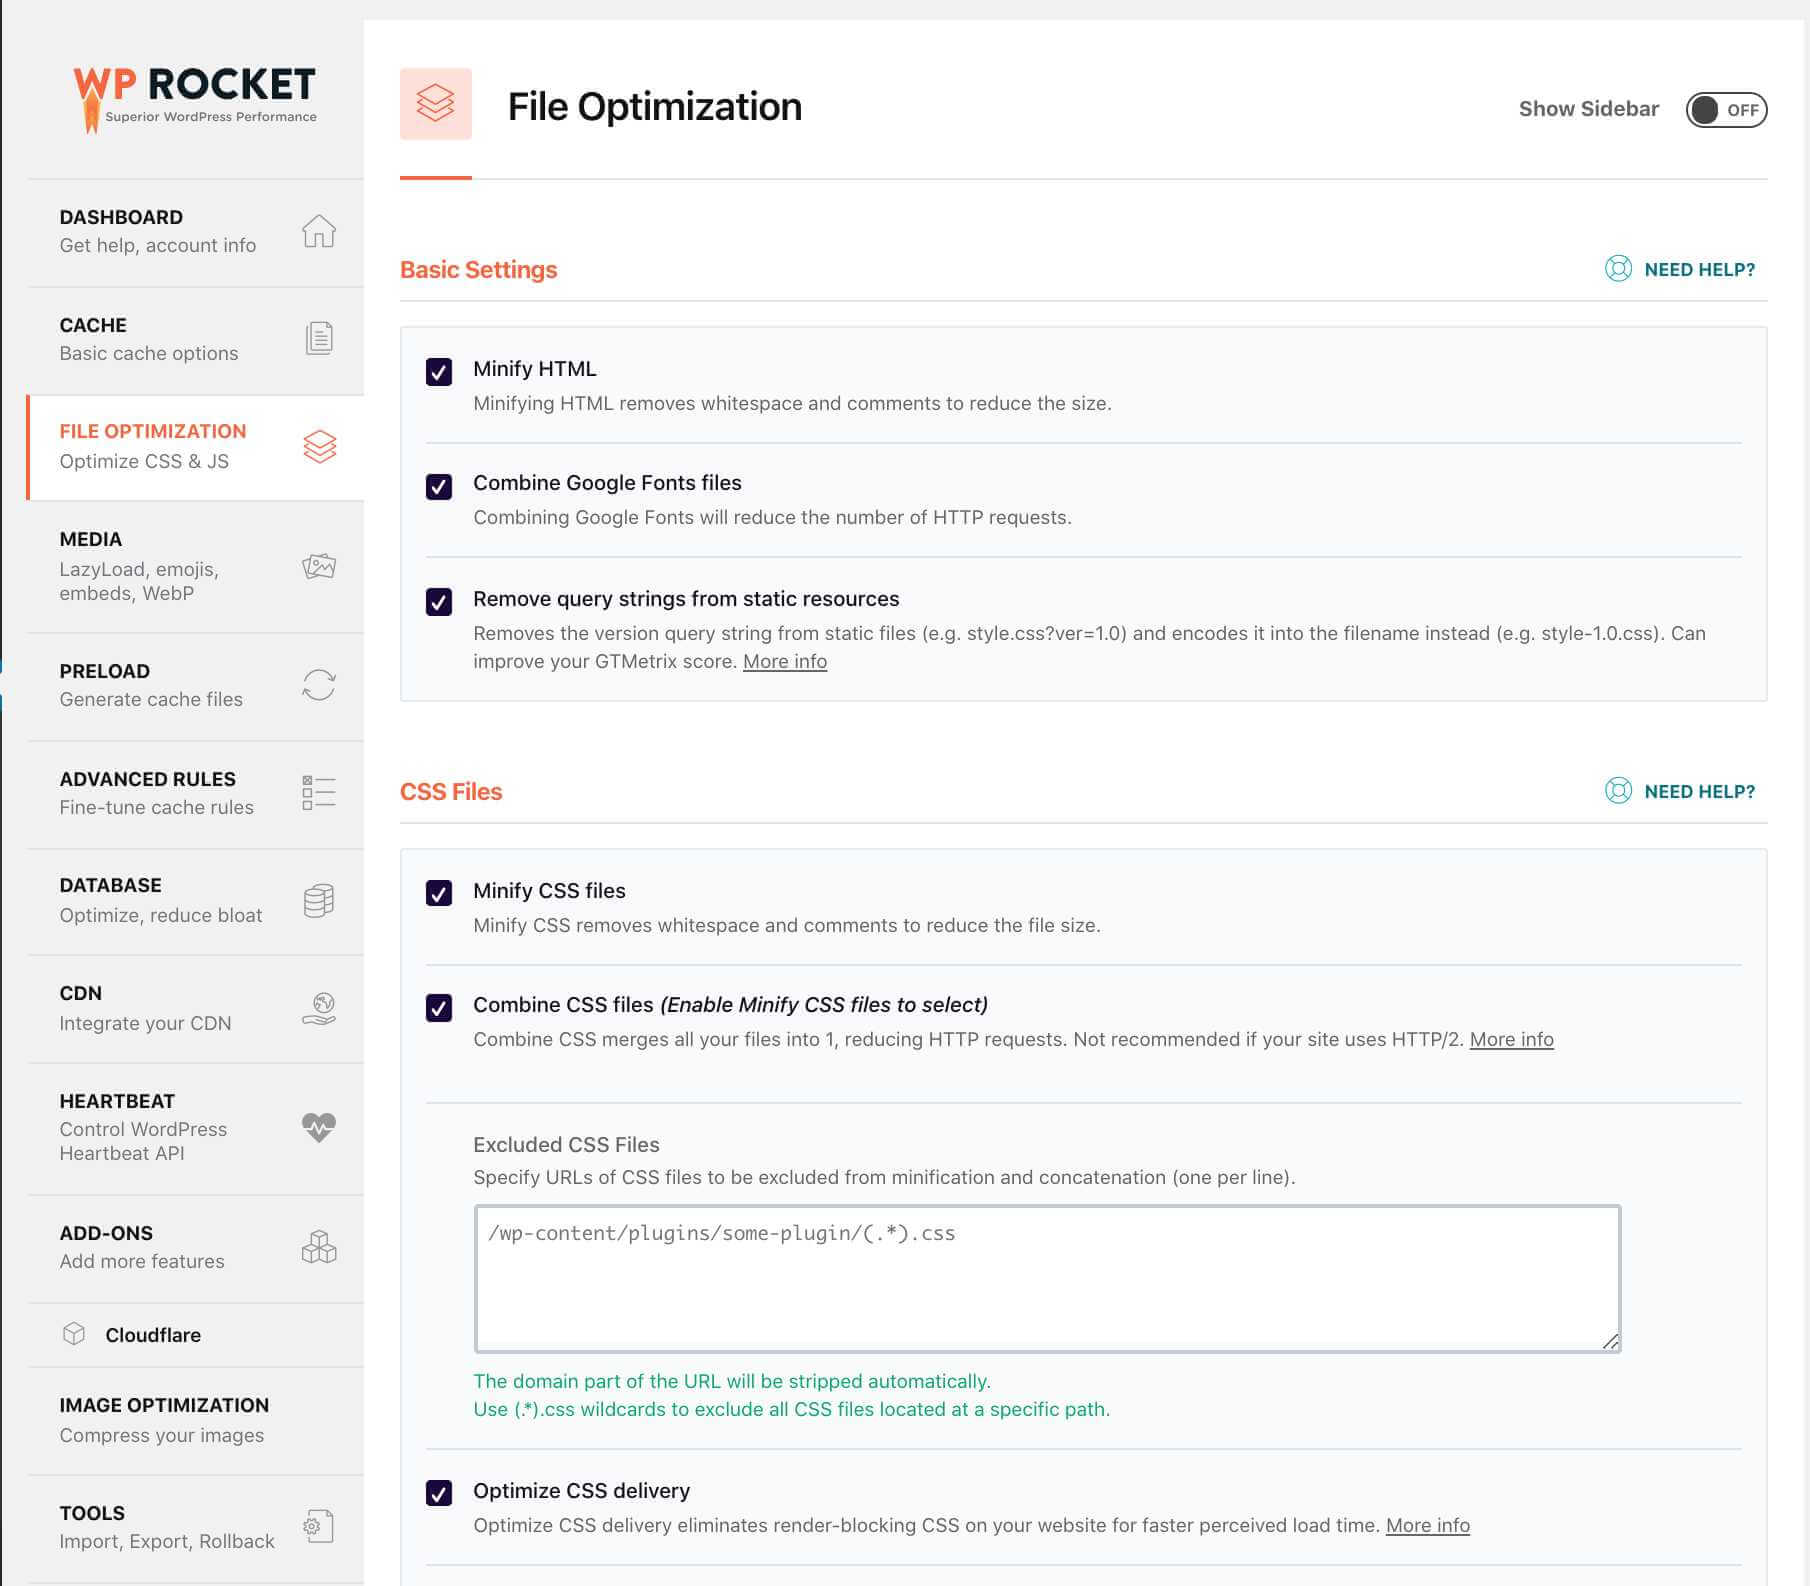
When you click on the “File Optimization” part, you’ll get various options to minify HTML, CSS, JS and to combine them in fewer files.
And in the “Basic Settings,” check all the three options to “Minify HTML,” “Combine Google Font Files,” “Remove Query Strings.” It will not affect your website – But when you activate the “CSS Files” & the “JS Files” settings, make sure it won’t break your site.
Sometimes these settings can break your front-end design, and if it ever breaks your theme design, uncheck those boxes, and it will fix your website.
Now check the “Minify CSS,” “Combine CSS,” & “Optimize CSS Delivery” option in CSS Files to minify your CSS and combining them into fewer files. It will also fix the “eliminates render-blocking CSS” issue on your website.
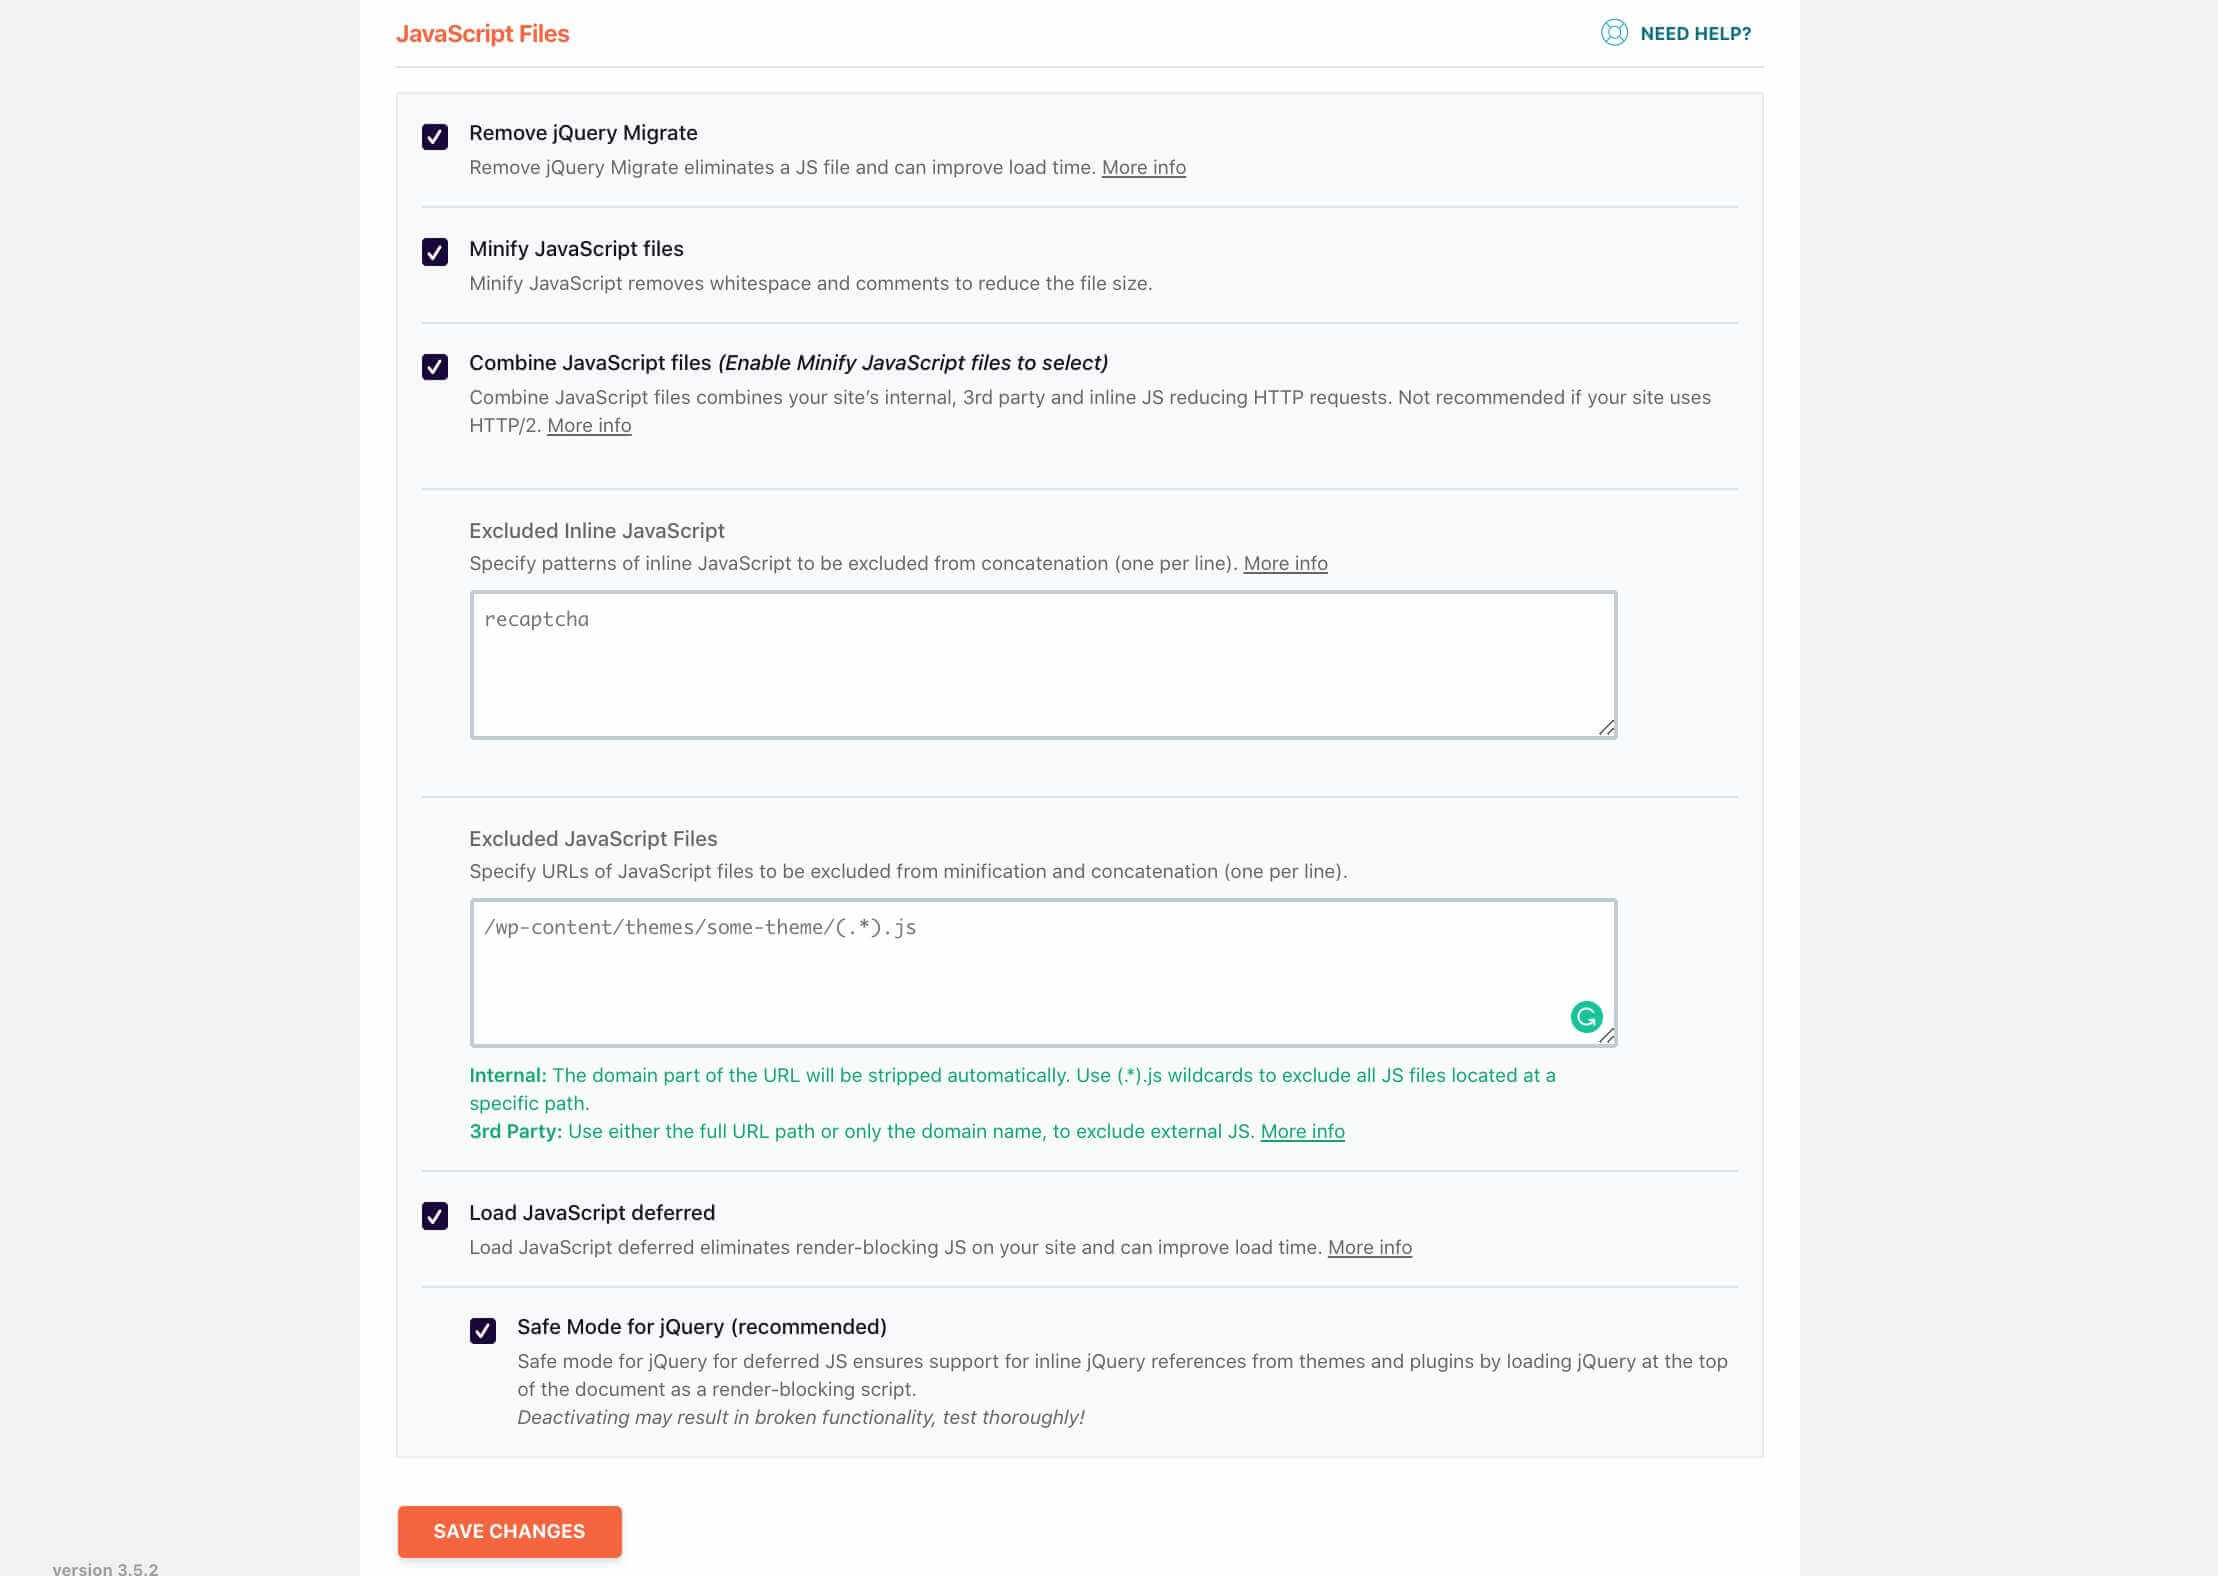
Similarly, in the JS Files section, click on the “Remove JQuery Migrate,” “Minify JS,” “Combine JavaScript Files,” “Load JavaScript Deferred” and then enable the “Safe Mode for JQuery” under the JS deferred section.
Once you have done these settings in File Optimization, please clear the cache and ensure if it wouldn’t destroy your site by visiting the homepage or any page of your website.
If these settings break the overall look of your site, then I would recommend you to disable these settings and once check if your server and theme is compatible with WP-Rocket plugin.
After the File Optimization settings, you will get the settings to manage Lazy loading & Media. Click on the Media option to make changes in media settings;
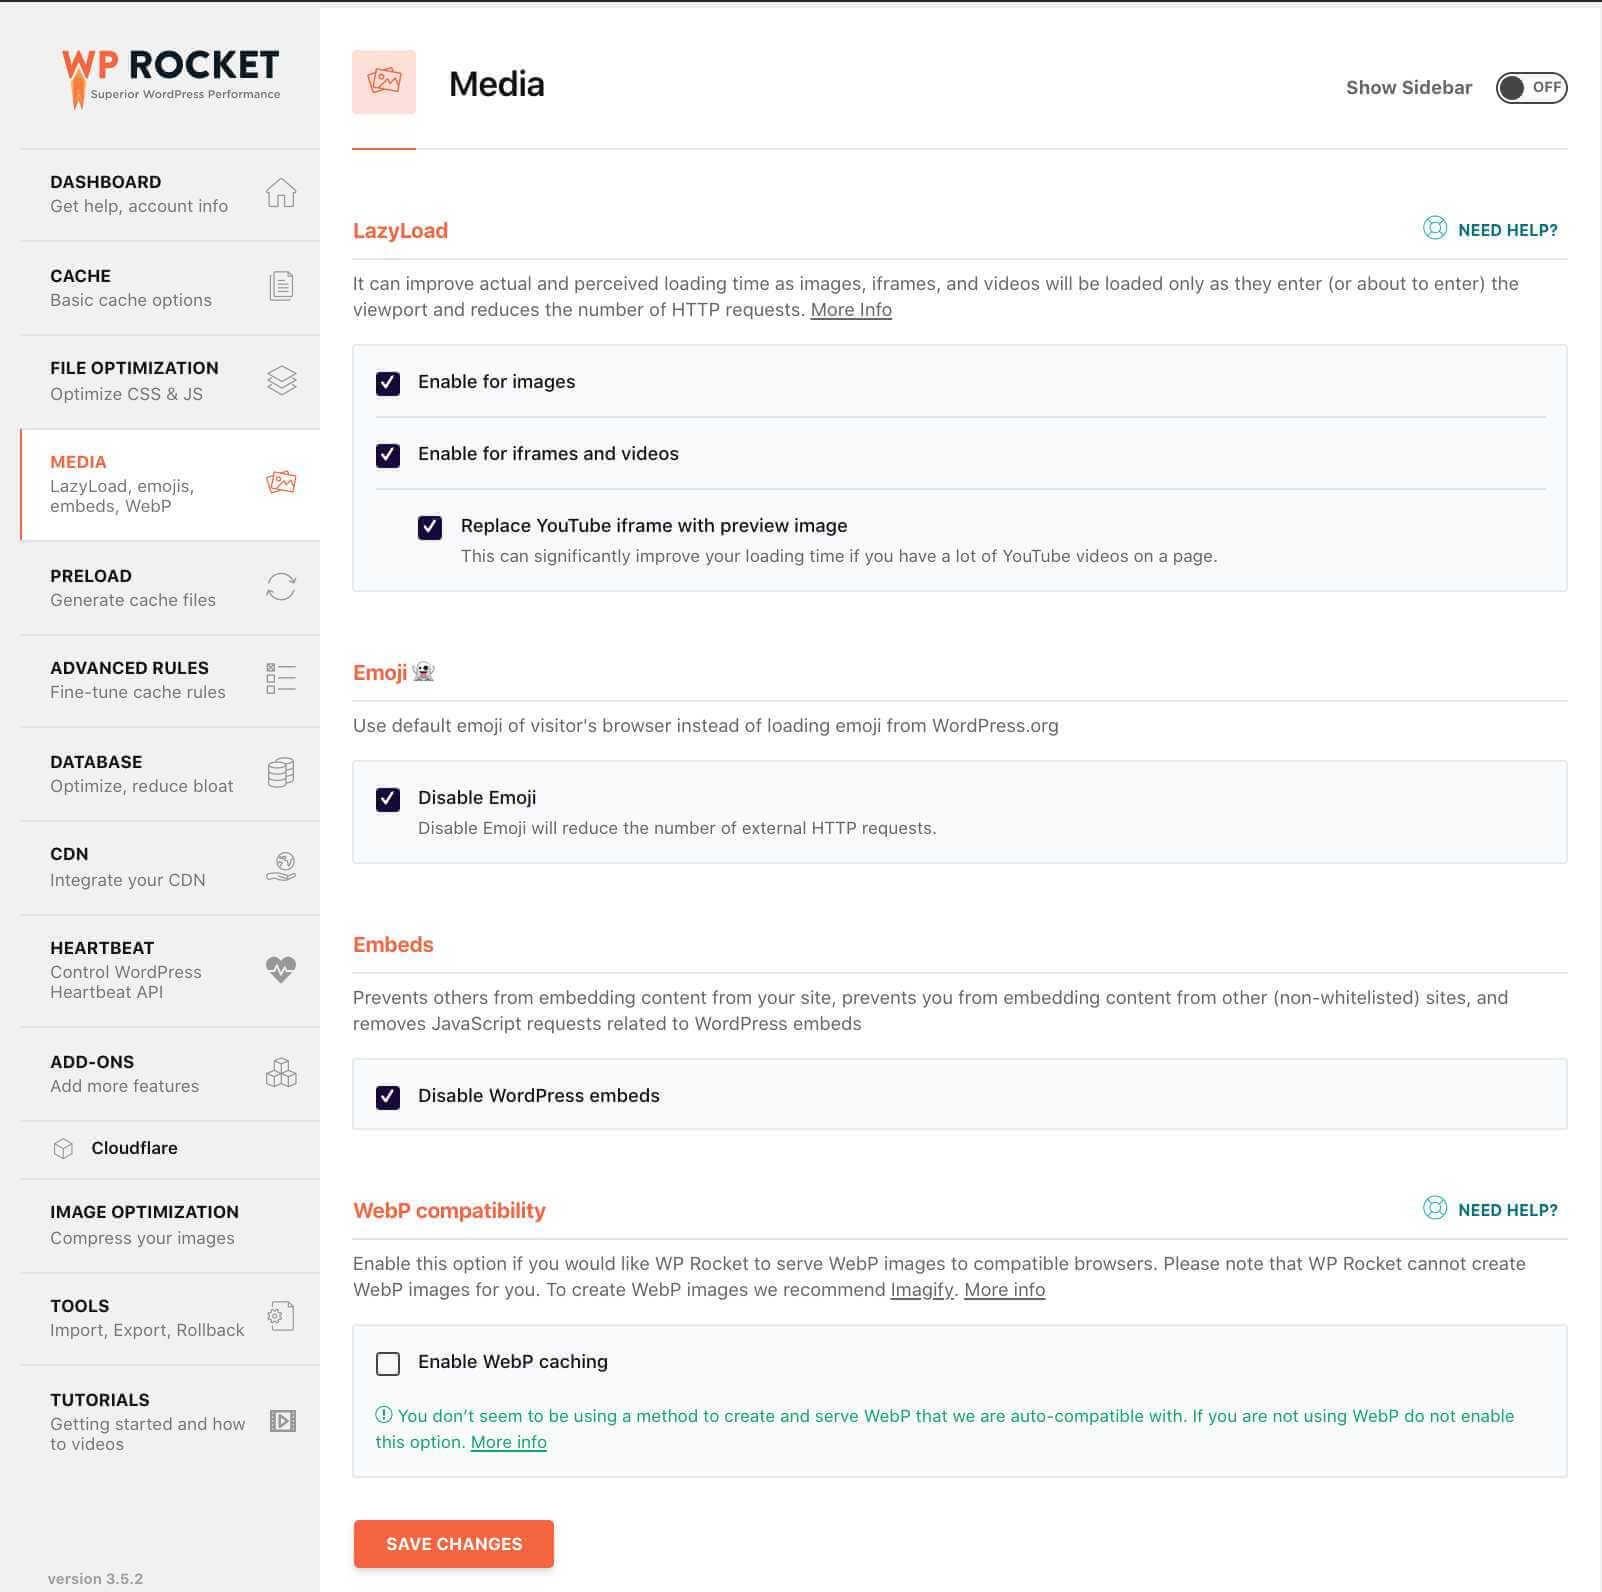
Here in this option, you’ll get an option to enable lazyload on images & videos, and you’ll also get an option to disable embeds, emojis and enable WebP compatibility.
I will suggest you to enable the Lazyload settings for images, iframe & videos. You can also replace the YouTube videos or iframes into images (trust me, it will make your website blazing fast).
You’ll also get an option to disable emojis & embeds, mostly these are of no use to us, and by disabling the embeds, you’ll save your website resources, so I recommend you to enable these settings.
As you can see in the image above, that I’m not using WebP caching, and if you’re using the WebP images on your website, you can enable it for better media caching. You can learn more about WebP here.
After the Media settings, you’ll get an option to enable Preload on your website.
Why is cash preloading essential for improving the performance of your site?
Preloading ensures your visitors get the speedier, cached versions of your site right away. WP Rocket automatically takes care of this, and your homepage and all the links found on it will be preloaded
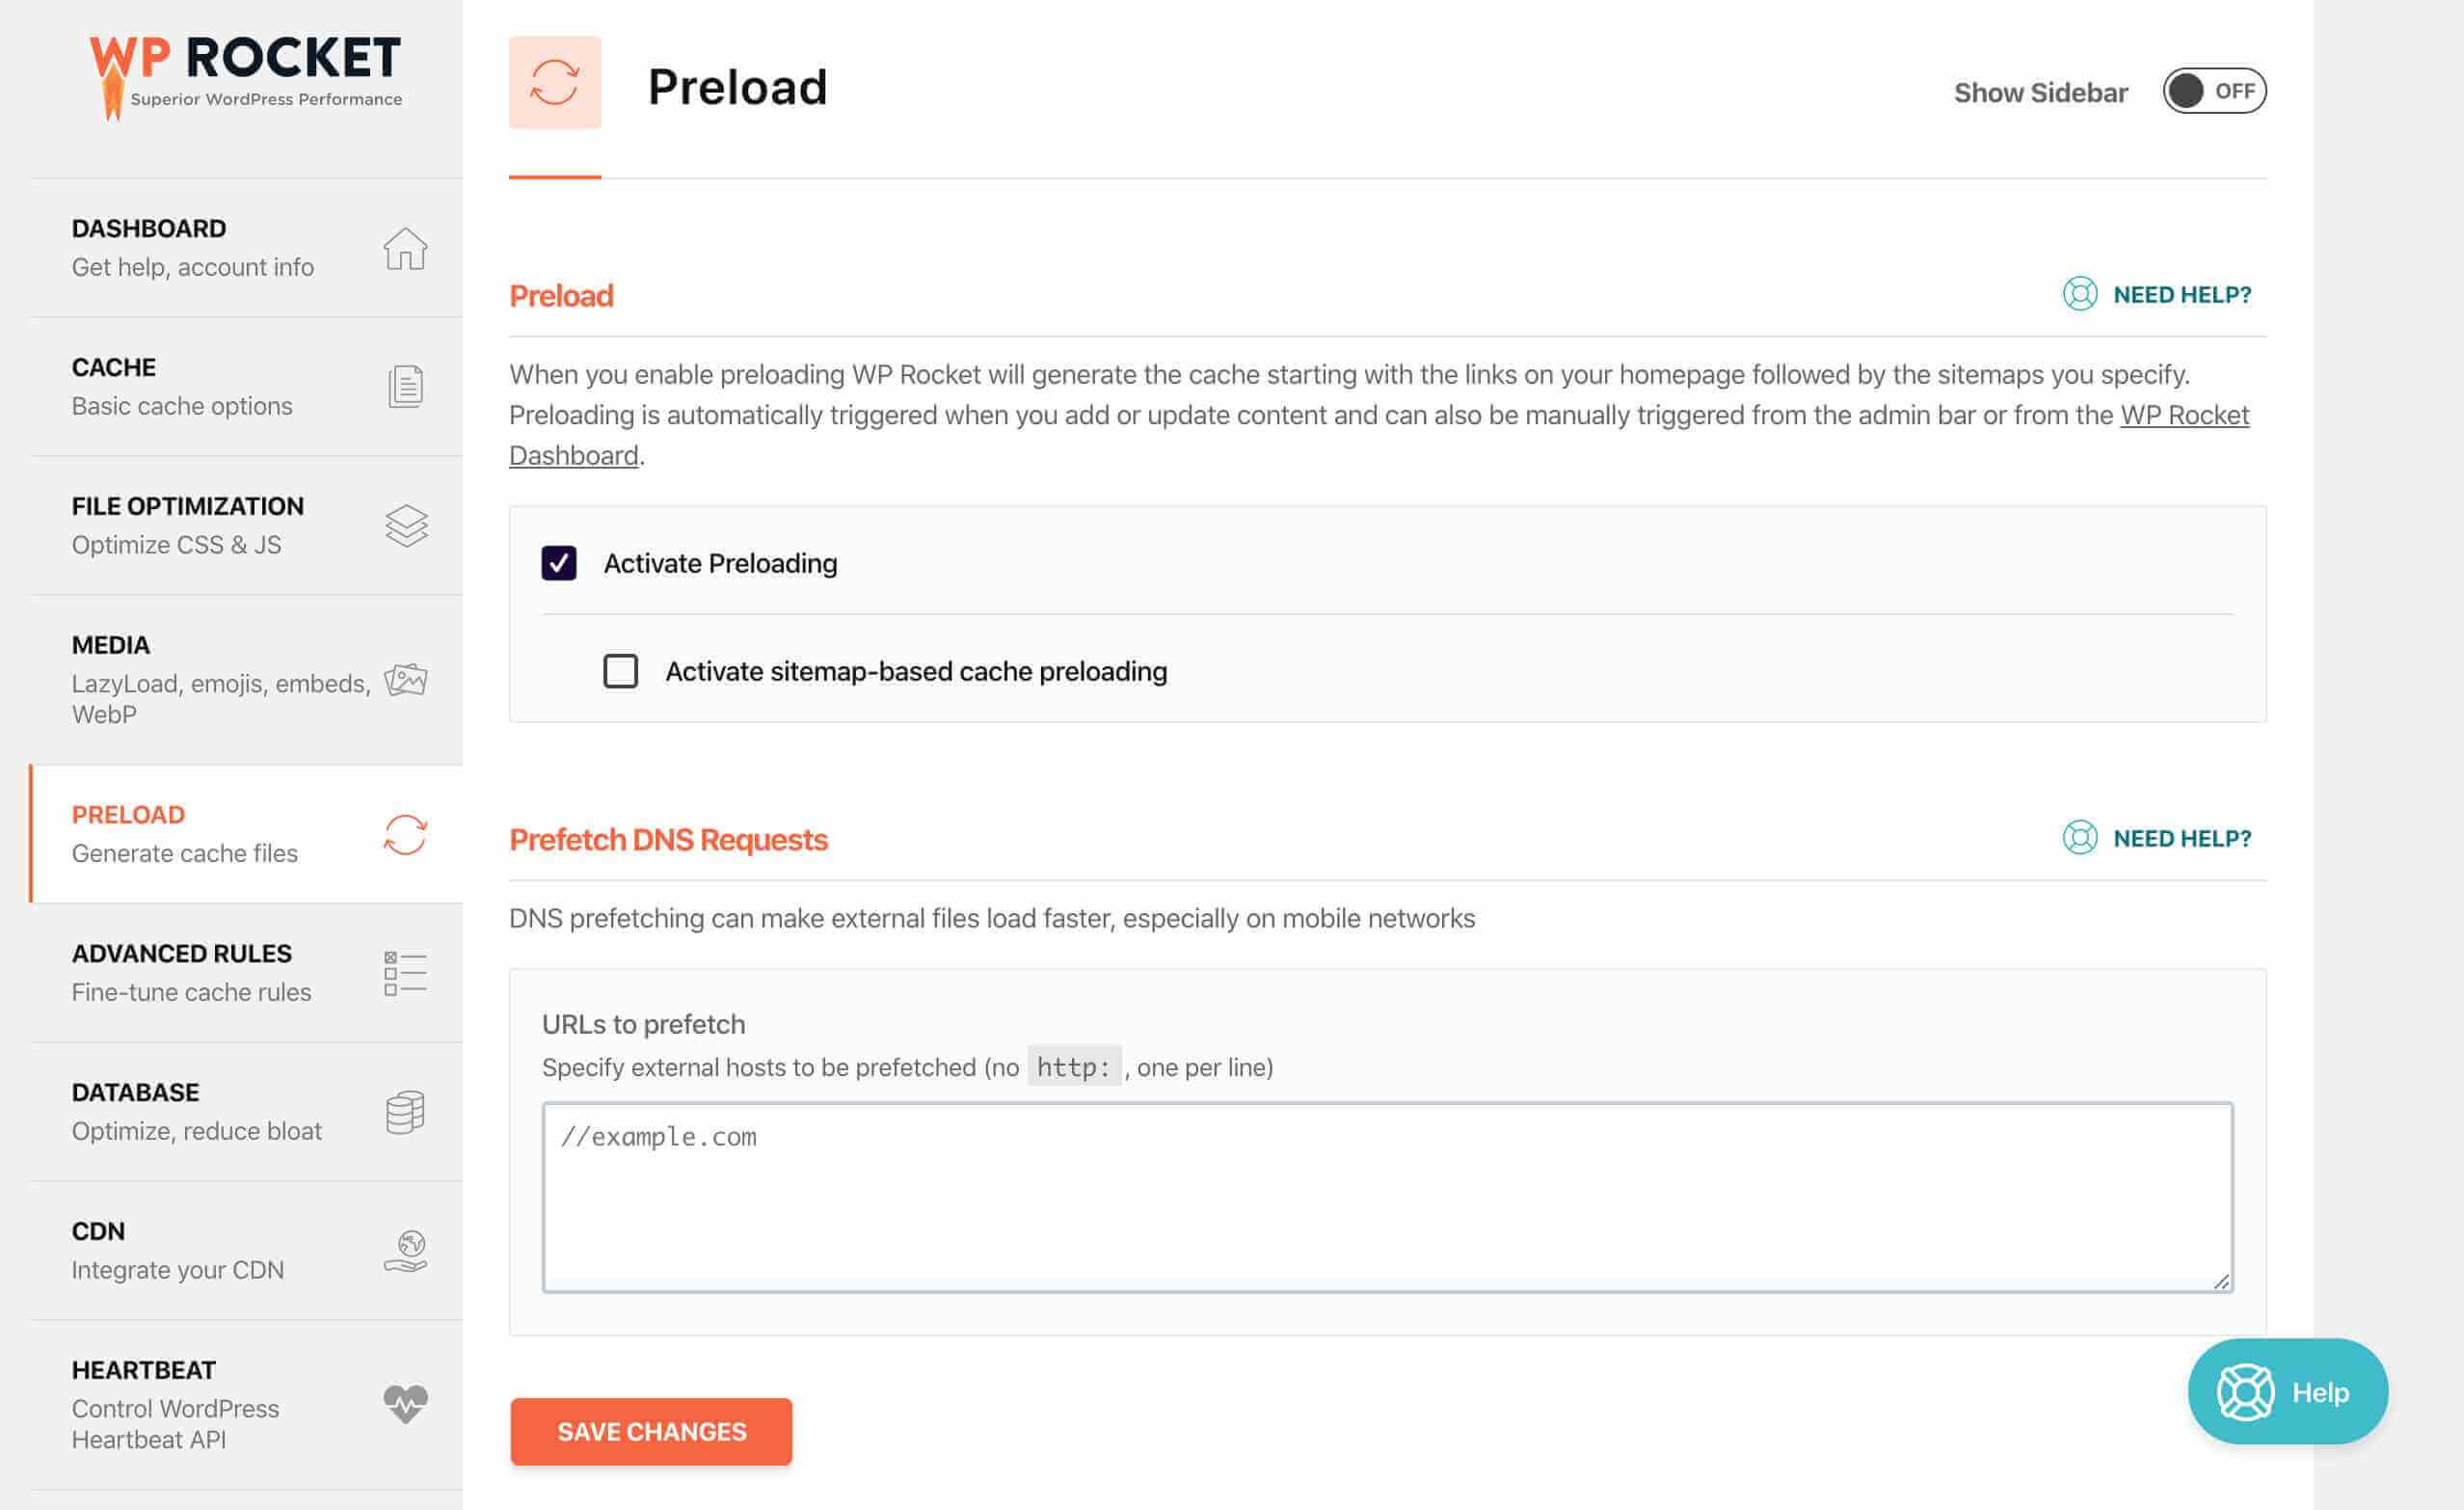
If the preloading is slow and it doesn’t finish at all, then there are two possible reasons. Make sure to check the PHP execution time & corn job settings to fix this issue.
Once you did the Preload settings, you’ll get an option to configure Advance Settings. From the Advanced Settings, you can easily manage a few settings that can include disabling the cache for custom URL, or custom cookies, User-Agent, and to purge the desired URL.
After this, you’ll get an option to manage Database Optimization & CDN, but we will skip this setting here. And we use the WP-Optimize plugin for optimizing the database efficiently, and we’ll show you how to implement CDN later in the CDN section.
And again, after these settings, you’ll get an option to manage the WordPress Heartbeat API. Basically, WordPress Heartbeat API provides a connection for real-time data transfer and syncing between the server and the browser.
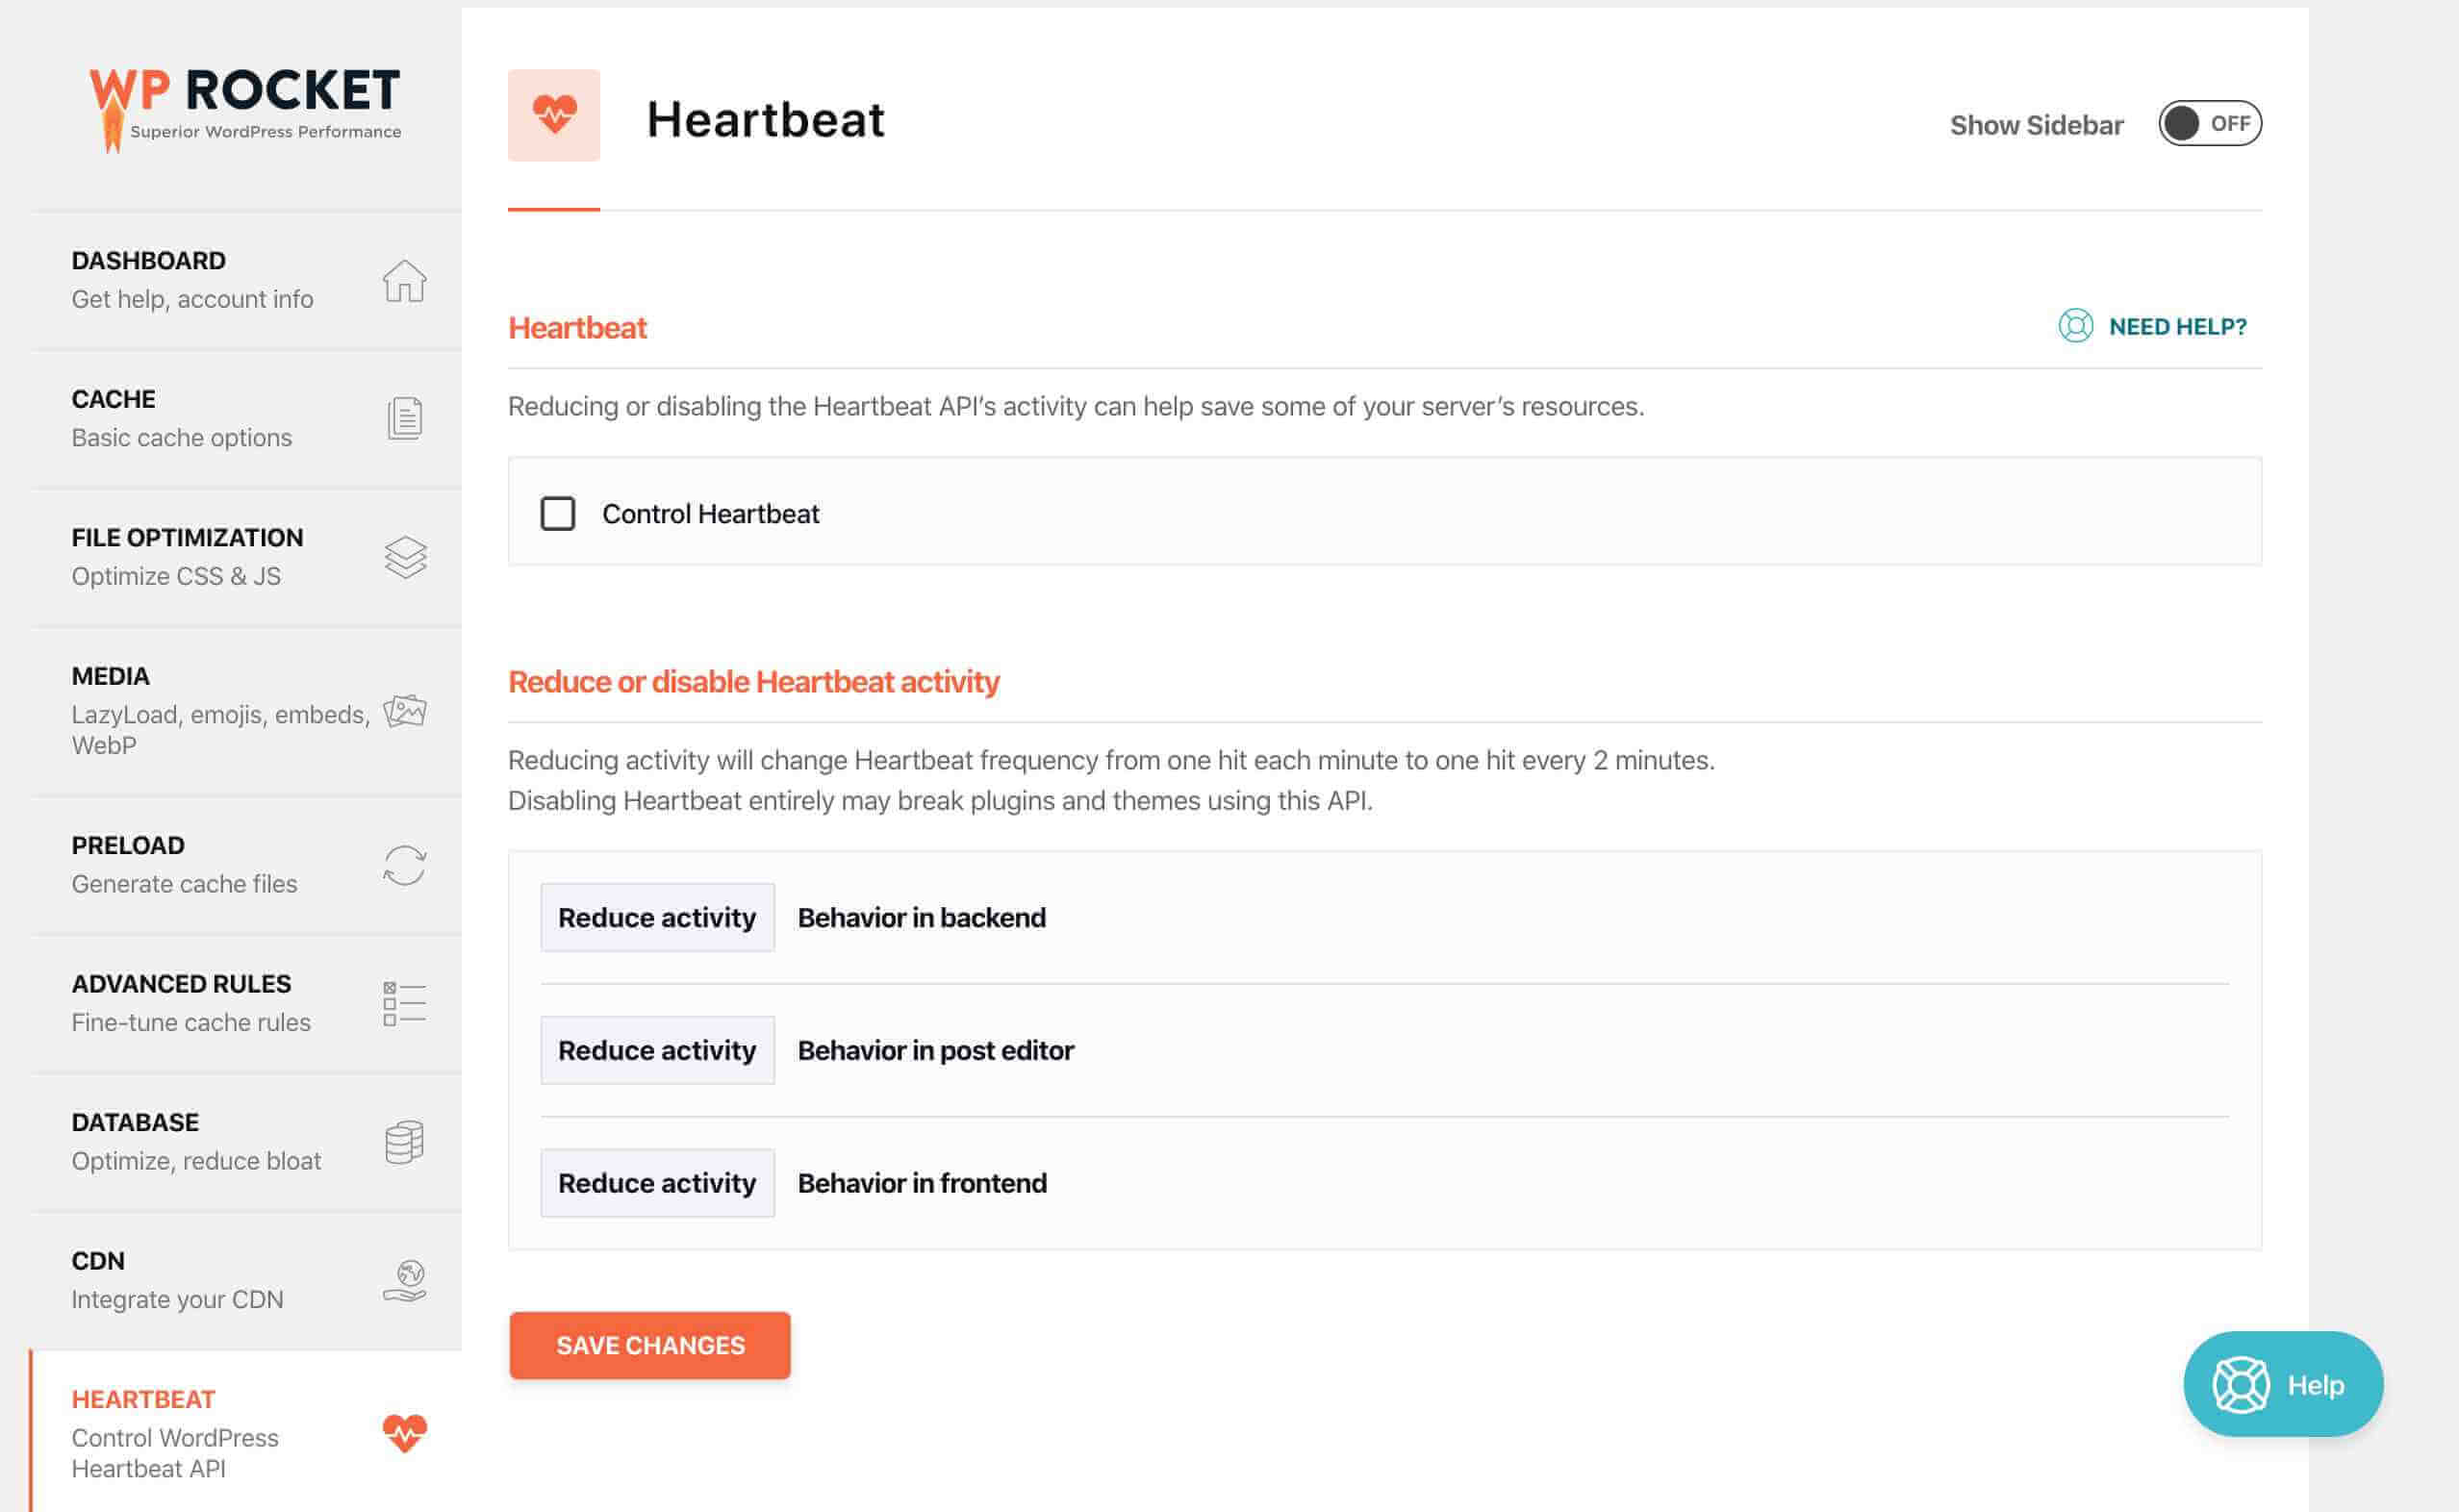
Still not able to understand the heartbeat settings? Here I’m sharing few examples were heartbeat settings are involved;
- Autosaves & Revisions in WordPress Editor,
- Post Locking – When one editor works on a particular post, it disabled the post-editing for other authors.
If you’re using a server with low resources, you can disable it to save your resources, but for small websites, it isn’t a major issue.
And now the last, but not the least setting in WP-Rocket plugin, is their add-ons settings. If you’re using Facebook Pixel & Google Analytics on your website, it will help you to store them locally on your server to optimize the site speed.
You can simply enable it to improve the Leverage browser caching issue on your website.
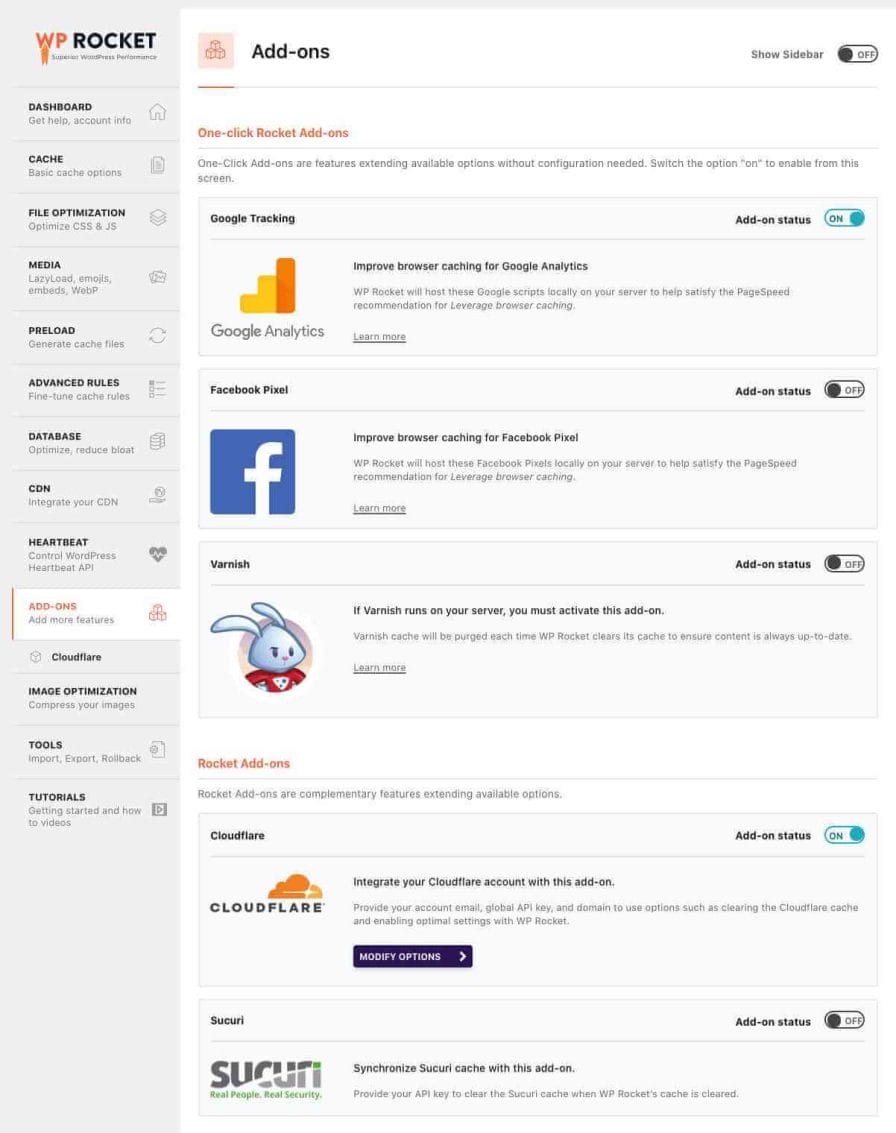
Another great add-on can include integrating your website with Cloudflare & Sucuri right from the WP-rocket dashboard. It will help you to clear and purge the cache on these CDN providers whenever you purge something on your website.
Trust me; these are one of the best settings that will make your website really fast. If you want to make your website loads fast, I will suggest you to enable these settings.
As of now, we have implemented a few optimizations using the WP-Rocket plugin.
Now we’ll use some other plugins like WP-Optimize for database optimization and AssetCleanUp Pro for further speed optimization.
3.2 Optimize Your Site with Asset CleanUp Pro
Once you have optimized your website using WP Rocket and check the GTmetrix & Pingdom result, you’ll see an instant improvement of page loading speed.
But we’re not done here, I already mentioned above that we’ve to optimize our website as much as we can.
So now we’ll use a few other plugins like Asset CleanUp Pro for further optimization of our website (You can also use the free version of Asset CleanUp for optimization, but I would suggest getting the paid one).
This plugin can help you to fix the Flash of Invisible Text (FOIT) issue on your website, and it also blocks the access to XML-RPC file and do a lot more things.
As we already optimized our site with WP Rocket, So the modification of HTML, CSS & JS, and few other settings are blocked, and we can’t enable them (That’s a good thing!)
But before using this plugin on “Live Site,” I’ll recommend you to go to “Asset CleanUp” and then click on the “Test Mode” to enable the test mode.
Enabling the test mode can help your visitors browse your site without any Asset CleanUp settings while you’re going through the plugin setup and unloading the useless CSS & JavaScript!
Once you enabled the test mode, now click on the Optimize CSS option and then scroll down to the Cache Dynamic Loaded CSS settings and then enable it.

Once you did, click on the Save button.

Similarly, in the Optimize JS section, enable the Cache Dynamic Loaded JavaScript.
These options will help you to cache the dynamic values of CSS & JS. Although, you’ll not get these issues in WordPress after using WP-Rocket.
Once you’ve done these settings, click on the “Site-Wide Common Unloads” settings after the “CDN” option.
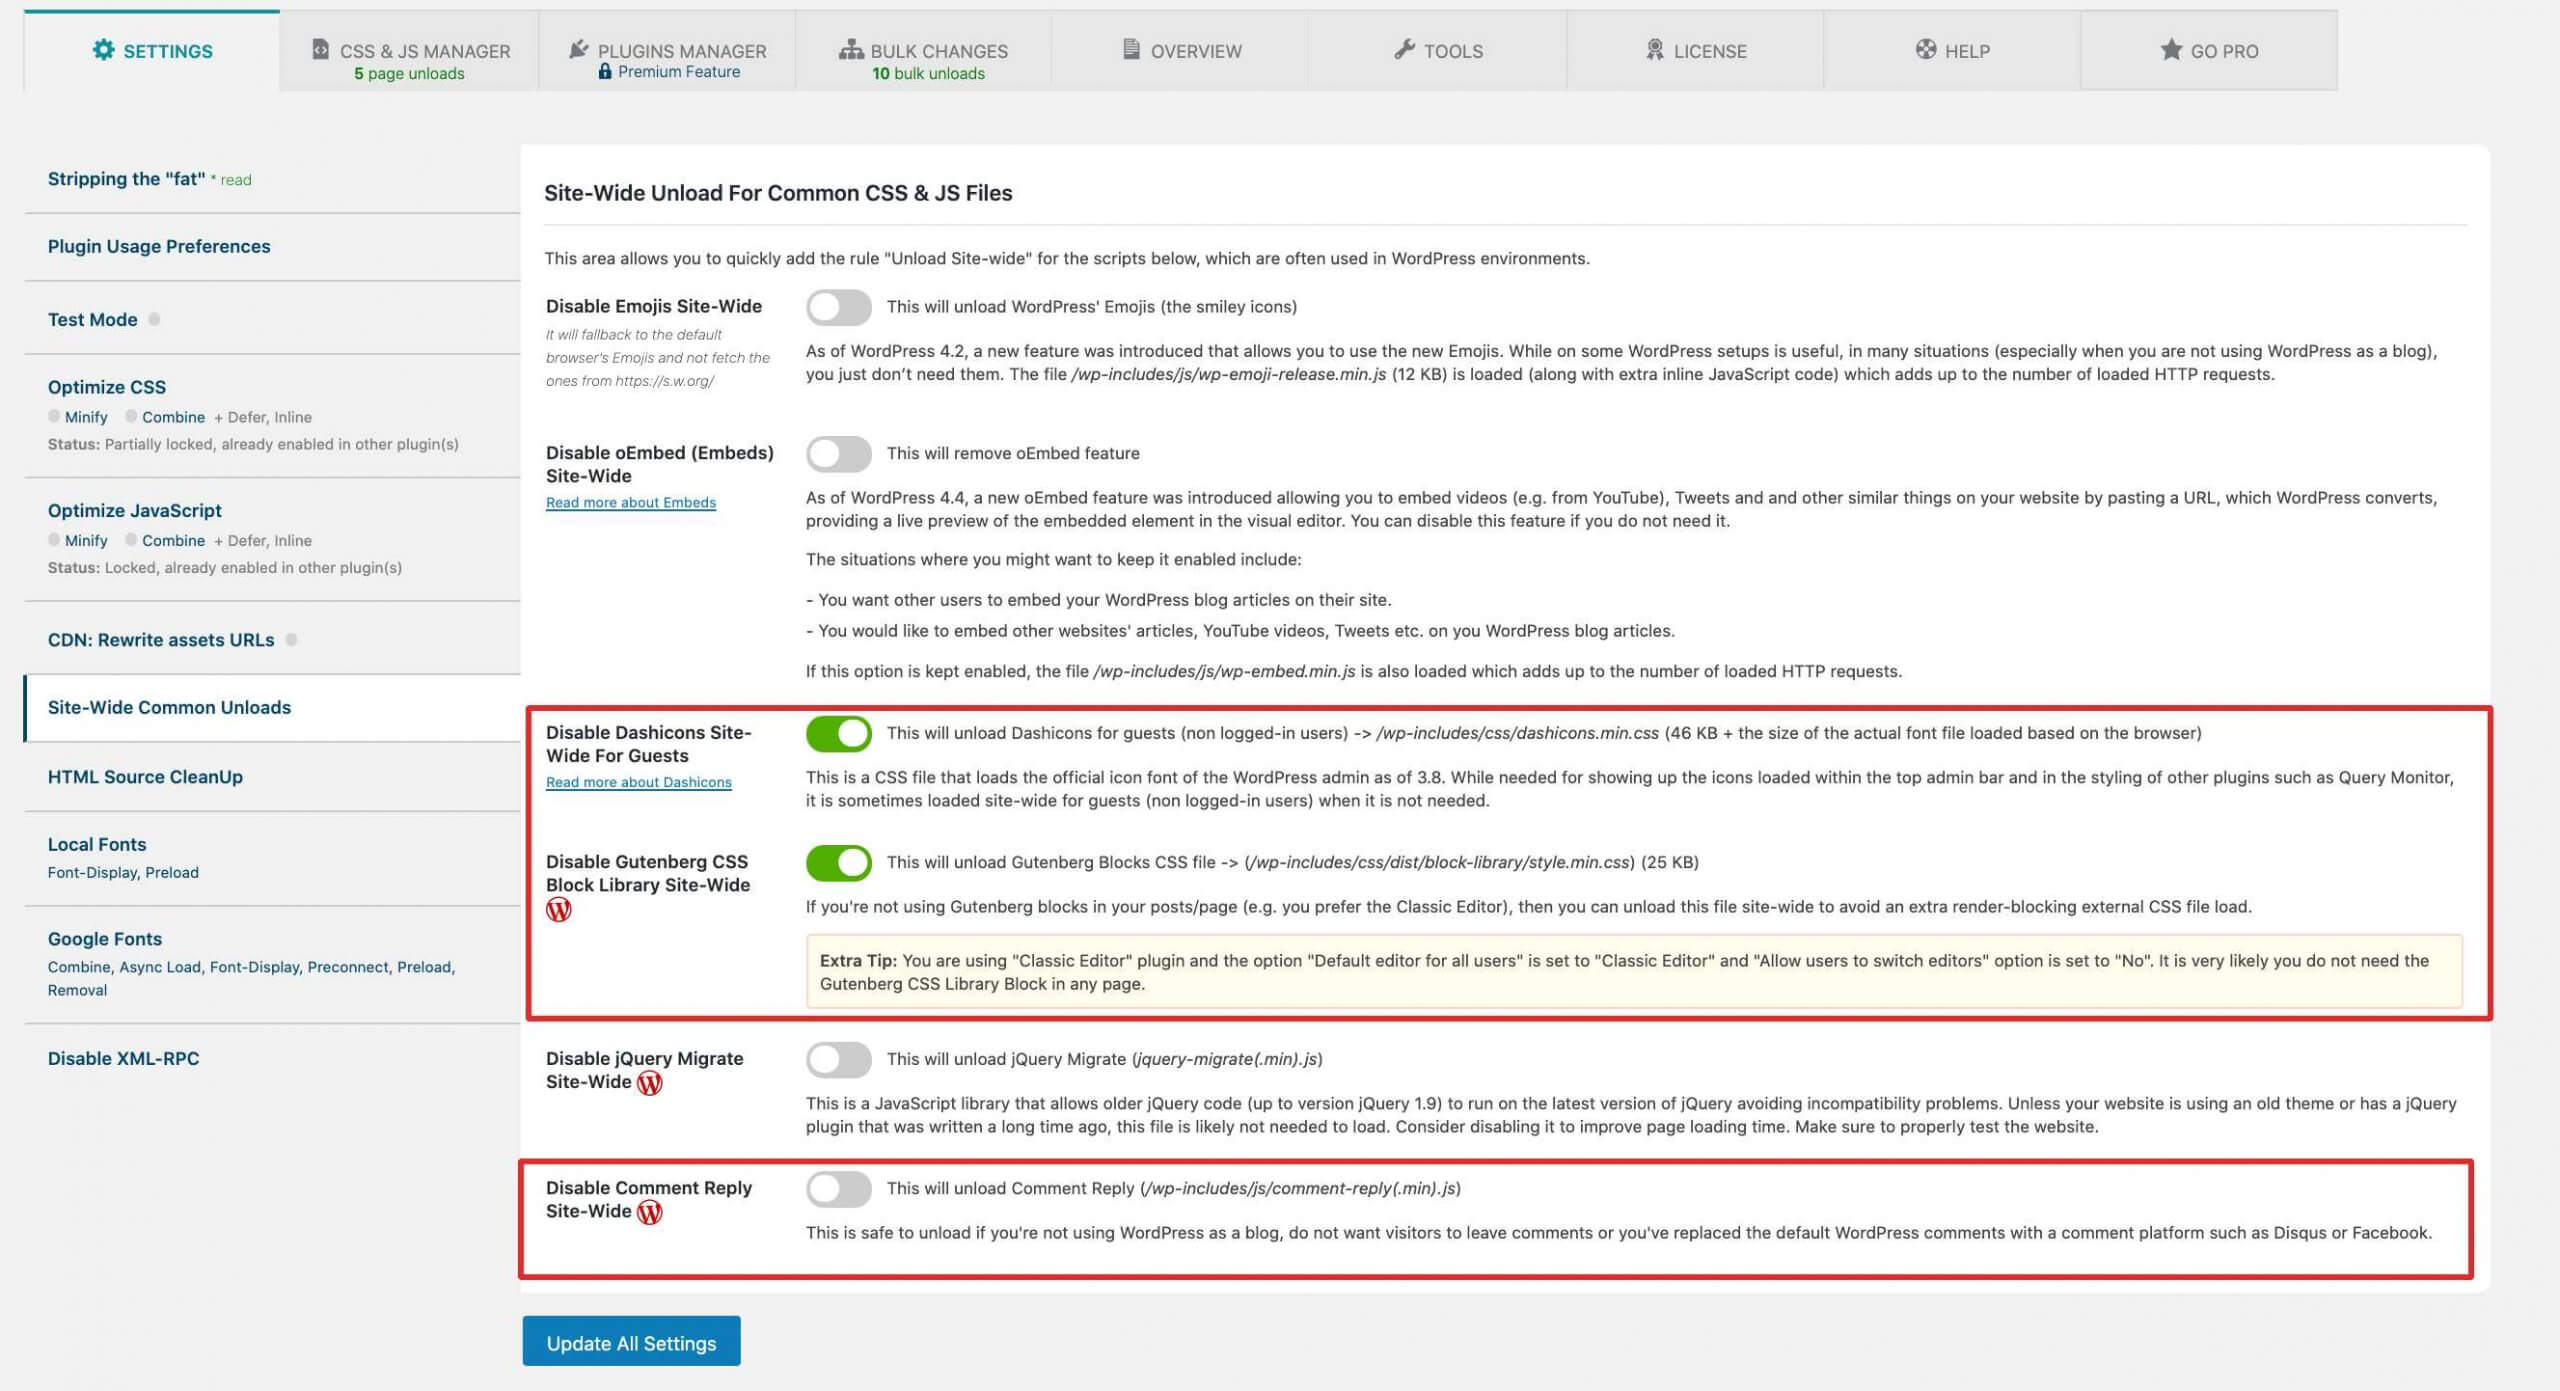
Here you’ll find some options to disable Emojis, Embeds, Dashicons, Gutenberg CSS Block Library, JQuery Migrate, and Comment Reply Site-wide.
As you can see, we have already removed the Emojis, Embeds & JQuery Migrate using WP-Rocket plugin. So to prevent over conflict, we’ll not enable these settings.
But if you’re not using Gutenberg, Dashicons icon on your blog, then you can disable them.
And if you’re not using WordPress as a blog, do not want visitors to leave comments, or you’ve replaced the default WordPress comments with a comment platform such as Disqus or Facebook, then you can also disable the “Comment Reply Site-wide” from the settings.
Now, we’ll move to the “HTML Source Cleanup” section from where we can remove unused elements from the <head> section.
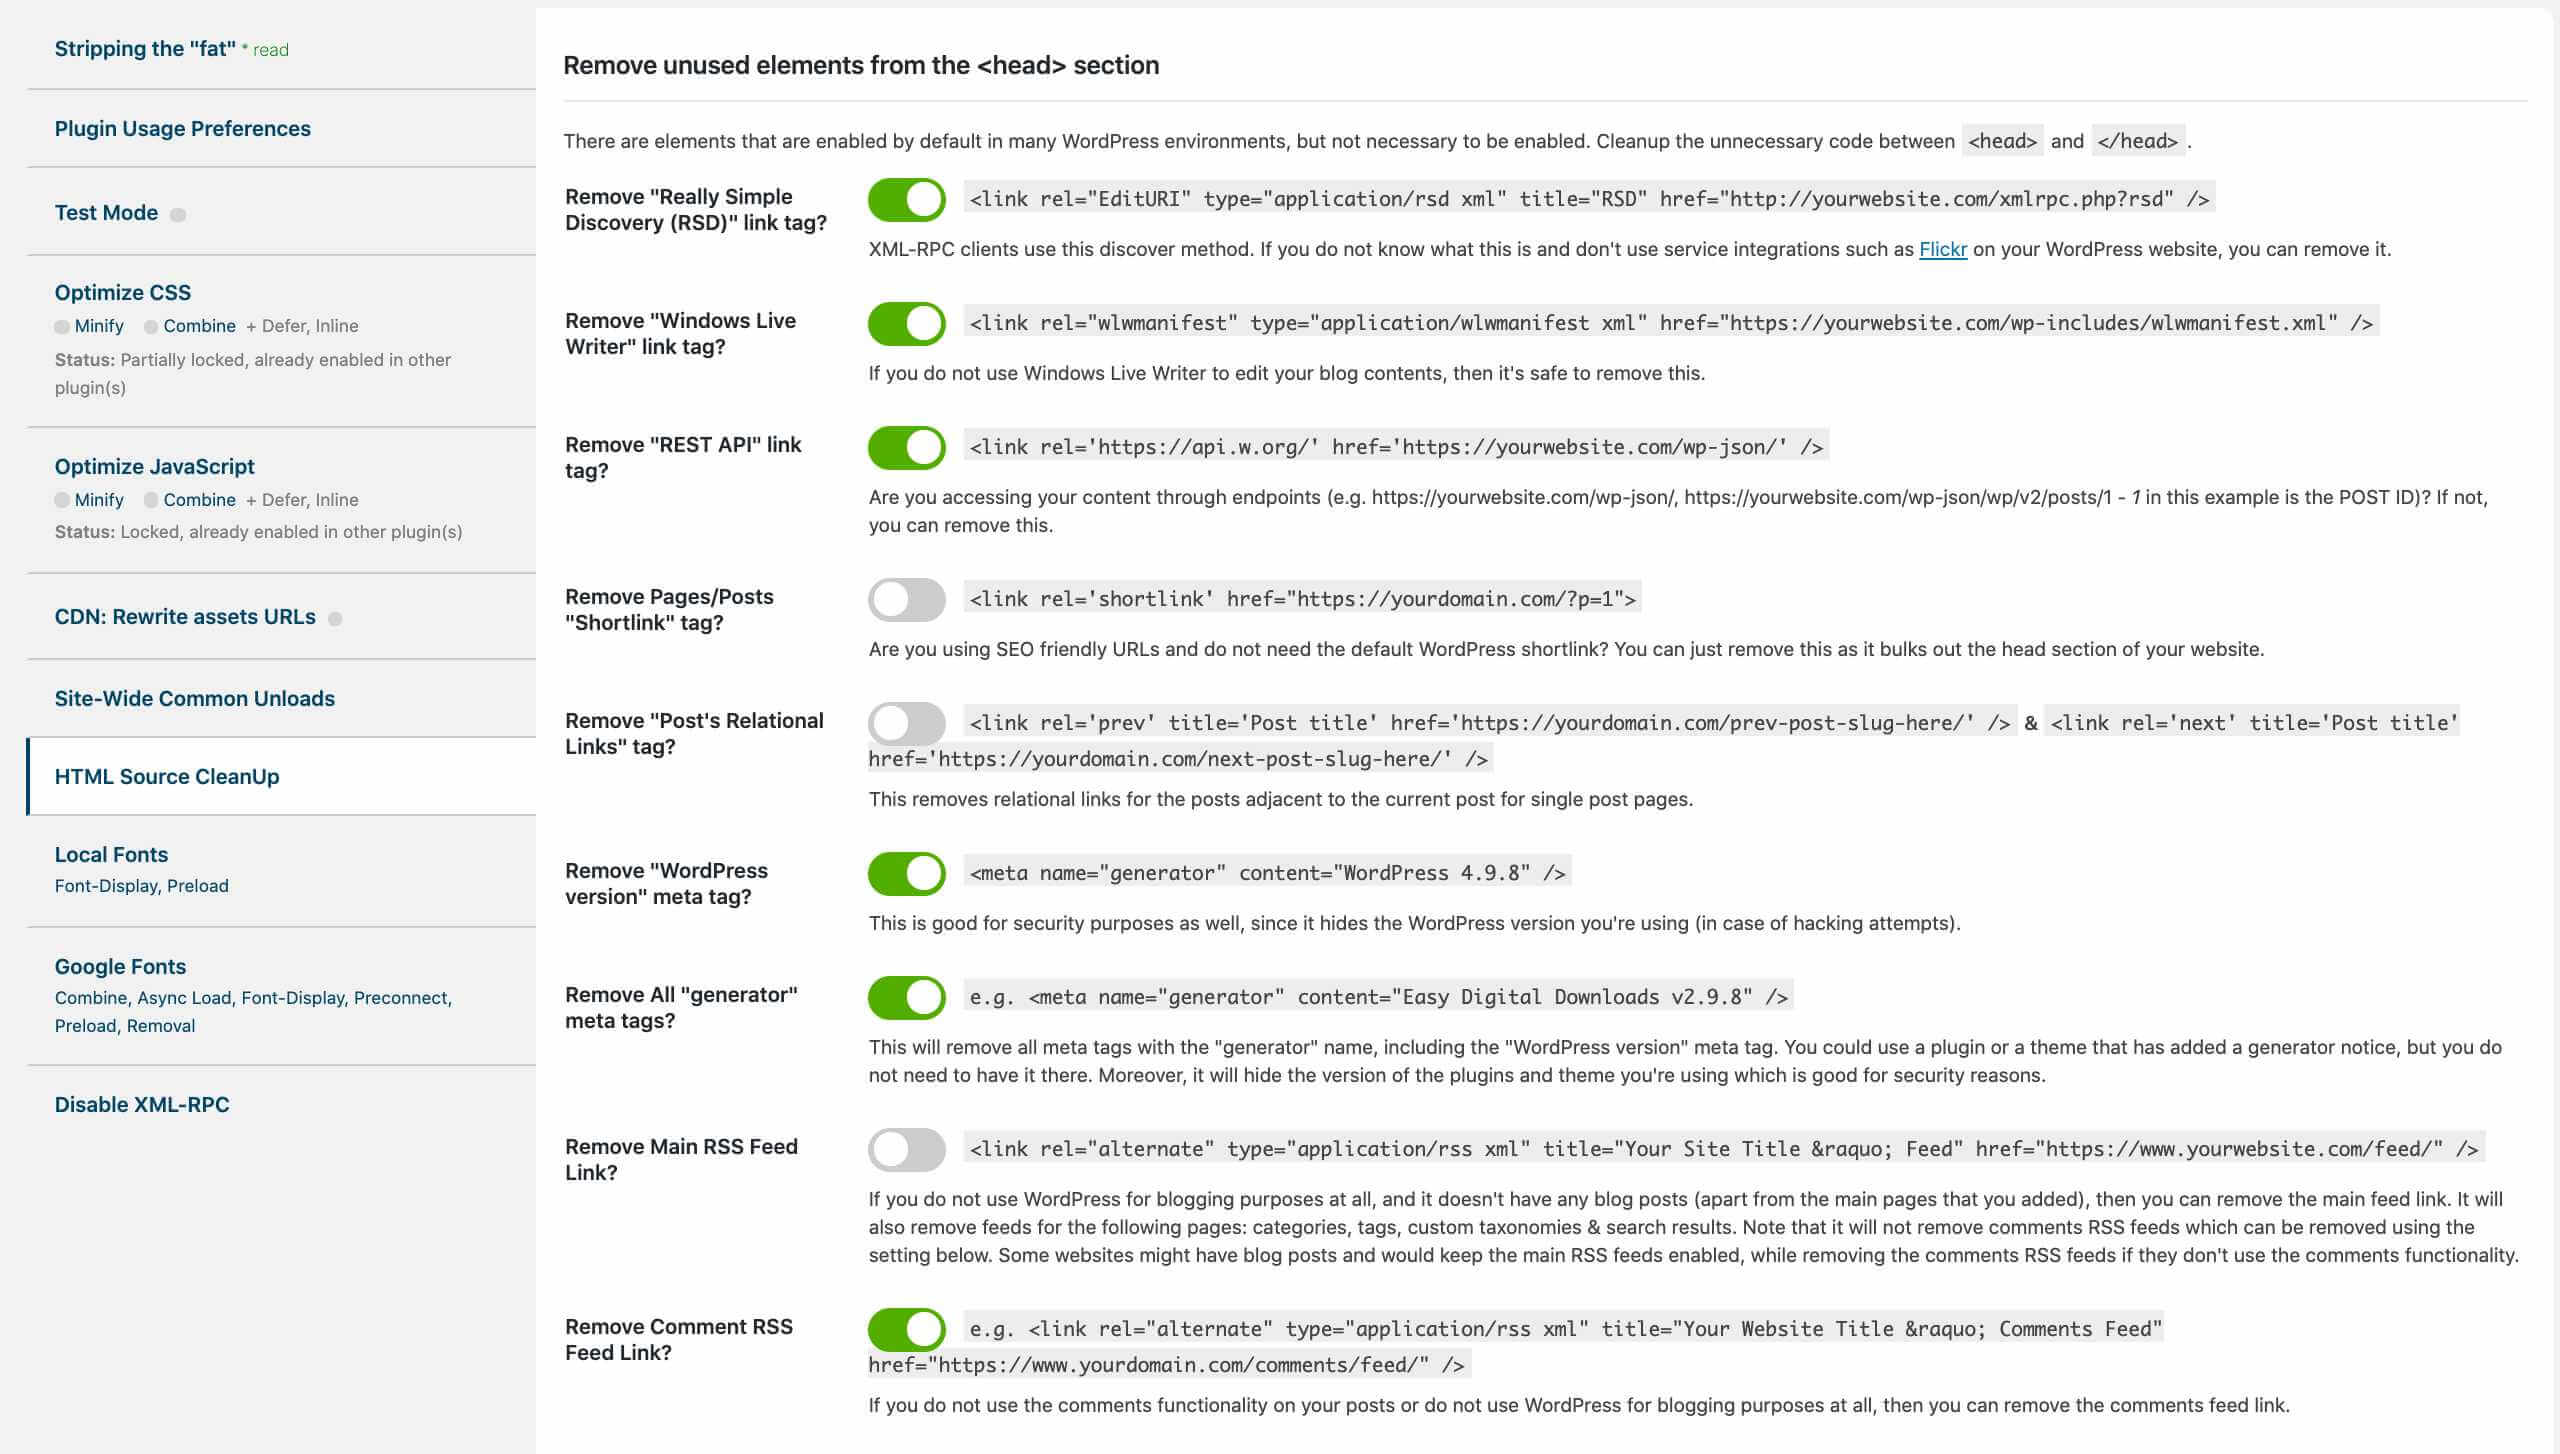
From these settings, we can remove the unwanted elements from <head> sections.
Don’t worry!
Removing these elements will not affect your site at all.
I’ve removed several options from these settings, including Comment RSS, Meta Generator Tags, WordPress Version tags, REST API & RSD Links.
You can remove these settings from your website, and it will not harm your website. You can also remove the RSS feed link only if you’re not using it.
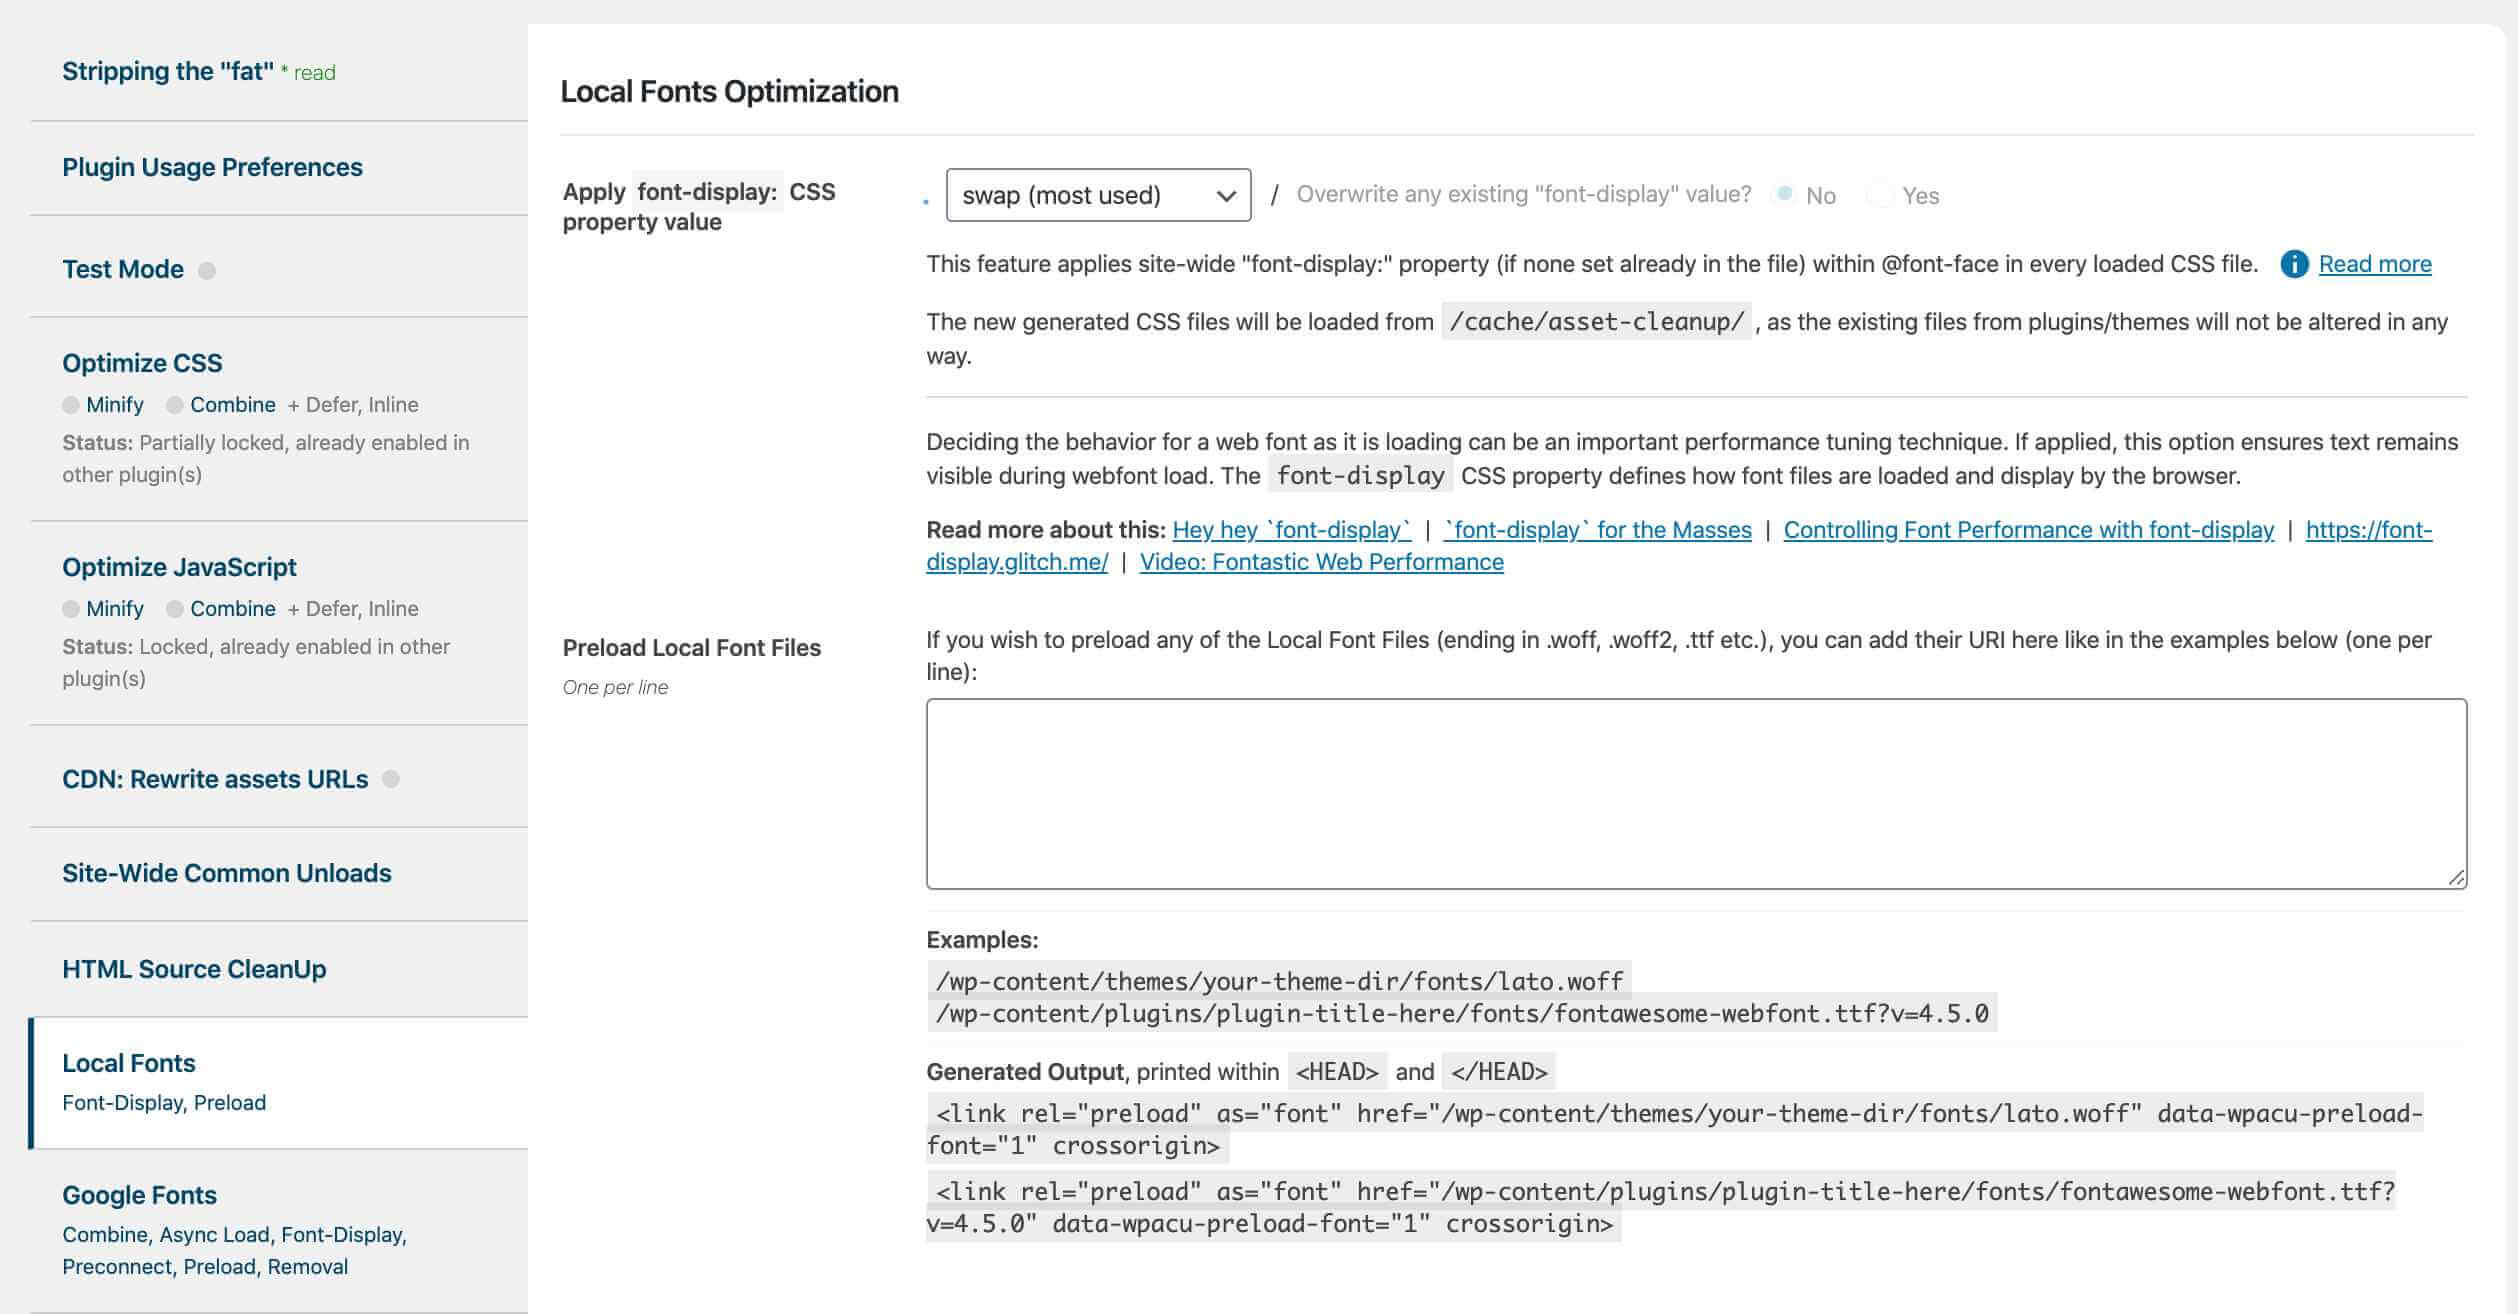
And if you’re using the premium version of Asset Cleanup Pro, you can change the “Apply font-display CSS” value” from “Don’t apply” to “Swap.” This can prevent your website from a flash of invisible text issue. You can click here to know more about this issue.
You can also enter the URL of local font files in the preload section to load it instantly. When we preload a font file, we explicitly increase the priority of the resource.
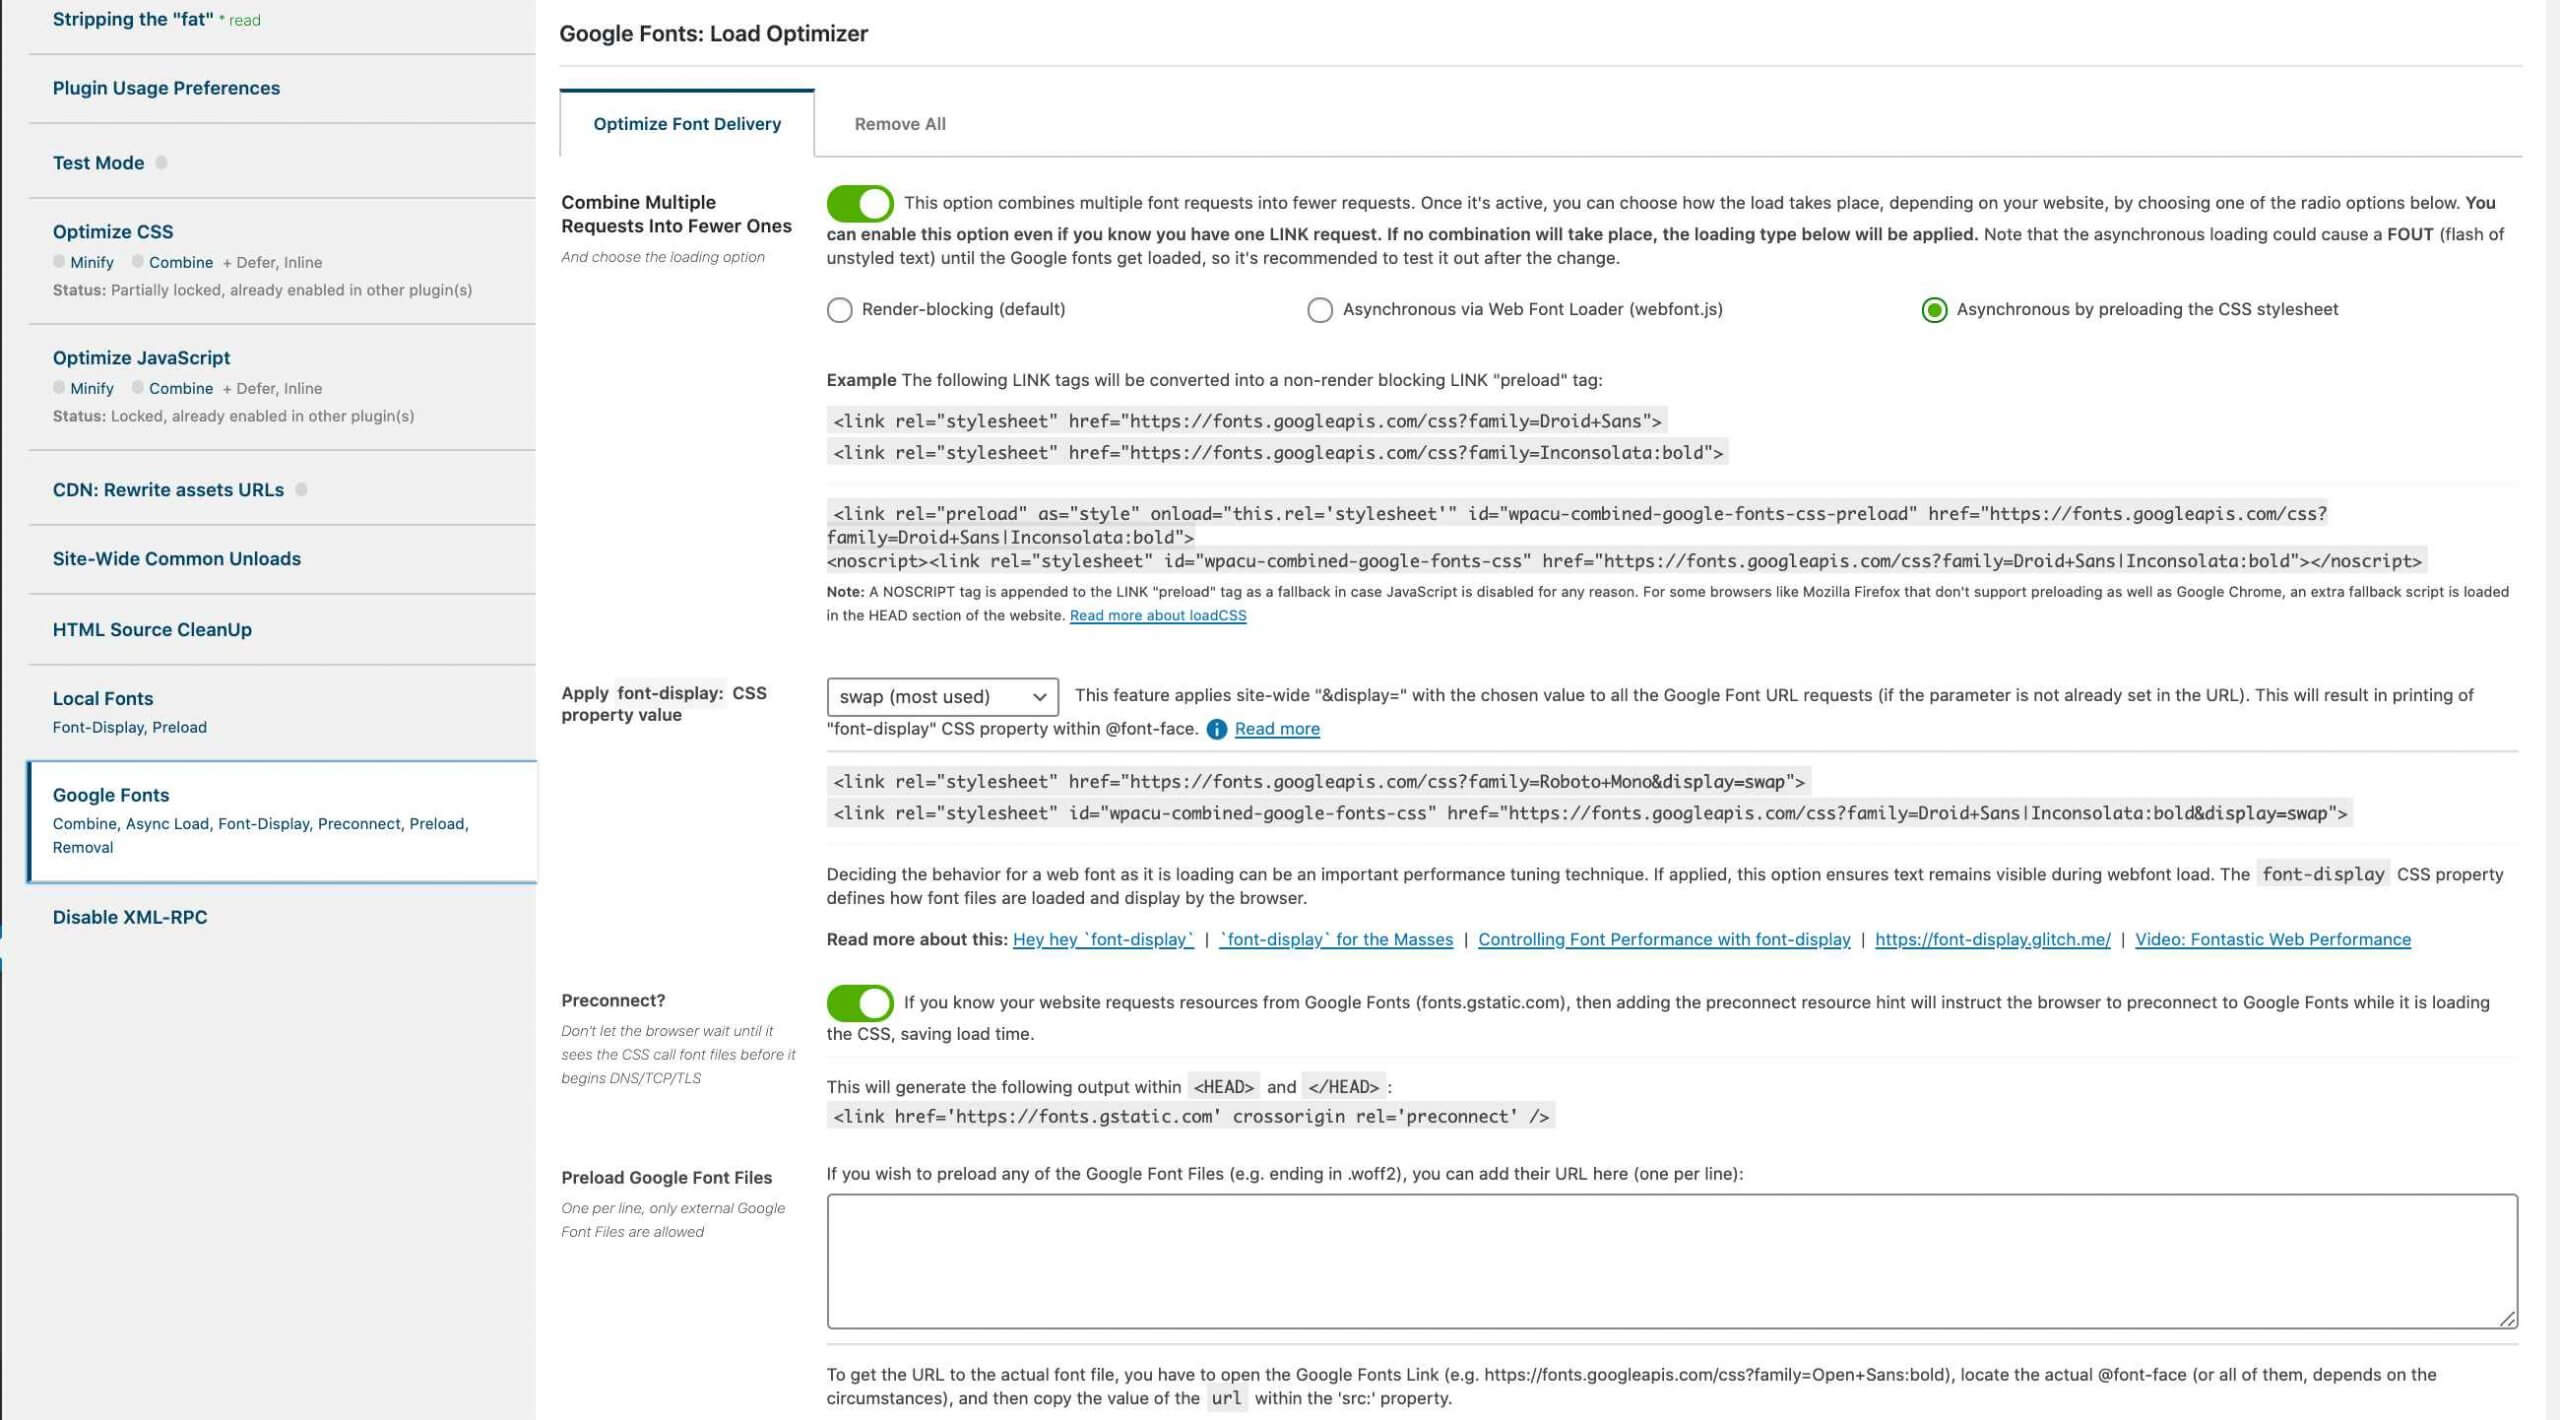
And after the Local Font Optimization settings, you’ll see a similar option in the “Google Fonts.” setting.
Just select the “swap” option in the font-display settings and also enable the preconnect. Enabling the preconnect option will hint and instruct the browser to preconnect to Google Fonts while it is loading the CSS, saving load time.
You can also enable the combine multiple request settings to combines multiple font requests into fewer requests.
Use Plugins & Tools Only on Necessary Pages using Asset CleanUp Pro.
As of now, we have done a few optimizations using Asset CleanUp to improve the loading speed of the site – yet there are few more amazing features available in this plugin we’re not aware of.
These features can include loading plugins in a specific post of the website.
In easy words, let’s assume that you’re using the “Contact Form 7” (most popular plugin for creating contact form) on your website and used it on a specific “contact page” on your website.
But the main issue with this plugin is that it loads its CSS & JS file in the <head> section of your site and thus, it increases two more requests on all pages (including contact page) – But we only need it to load on the specific page, and that’s the contact page.
For example; If you check TheVPNCoupon, I’m using “Contact form 7” plugin on the Contact page and on the other post/pages like “Best Animated Movies,” I’m not using any contact form – but still it loads the CSS & JS of Contact Form 7 plugin on these pages (You can check in the image below).
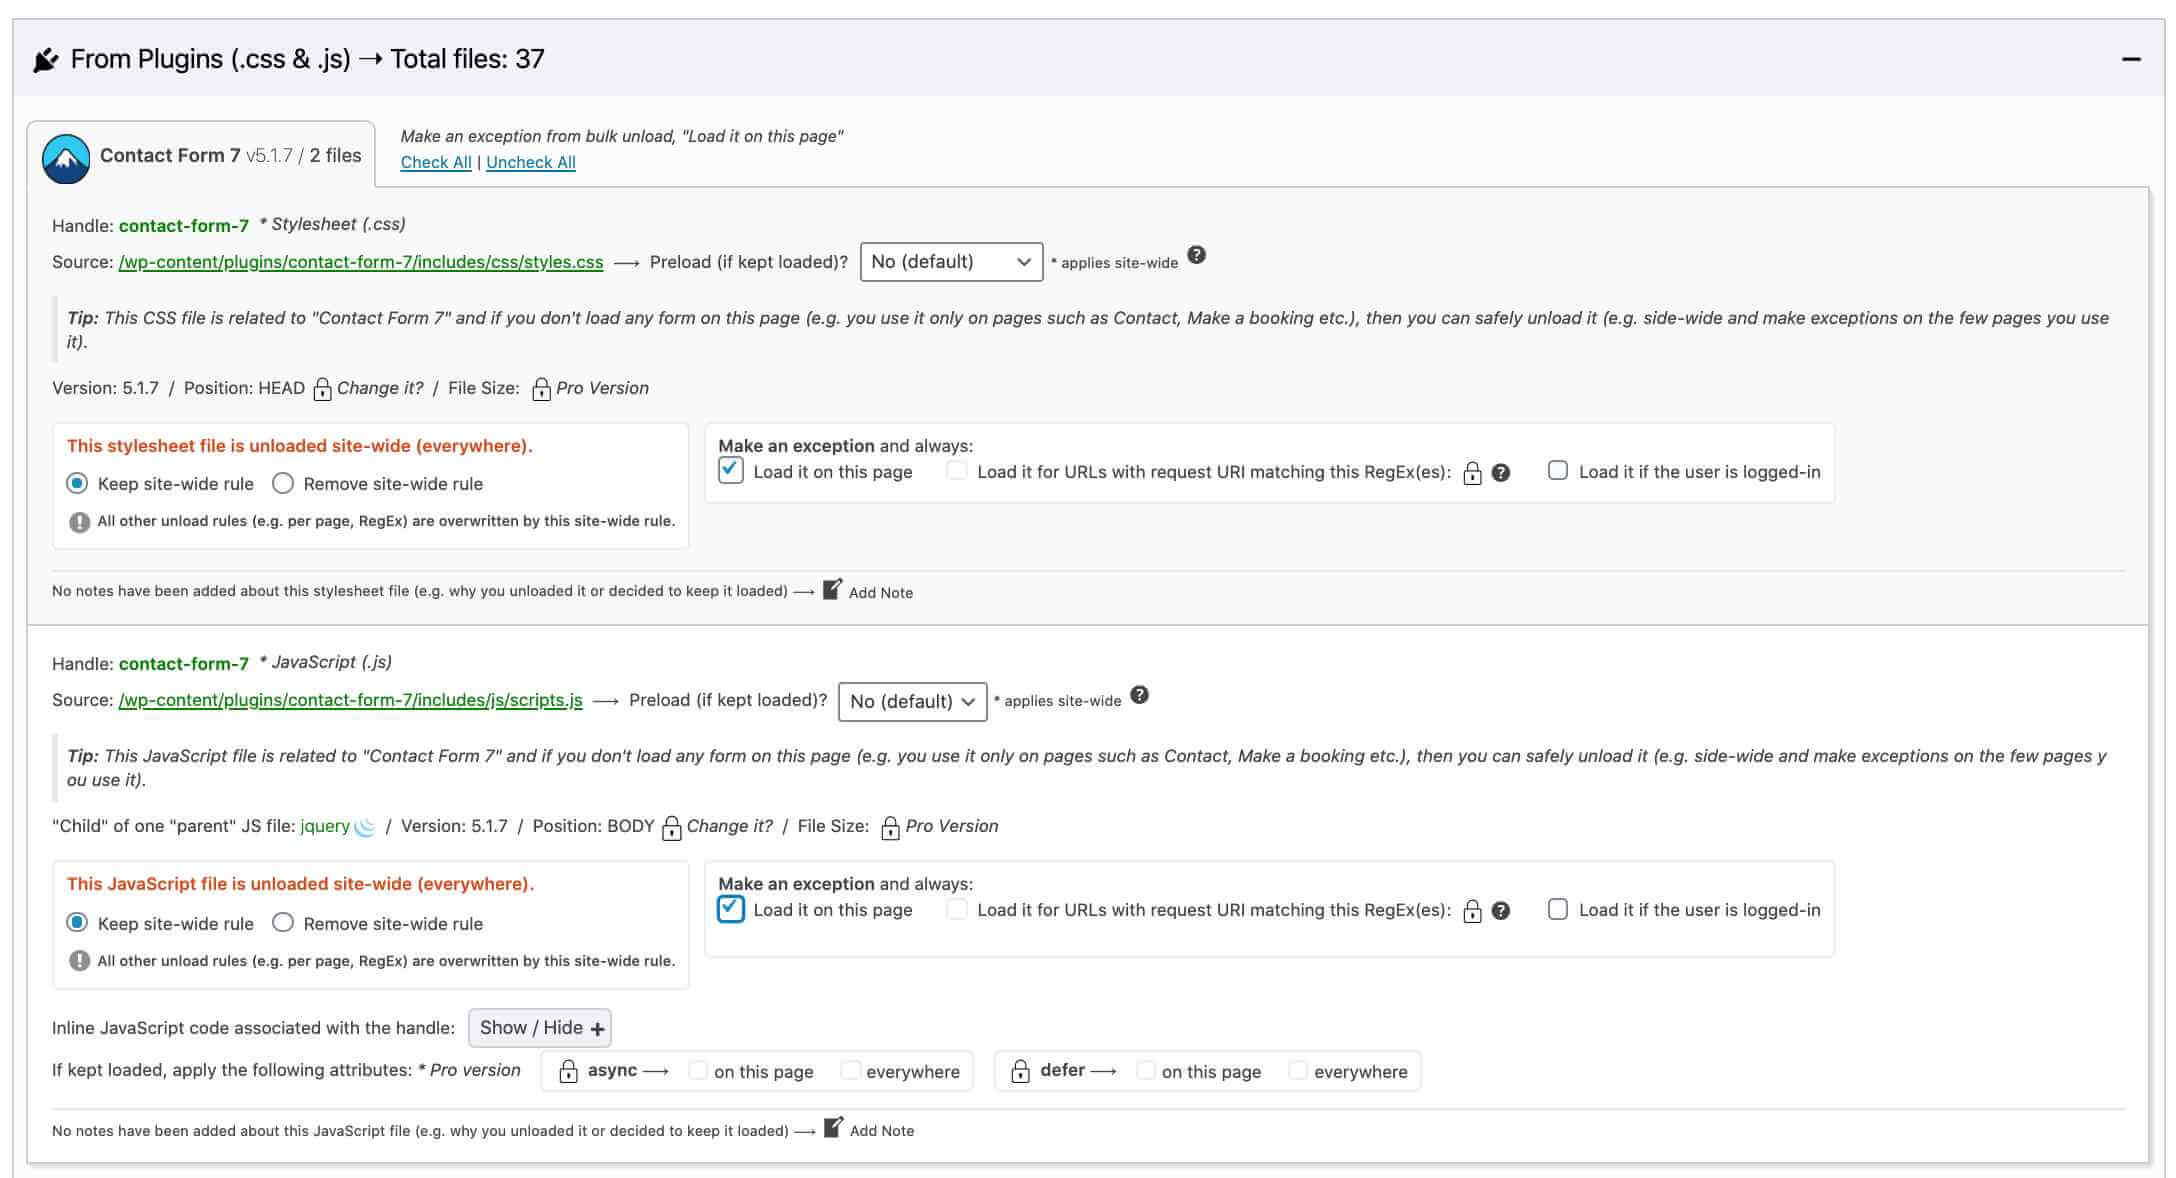
But how can you solve this issue?
The solution is very simple, you just have to publish the post or page and then again click on the “Edit Post/Page” option, and then this plugin will load all files in the WordPress post dashboard.
And then unload the specific CSS & JS file from the Asset CleanUp option.
For example; If I’m creating a “Contact Us” page on my site using the “Contact Form 7” plugin, then I’ll publish the page once it is ready, and then again, I’ll click on the “Edit Page” option.
Once we click on the Edit Page, it will show all the files which are requested or loaded when someone loads the contact page.
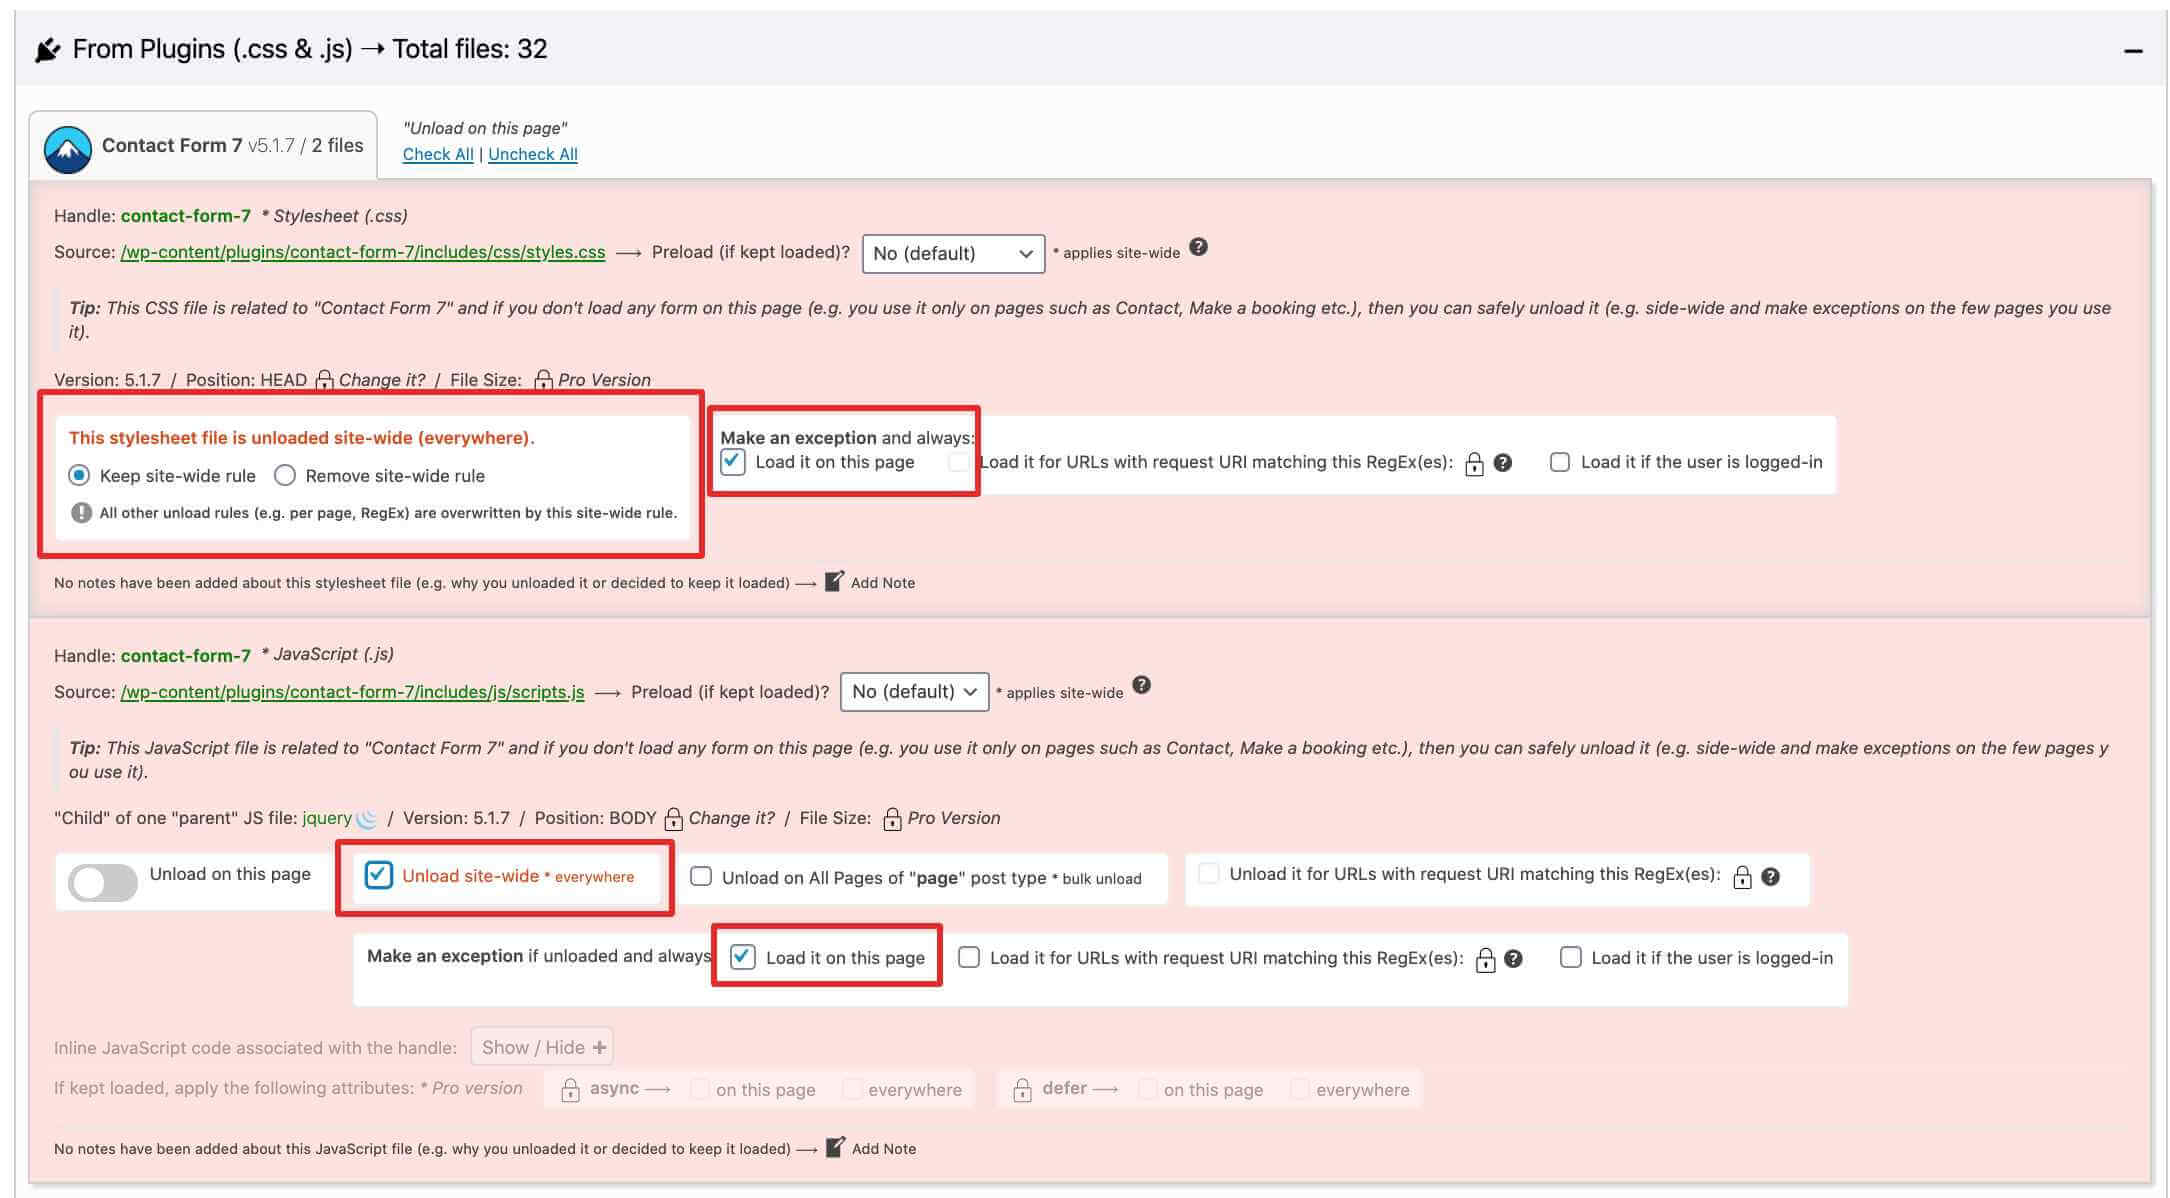
Now we’ll make some changes to the settings and unload the CSS & JS of Contact Form 7 from all pages except the Contact page (You can perform the same settings we have done in the image above).
3.3 Optimize Images on Website
As you know, Image Optimization is one of the most important factors for slowing down your website speed. It is the primary source of slowing down the sites, so we always have to compress our images before uploading them on your website.
Even when you check any of our blog post at TheGuideX,

…the images are heavier than anything else on my website.
Therefore, Optimizing images should lead to the most significant improvements in your website speeds, and it does.
We all know that images are essential for any website, but using significantly high-quality images isn’t recommended. Thus, we have to make sure that the image we upload is properly optimized.
You should have to compress the images in such a way that it can’t decrease the overall quality of your image but only reduce the size of it.
For this purpose, I’ve created a website on Image Optimization, and you can use this site to optimize your images before you upload them in WordPress.
To optimize your images properly, you’ve to follow these five steps;
- Upload Images of the Right Size.
- Use Online Image Optimization Websites to Compress Images (Recommendation: TinyPNG and ImageOptimizer.org).
- Use WordPress Plugin for Further Optimization (Recommendation: “Compress JPEG & PNG images by TinyPNG“).
- Using Proper Image Formatting.
- Using CDN for Images (Recommendation: ImageKit)
Use Correct Type of Image Format
The two most commonly used types of images on the web are JPGs and PNGs.
And they’re not alike;
- JPEG: JPEG images are used on websites for more complex images with a lot of color information in them.
- PNG: PNG images are perfect for images and graphics having little color information.
In the above examples, I’ve shown one JPG image with 79% image compression & a PNG image with similar compression level – But the compressed size of JPEG image is way more than the original size of the PNG image because of their complexity and a lot of color information.
So next time, whenever you upload images on your website, make sure you’re using the correct image format.
3.4 Database Optimization Using WP-Optimize
As of now, we have optimized our site using WP Rocket and Asset CleanUp, but if you still feel that your website takes a lot more time to load, then you can optimize your database and deleted revisions of the post.
Sometimes when we update the content of our website or when we write something on the WordPress Editor, it automatically saves the post revision in our database.
So optimizing the database is another very helpful and important process to increase the speed of a website.
To do so, we will use a free WordPress plugin named “WP-Optimize.” The plugin is developed by Team Updraft, Who also developed an amazing plugin, which I recommend for taking backup of your site.
To use this plugin, simply install the “WP-Optimize” plugin from the WordPress repo.
But before proceeding with database optimization, I will always recommend you to take a backup first.
Once the plugin is installed, I would recommend to take a backup of your database and then go to “WP-Optimize” > “Database.” And when you’re on the database page, click on the “Run all selected optimizations,” and it will start optimizing the database.
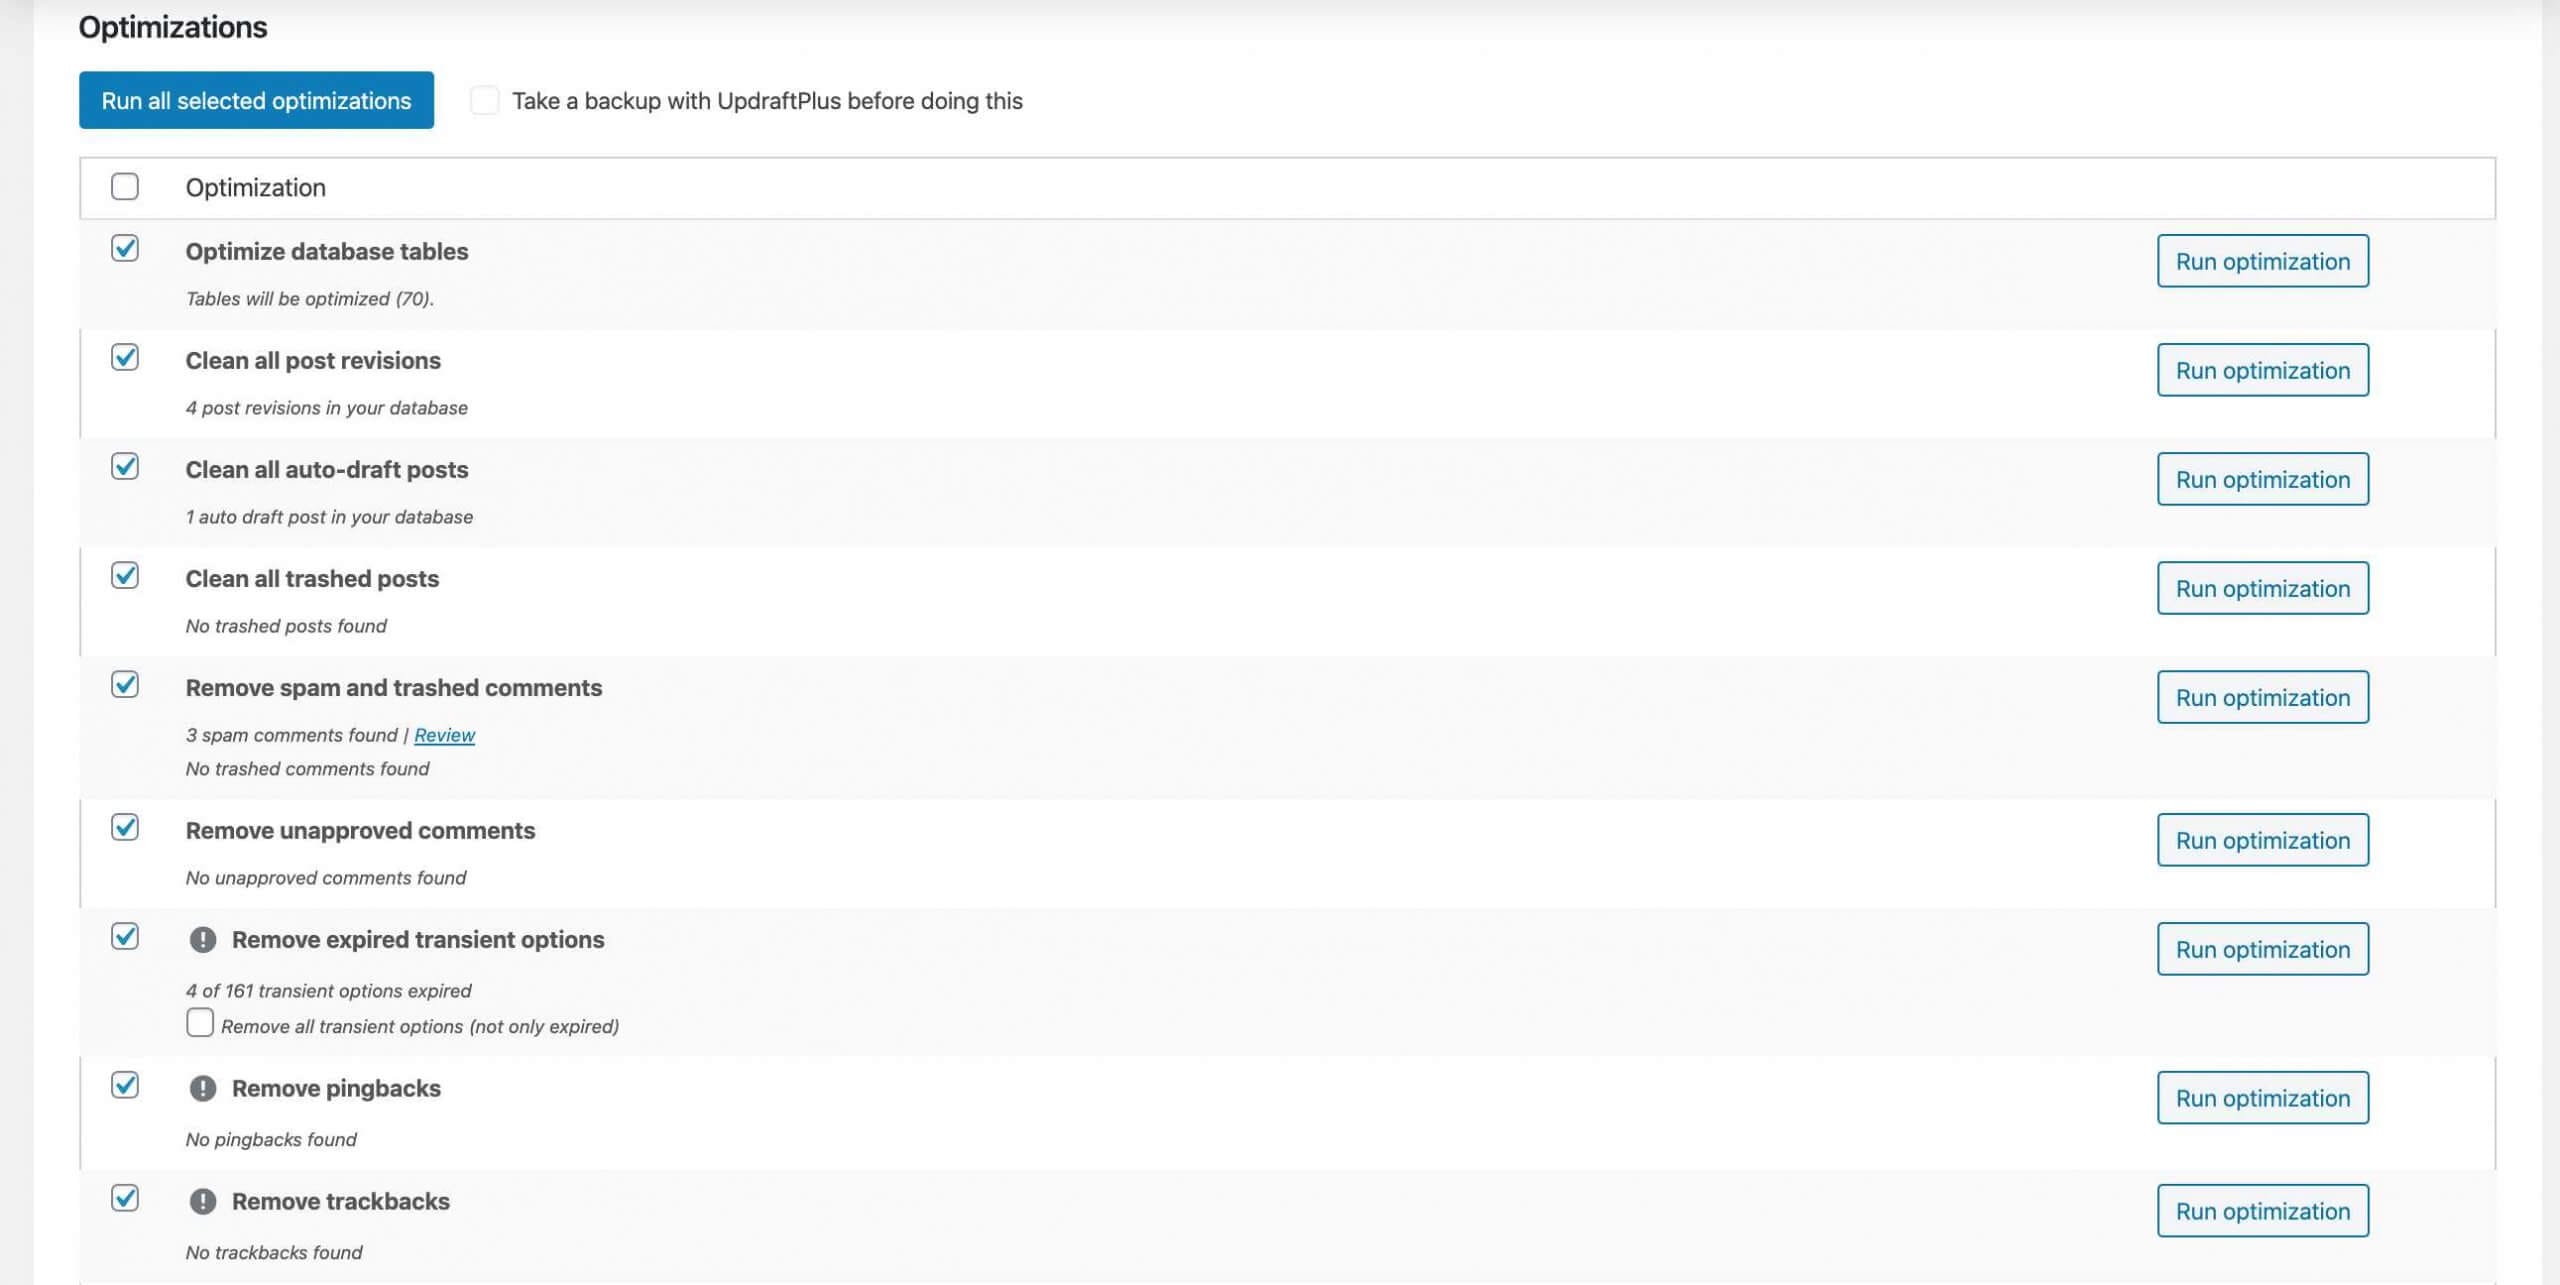
It will take a couple of minutes to optimize your database, and once it is done, it will delete all the post revisions, spam comments, pending comments, trackbacks, trashed posts, and auto-drafts.
Don’t worry!
Your posts and drafts will remain safe. It will delete none of your published or any draft posts on your website, but it will only delete revisions. So you’re safe.
Recommendations: I use this plugin on a daily basis to delete spam and pending comments. It also helps me to delete post revisions and optimize the database efficiently.
Even when I was writing this post, WordPress has saved over 40+ revisions in a database that makes my post editor page really slow – But after using this plugin, everything is fixed. And then, I again started writing this monster article.
3.5 Don’t Use These Plugins on Your Website
Certain plugins can slow down your website and cause high CPU usage. I will always suggest you not to use heavy plugins on your website.
These plugins can include;
- Broken Link Checker
- Jetpack
- Similar Posts
- SumoMe
- AddThis
In this step, we’ve used a few WordPress plugins to optimize our site effectively, and if you check the GTmetrix & Pingdom result of your website, you’ll see an instant increase in performance.
But speed optimization is not all about optimizing the site with the use of some plugins or fast-loading WordPress theme.
There are a lot more things to do if you want to increase the overall performance of your website. For example, using a CDN on your website and serving the files, images, or data from the closest server available.
4. Using a Content Delivery Network (CDN)
Before I’ll explain how you can use a CDN to increase the performance of your website, first we’ll learn what is a CDN and how it can help in improving the website performance.
So what is a CDN or Content Delivery Network?
According to Akamai, A CDN (Content Delivery Network) is a highly distributed platform of servers that helps minimize delays in loading web page content by reducing the physical distance between the server and the user. This allows users around the world to view the same high-quality content without slow loading times.
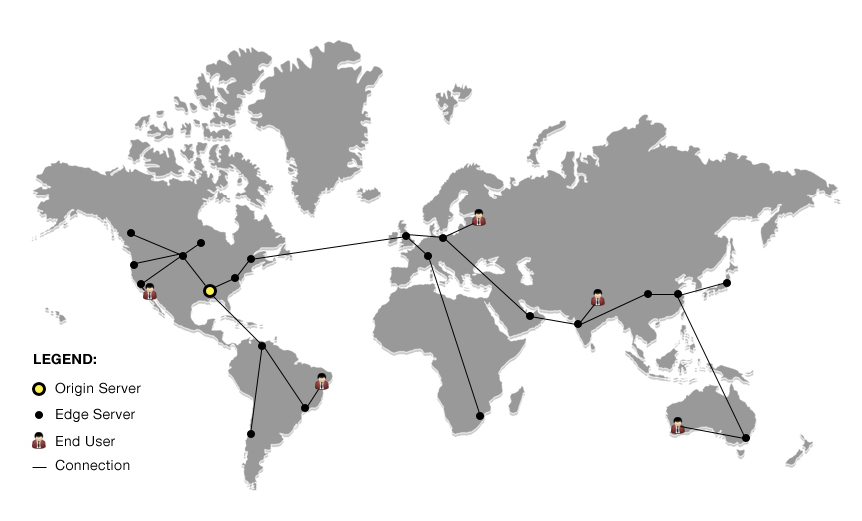
So how can it help in increasing the performance of the website?
The answer is; Whenever you visit a website, it makes requests to the remote server, and this server responds back with the data. The transmission of data is done over the public internet, and it causes some delay.
And if we reduce the distance of your local machine to the server, then it will surely decrease the delay time and increase the performance of the website.
For example; If you’re from India and visit our site TheGuideX, then your local machine requests resources from the server. If I host my website on a server near to the United States. Here, it will take around 200-300ms to request the resources, and it causes some delay.
But what if my website data will serve to your local machine from a Mumbai based data-center (or a data-center closet to you). It will reduce the requesting time from 200-300ms to 30-40ms. This way, we can definitely avoid these latencies by decreasing the distance significantly.
So now we have understood the use of CDN on our website and how it is essential to increase the overall performance of our website.
Now we’ll discuss some CDN’s to increase the performance of our website;
4.1 Use Cloudflare on Website
The very first CDN most of the people use on their website is Cloudflare.
Cloudflare has built an expansive global network of data centers that cache static content closer to users and deliver dynamic content over the fastest and most reliable private backbone links
Setting up Cloudflare on your domain name is very easy; you just have to change your nameservers from the current host to Cloudflare & then you can easily manage your DNS directly from Cloudflare.
You can follow this video to setup Cloudflare on your domain name. Once the Cloudflare is active on your domain name, then we will make a few changes to optimize our website performance.
Once the Cloudflare is active on your domain name, log in to your Cloudflare account and then select your website from the dashboard.
Now, go to the SSL/TLS page and set the SSL to Flexible. You can also set the SSL settings to Full – But before setting the SSL setting to Full, make sure your website already uses an SSL.
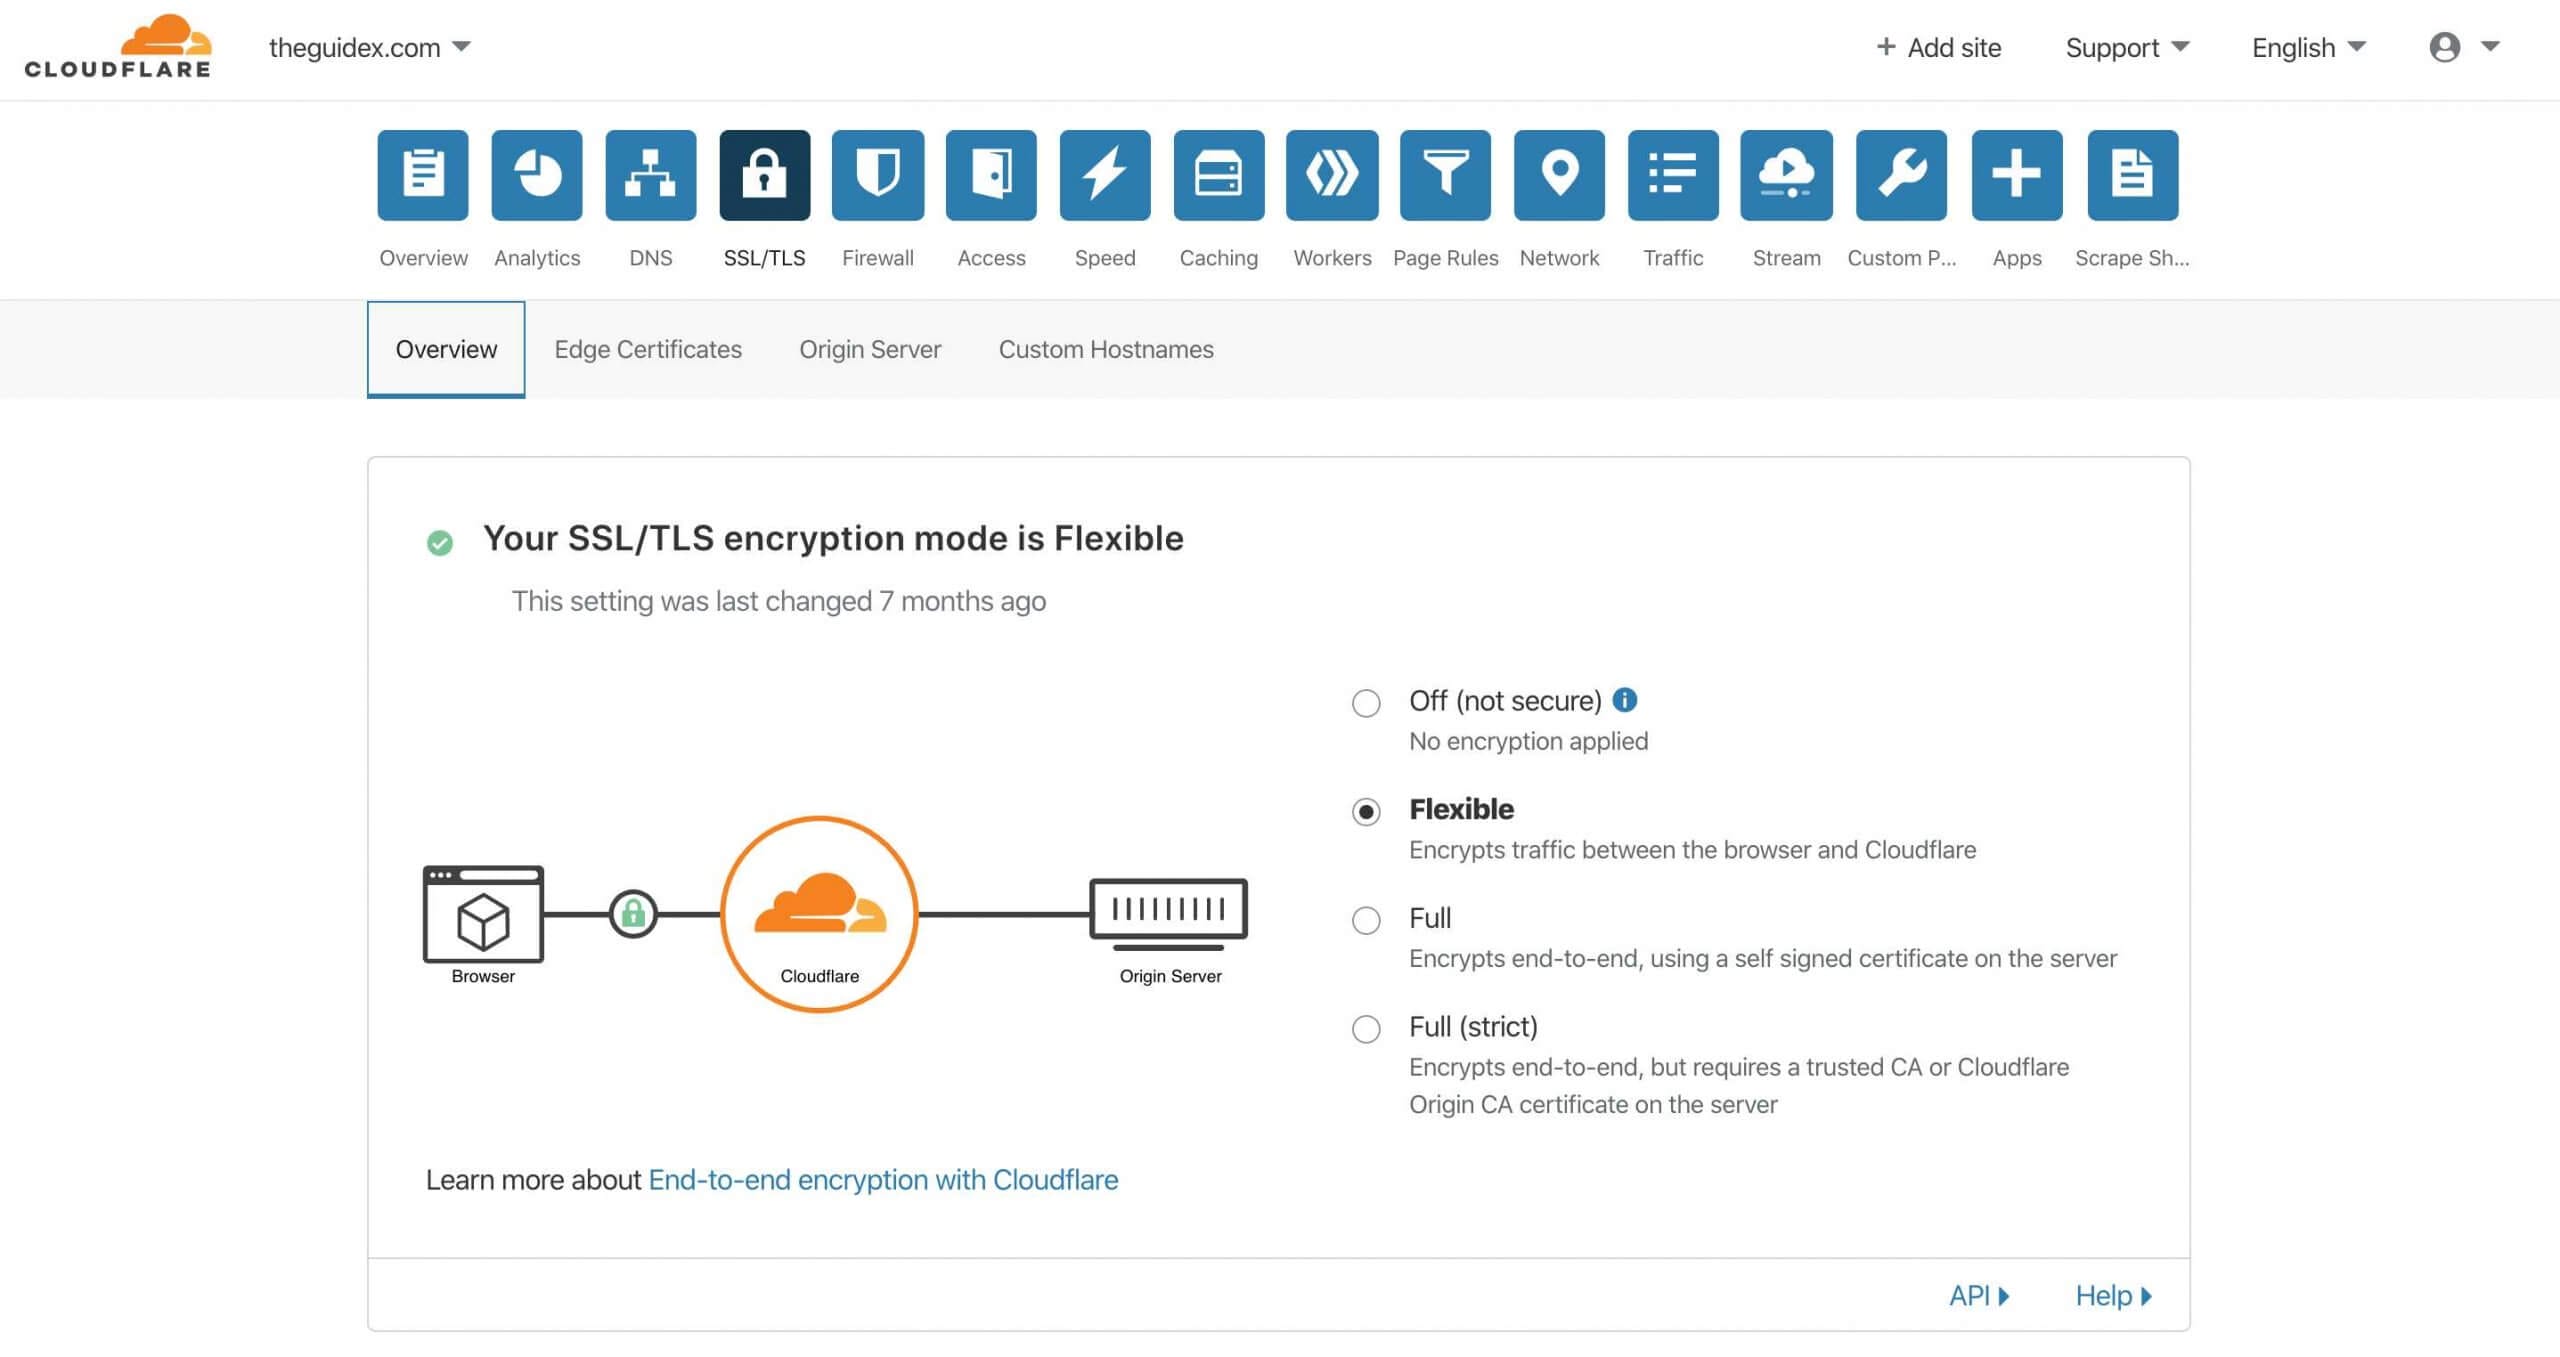
If you’re not sure about this, I will recommend you to set the SSL settings to Flexible. In the flexible mode, the data is encrypted between user’s local machine to Cloudflare only (Local Machine (Secured) -> Cloudflare (Not Secured) -> Web Server).
But if uses the Full SSL settings, the data is encrypted from Local machine to your server (Local Machine (Secured) -> Cloudflare (Secured) -> Web Server)
Once you setup the SSL on your website, Go to Edge Certificate settings in SSL and activate the “Always Use HTTPS,” “TLS 1.3,” and enable the “Automatic HTTPS Rewrites.”

Now we have done setting up the SSL on our website using SSL. After this step, click on the Speed settings and then click on the Optimization under the Speed settings.
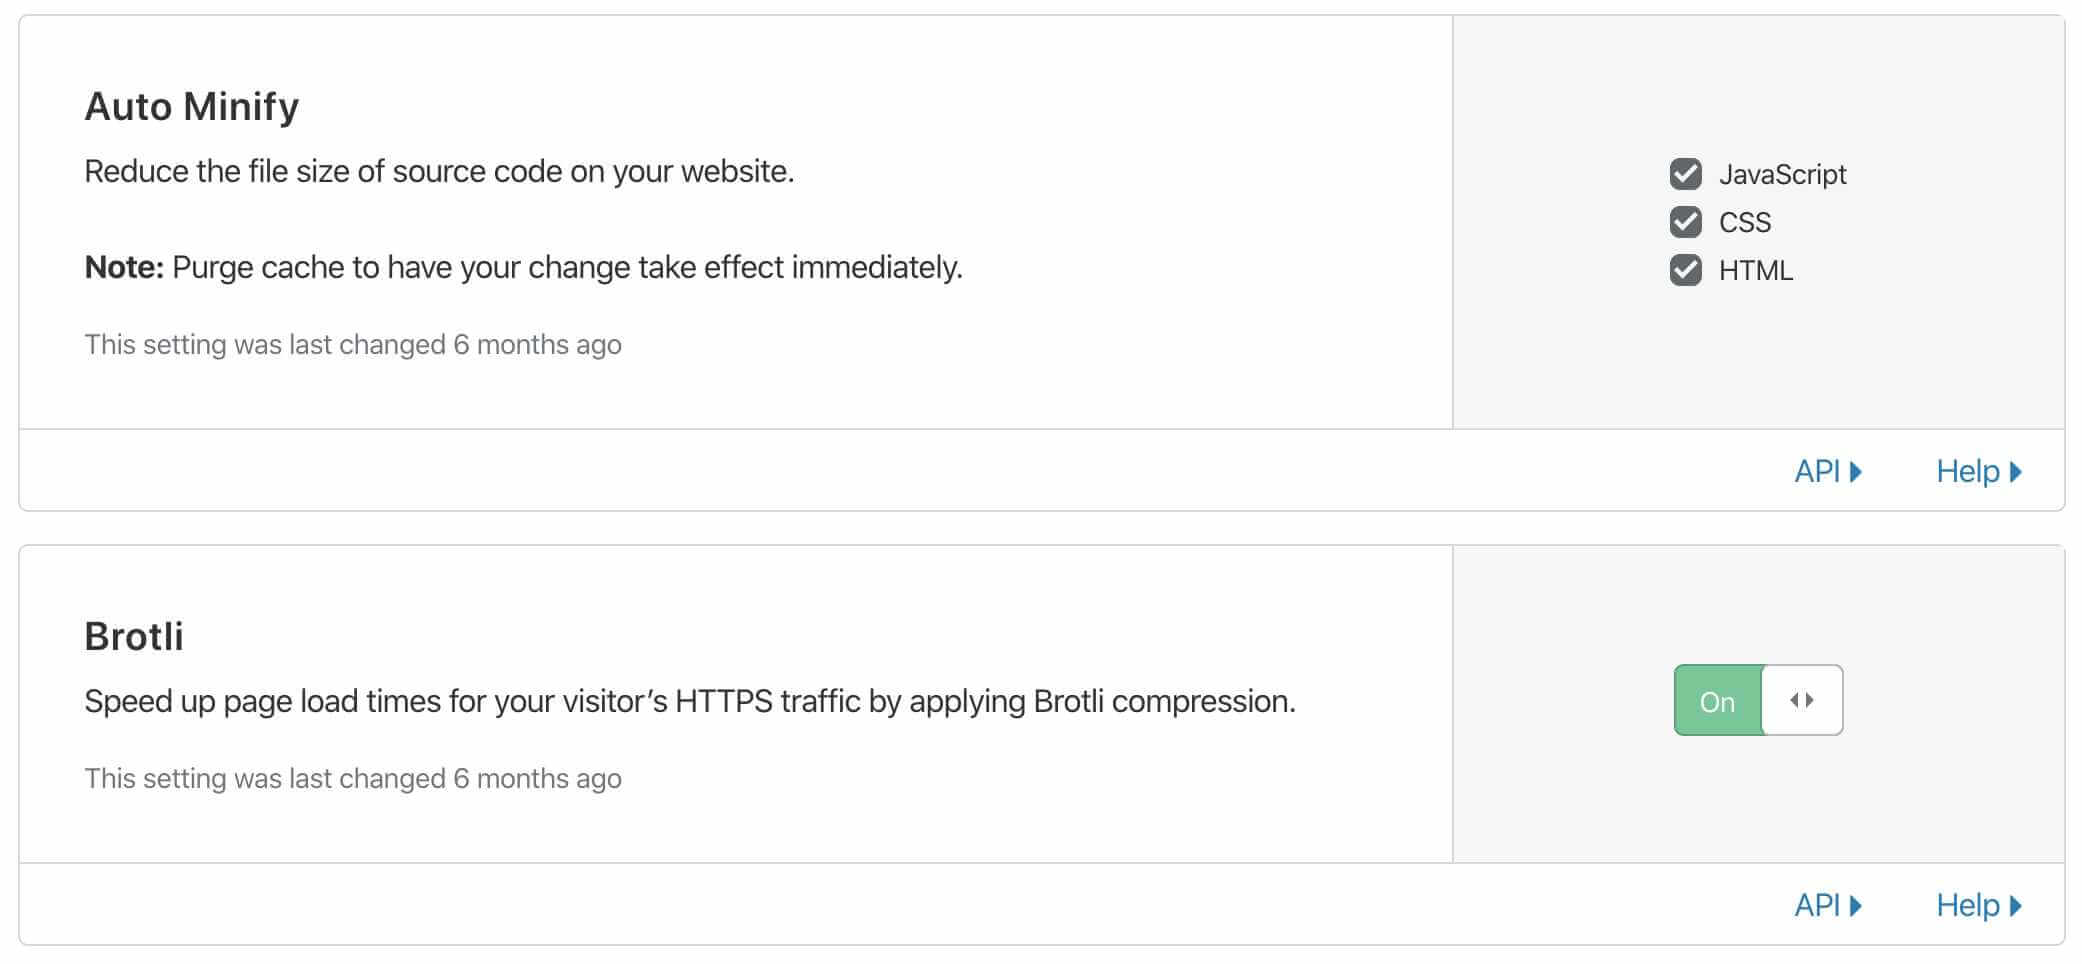
Once you’re on the Optimization page in Speed, enable the Auto Minify for JavaScript, CSS, and HTML.
And then enable the Brotli compression on your website. Brotli is a compression algorithm developed by Google and serves best for text compression.
Here are a few features of using Brotli compression on your website;
- JavaScript files compressed with Brotli are 14% smaller than gzip.
- HTML files are 21% smaller than gzip.
- CSS files are 17% smaller than gzip.
Note: Images should not be compressed either by gzip or Brotli as they are already compressed, and compressing them again will make their sizes larger.

Once you enabled the Brotli compression on your website, you can scroll down to the Rocket Loader option and then enable it. By default, this setting is enabled, but sometimes this plugin conflicts with the WP Rocket plugin and can cause problems.
Now we move to the Cache settings in Cloudflare and then set the caching level to “Standard” and Browser cache TTL to “1 year” respectively.
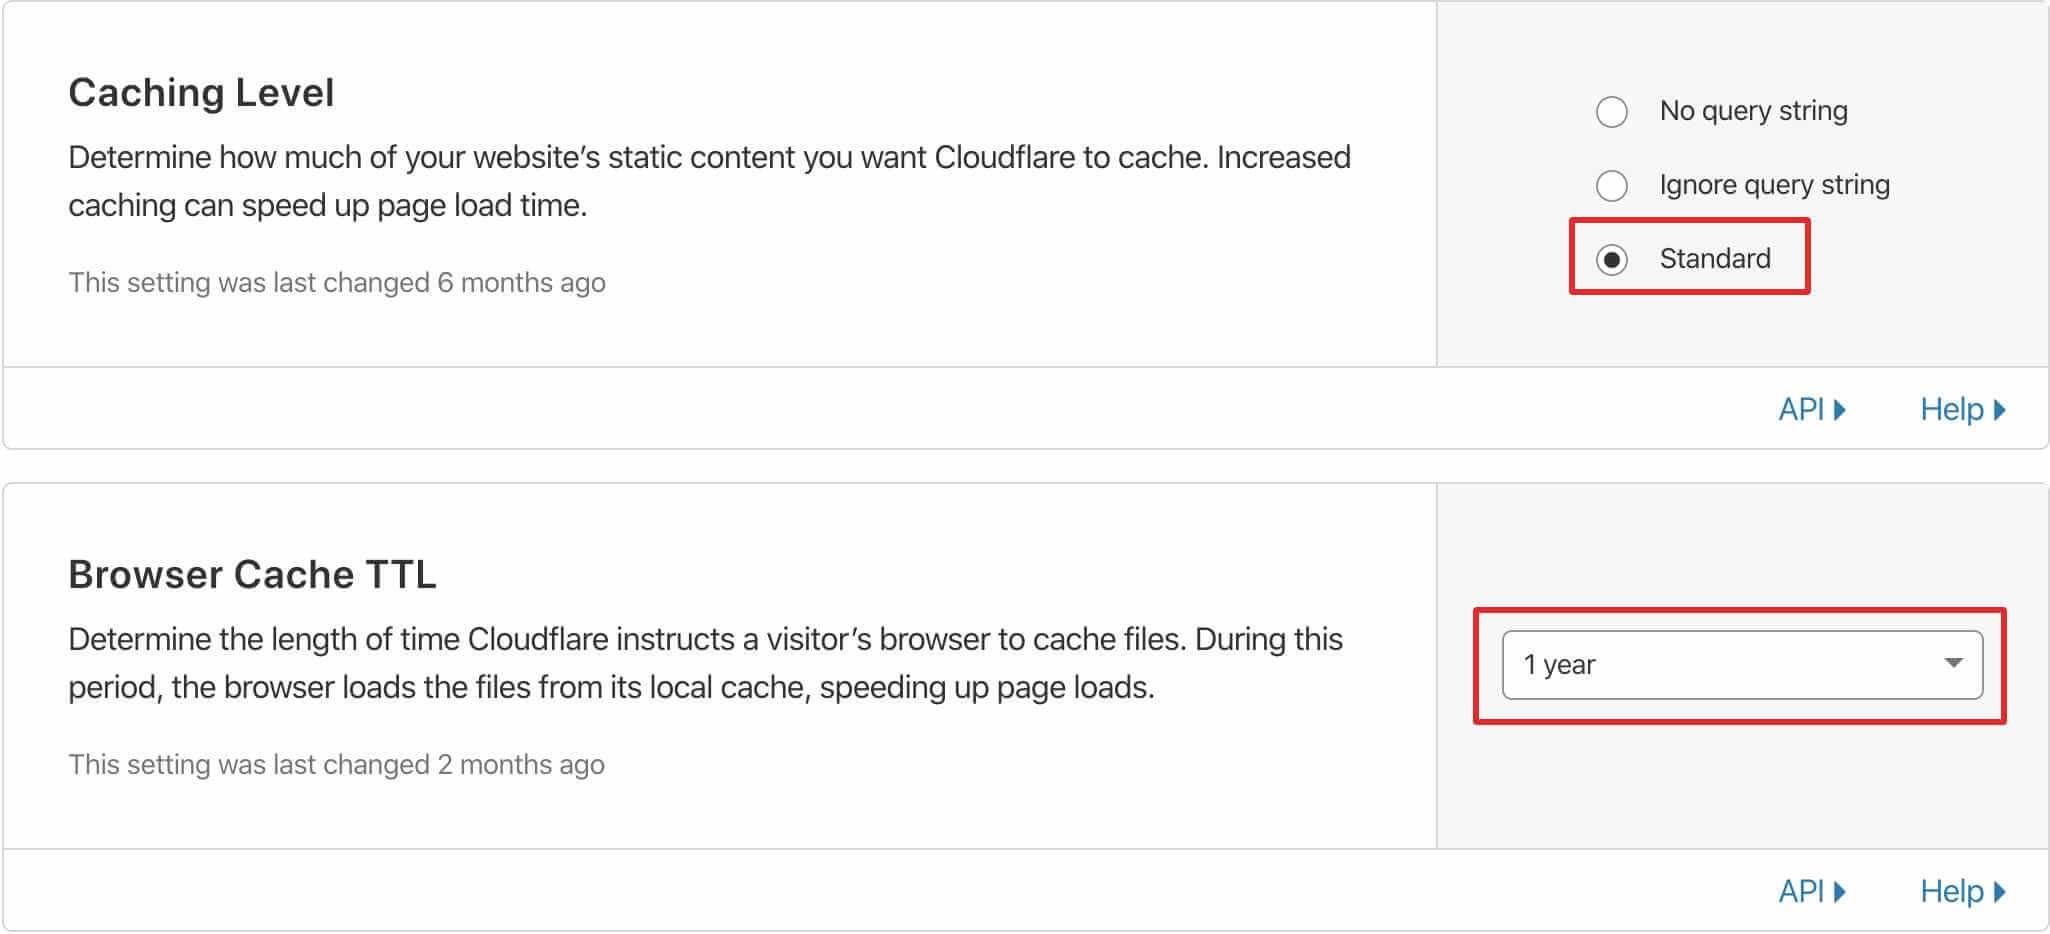
Once you enabled these settings, scroll down to Always Online and click to enable it. With these settings, if anyhow your server goes down, Cloudflare will serve your website’s static pages from their cache.
You can learn more about recommended settings here.
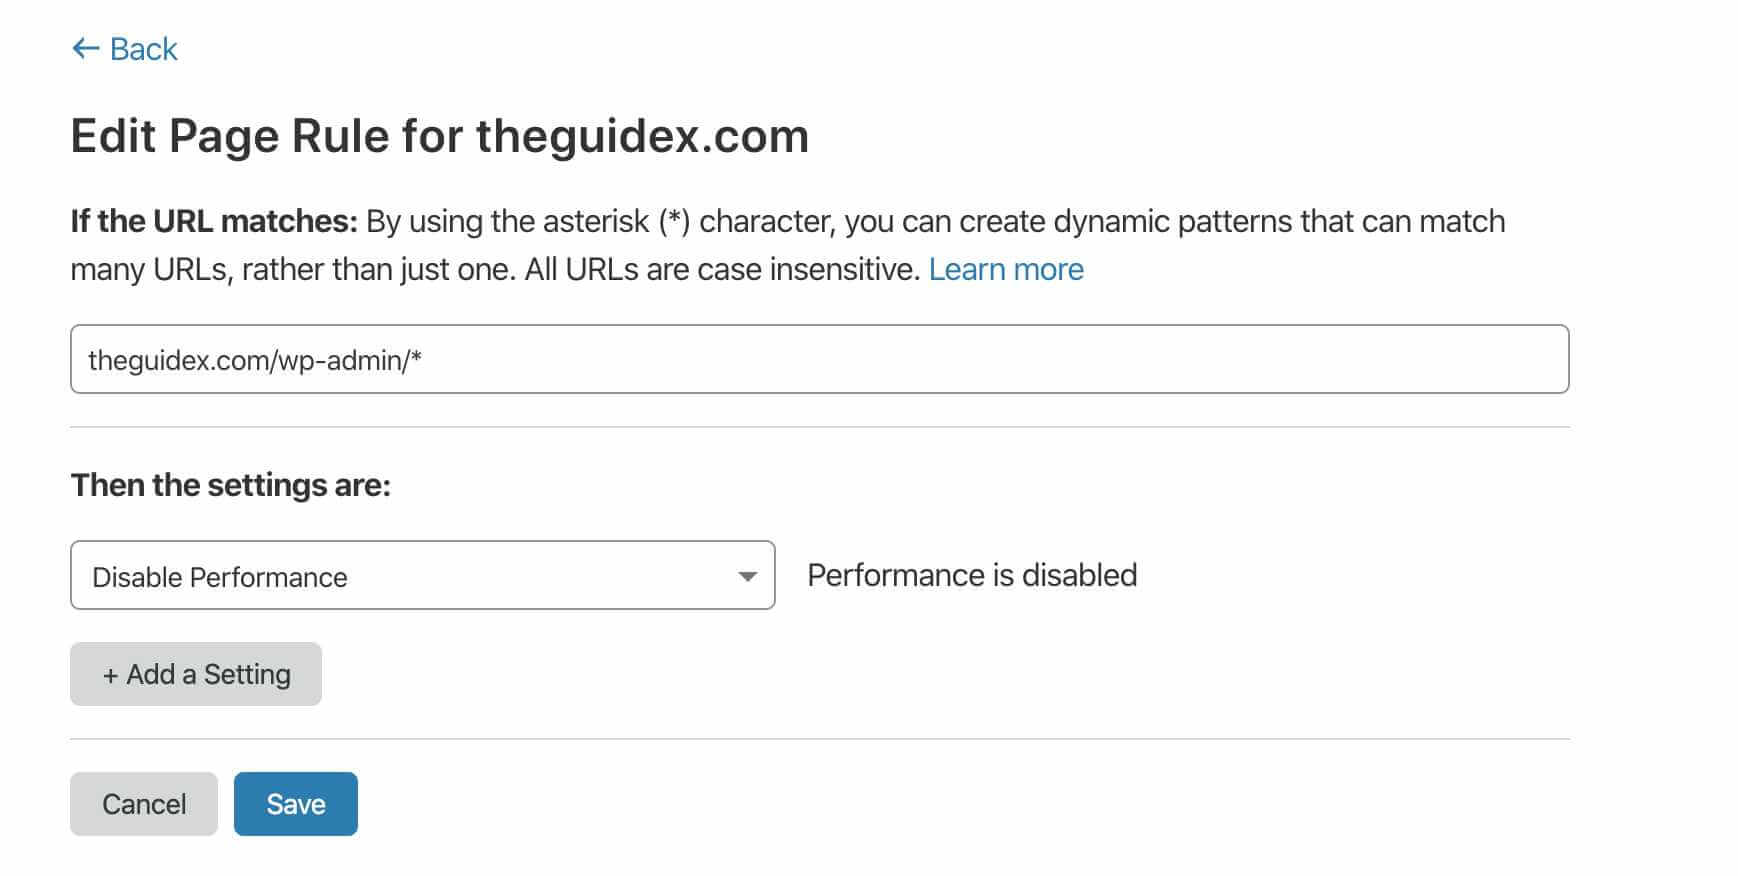
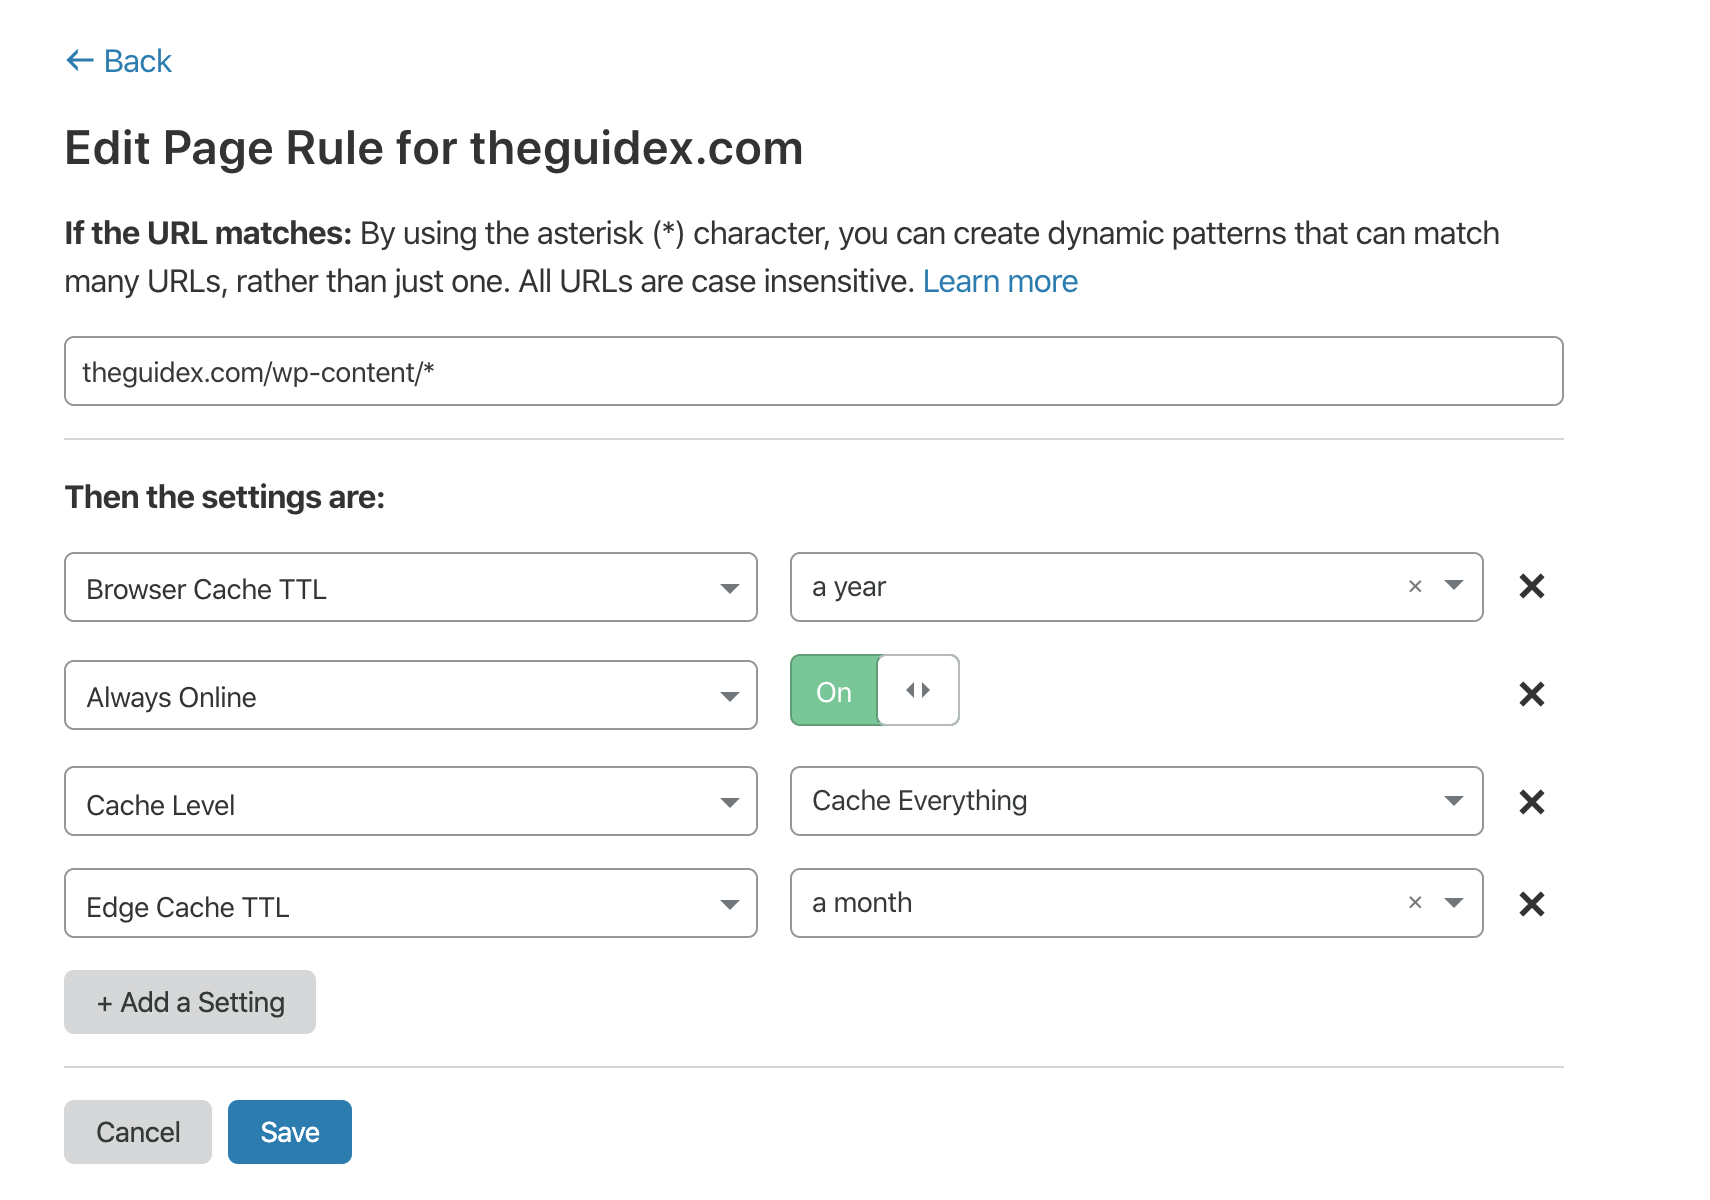
Now the most important thing is setting up Page Rules on our blog using Cloudflare.
To do so, open Page Rules settings in Cloudflare. With the free plan of Cloudflare, we can only create 3-page rules, and if you want to create more than 3-page rules, you’ve to buy more page rules from Cloudflare.
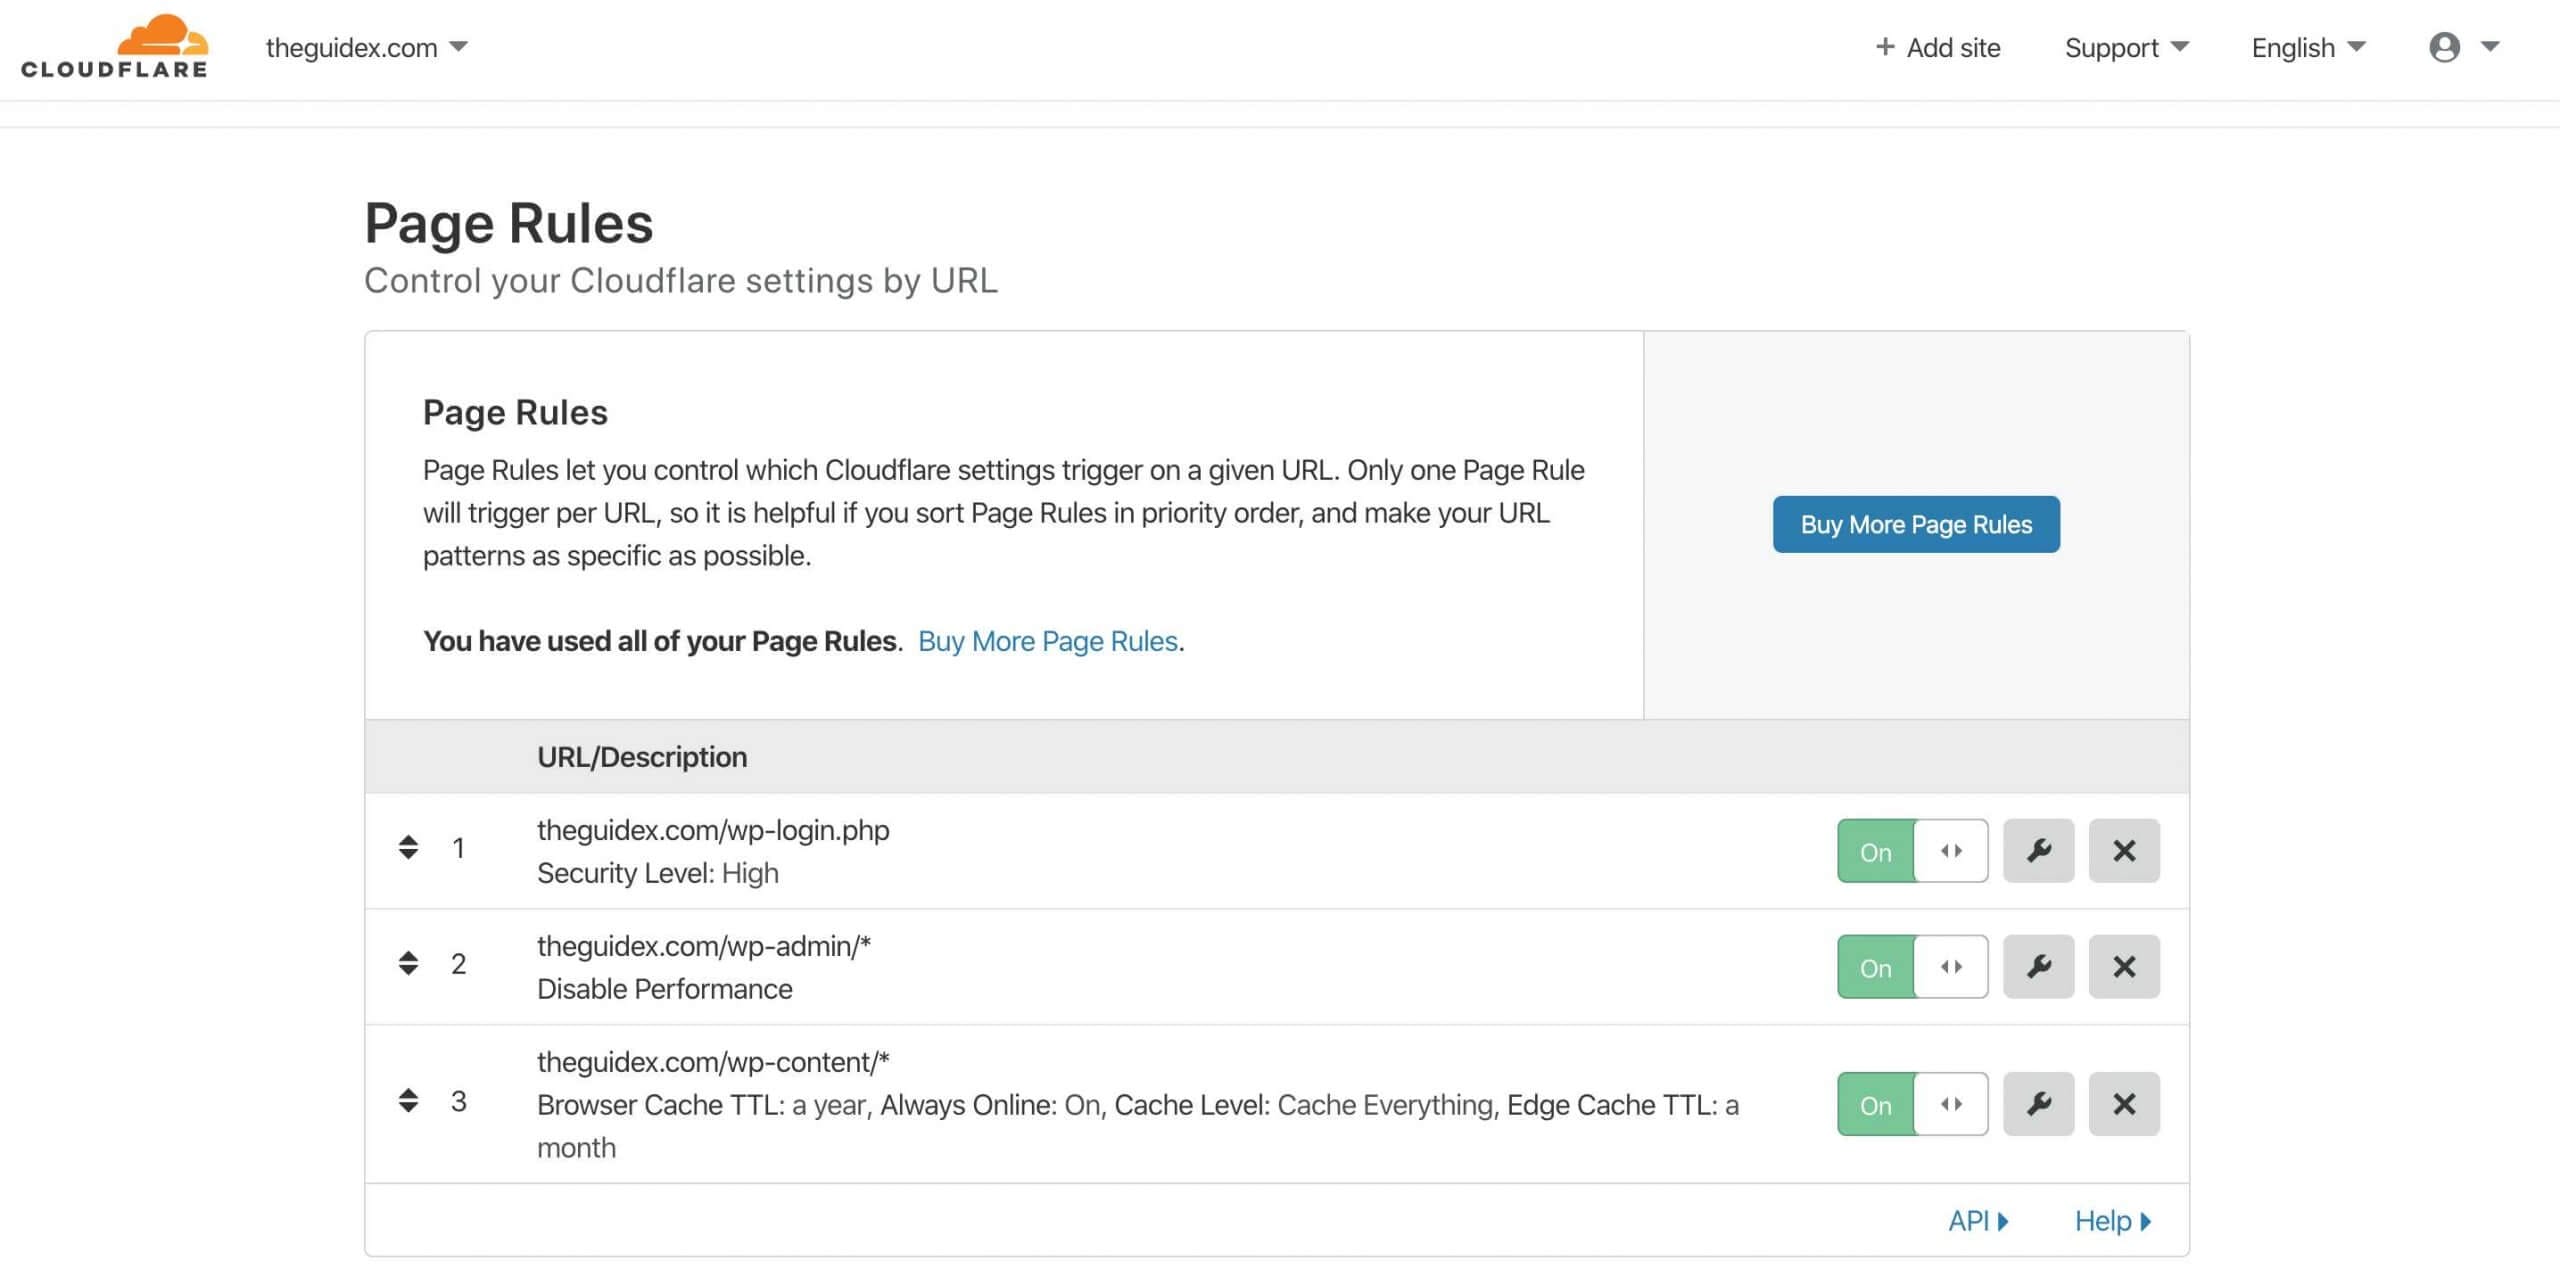
As you can see in the image above, I’ve created a 3-page rule on my website TheGuideX to improve its performance. These 3-page rules are one of the most important rules which help to optimize our website.

Now the first thing is to click on the Create Page Rule button showing in the blue color. Once we click on it, it will open a page from where we can create our first Page Rule.
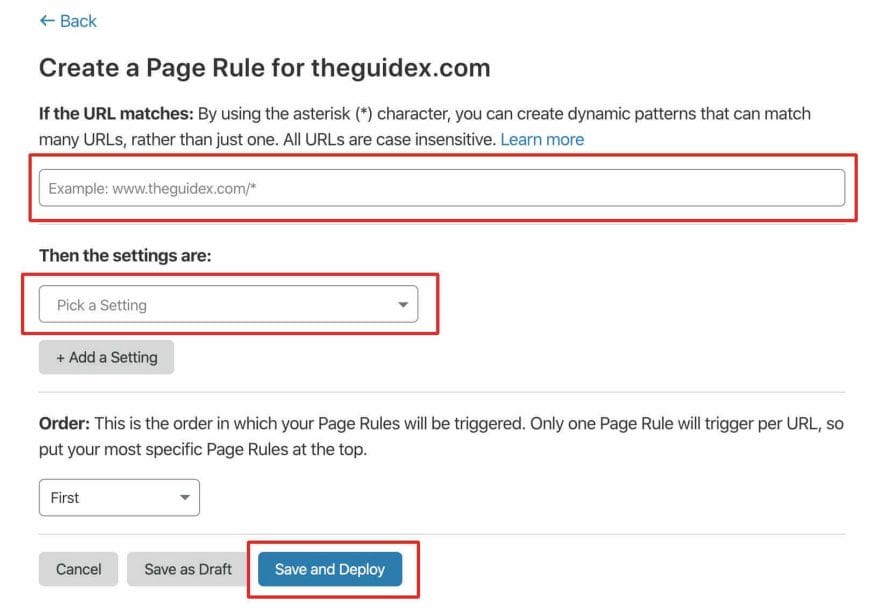
As you can see in the image above, in the first field, we have to enter the URL of the page where we have to apply the Page Rule settings, and then we have to pick the settings from dropdown menu. Once we’re done, click on the Save and Deploy button to enable these Page Rules.
If you’ve implemented the same settings on your website using Cloudflare, there are many chances that your website start performing well on GTmetrix and other page speed testing tools.
And till now, we have just shared one CDN to improve overall performance of our website. Now we’ll share few more CDN that can work along with Cloudflare CDN.
4.2 Use ImageKit for Image Optimization
Now we will use ImageKit for optimizing our images in real-time. It is one of the real-time image optimization and transformation CDN networks that helps the website to reduce the actual size of the photos without actually having any effect in the visible visual quality of the image.
One of the best things I liked the most in this CDN is the quick integration with the application like WordPress. It does offer reasonable pricing, and I have found it a far better option to choose for better image optimization.

ImageKit offers three types of pricing for CDN, and You can choose it according to your website requirements (I’m using the Forever Free Plan on my website).
Once you choose the pricing and register to their platform, you’ve to create an End Point. Once you’ve created the End Point, you’ll get the CDN URL (Check in the Image Below)
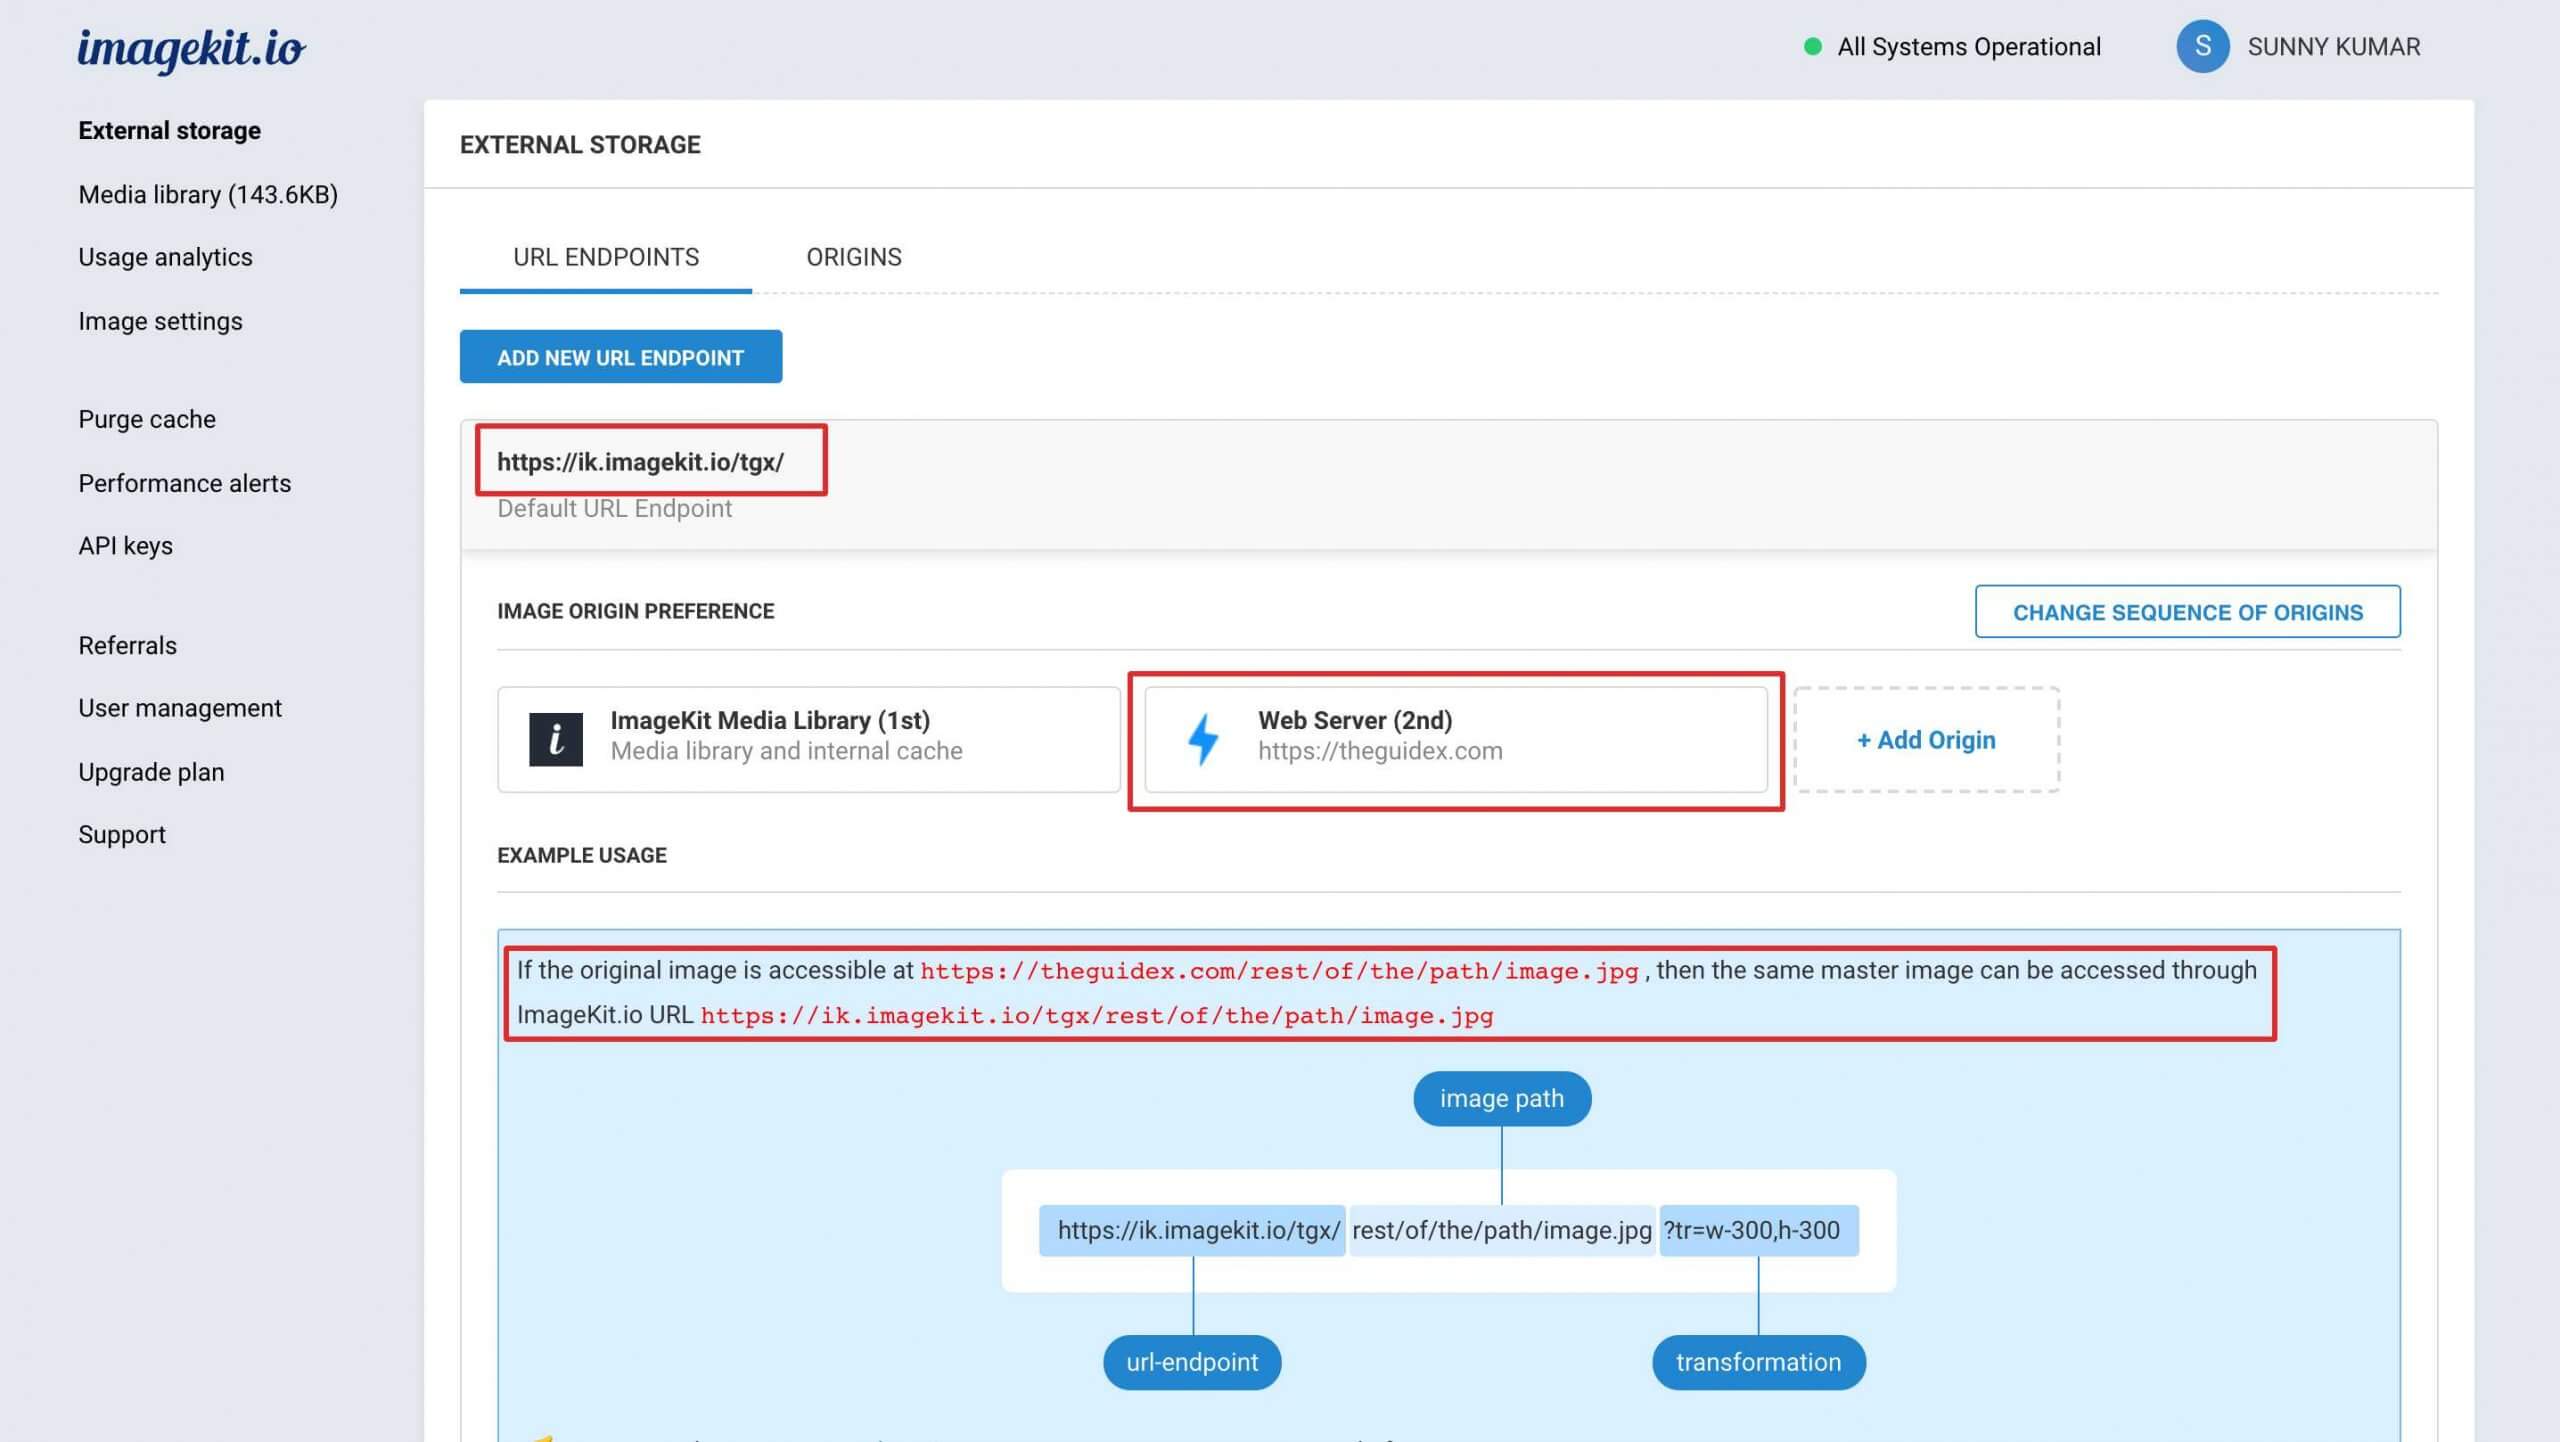
As you can see, I’ve created a Web Server based CDN URL for TheGuideX domain name. My CDN URL is https://ik.imagekit.io/tgx/
Then the same master image can be accessed through ImageKit.io URL https://ik.imagekit.io/tgx/rest/of/the/path/image.jpg
Once we got the ImageKit URL, we have to enable it on our WordPress website. To do so, we have to open WP Rocket CDN setting by visiting WordPress Admin Panel > Settings > WP Rocket > CDN,
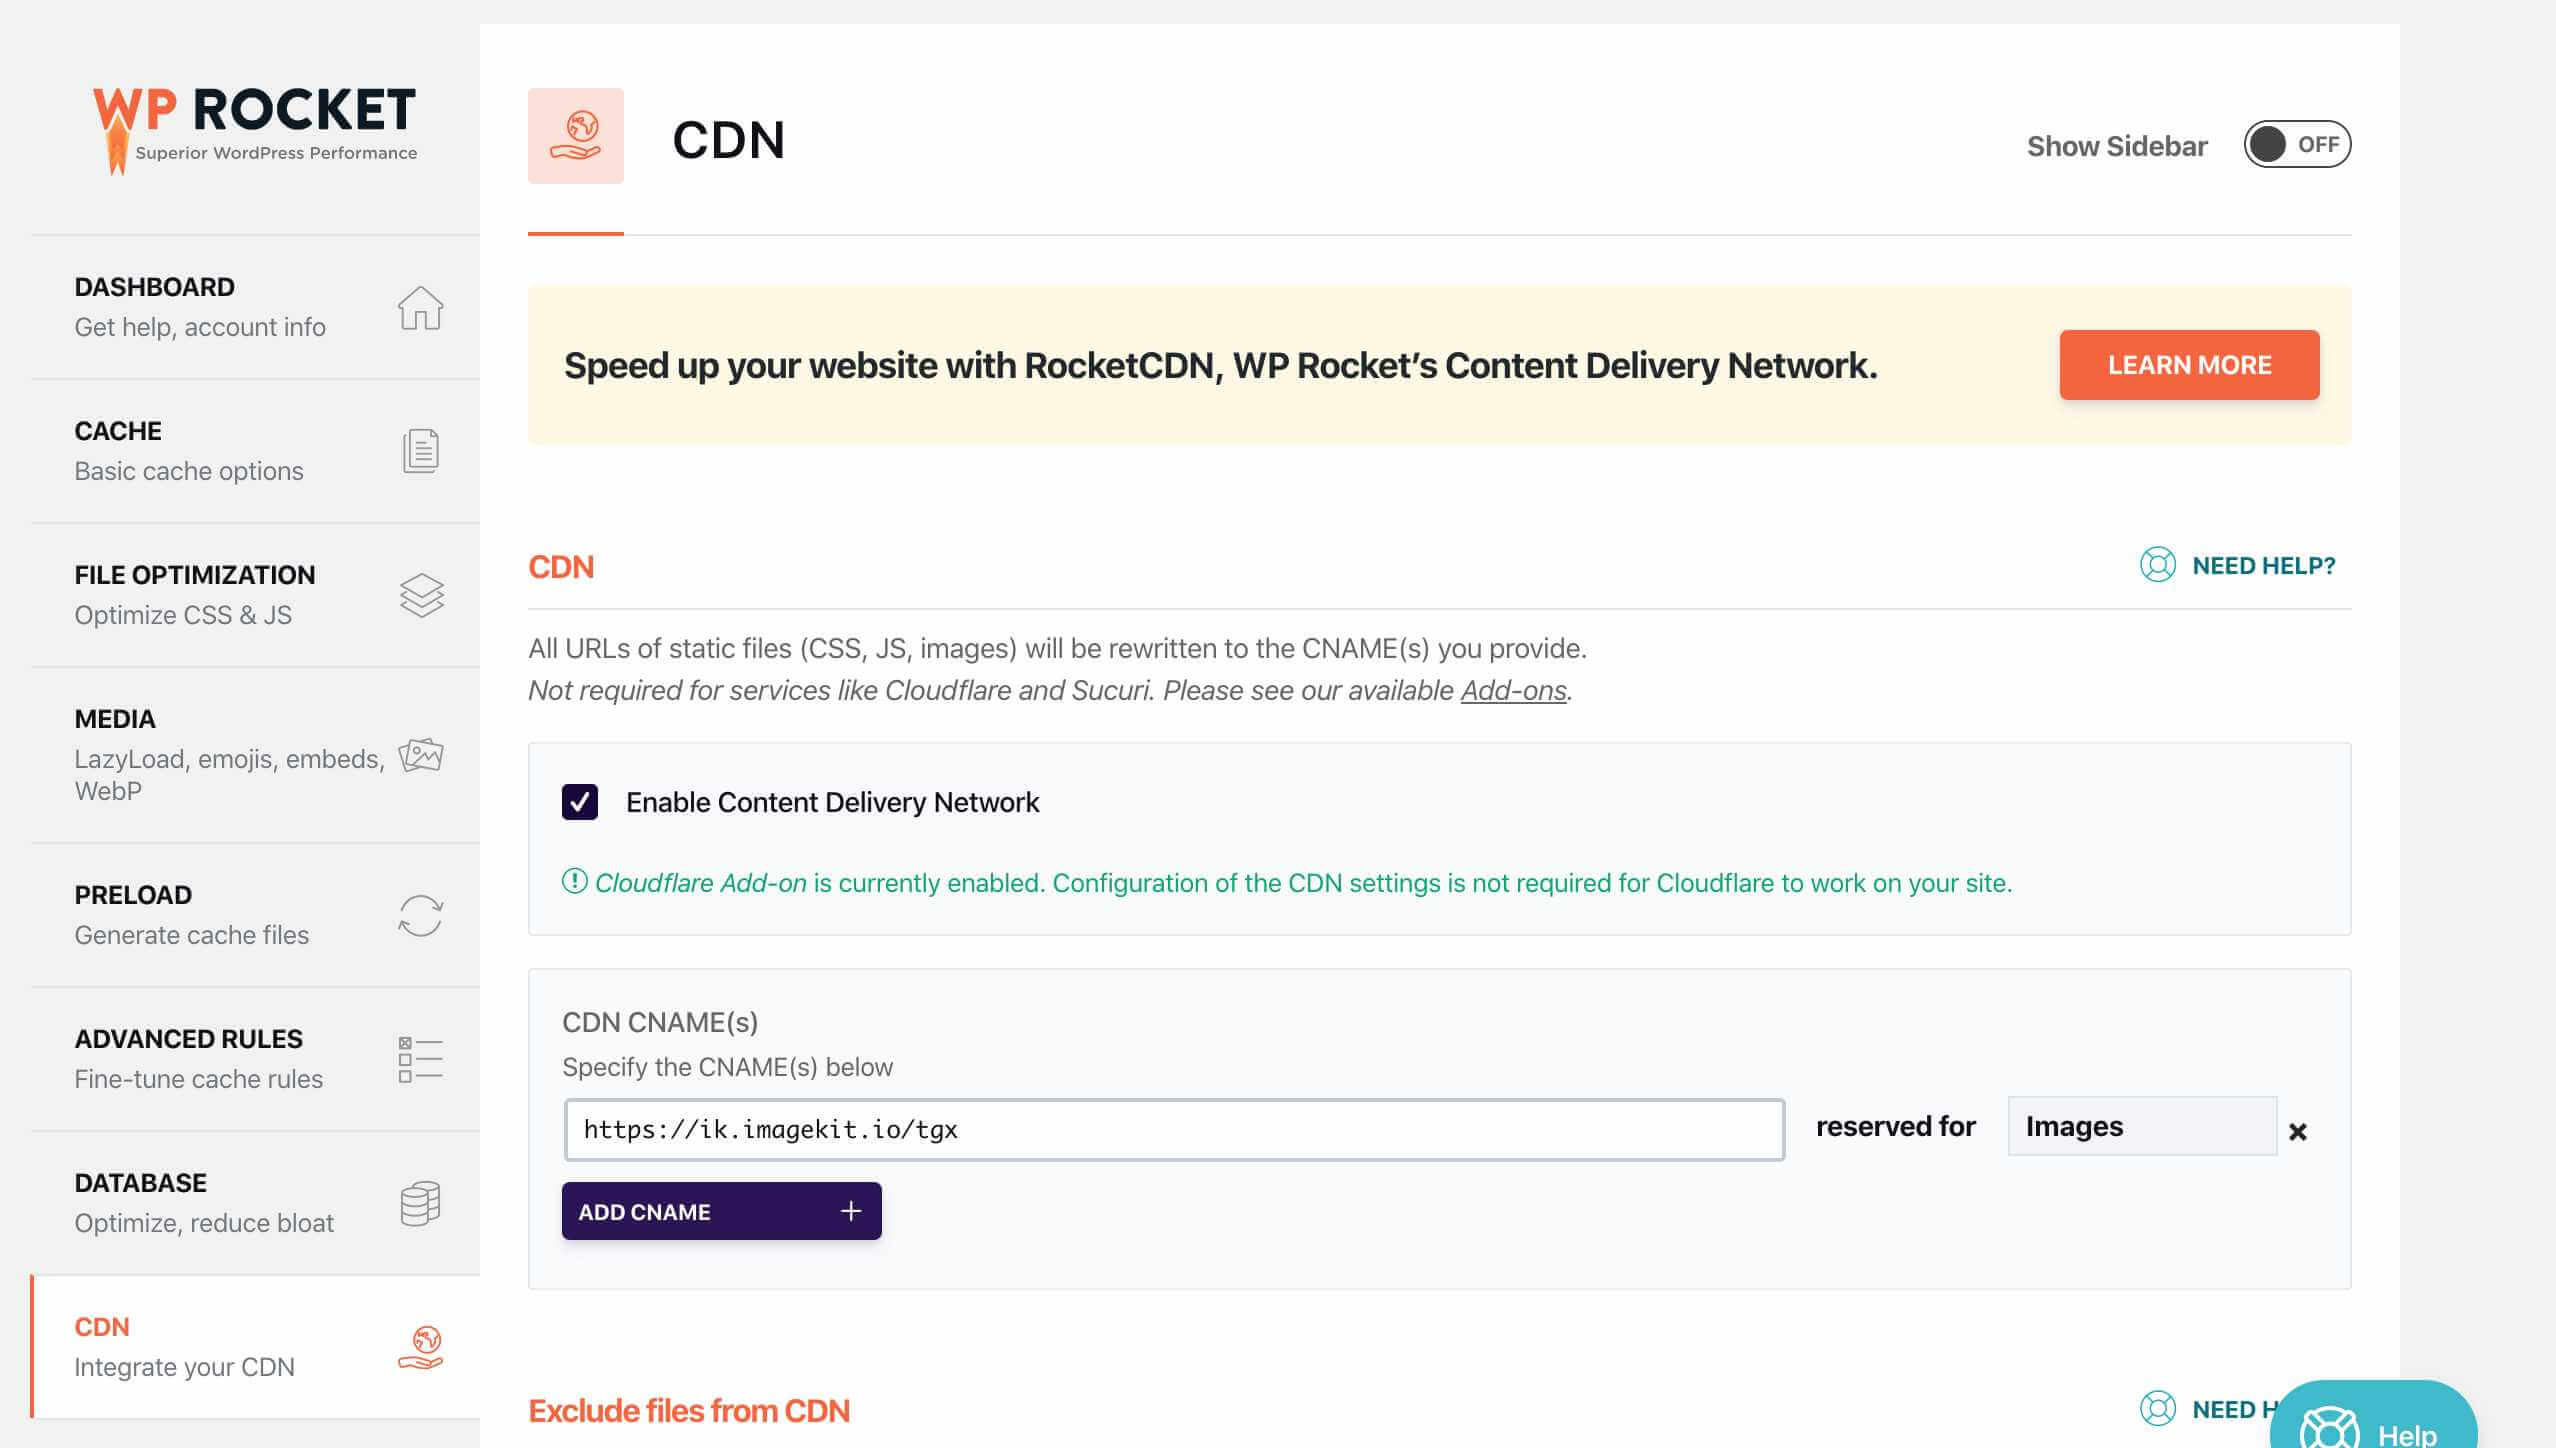
Once we’re on the CDN page, we have to enable the CDN for our website and then in the field enter the URL of ImageKit and on the “reserve for” setting, change it to images.
Once you do it, WP Rocket only re-write the URL of images from https://theguidex.com name to https://ik.imagekit.io/tgx. So your images will start loading from CDN URL in real-time.
Once you make these changes, we’ll now do some optimizations tweaks in ImageKit for better compressions and Image Delivery.
And for these optimization tweaks, we again login to the ImageKit Dashboard, and then click on the Image Settings.
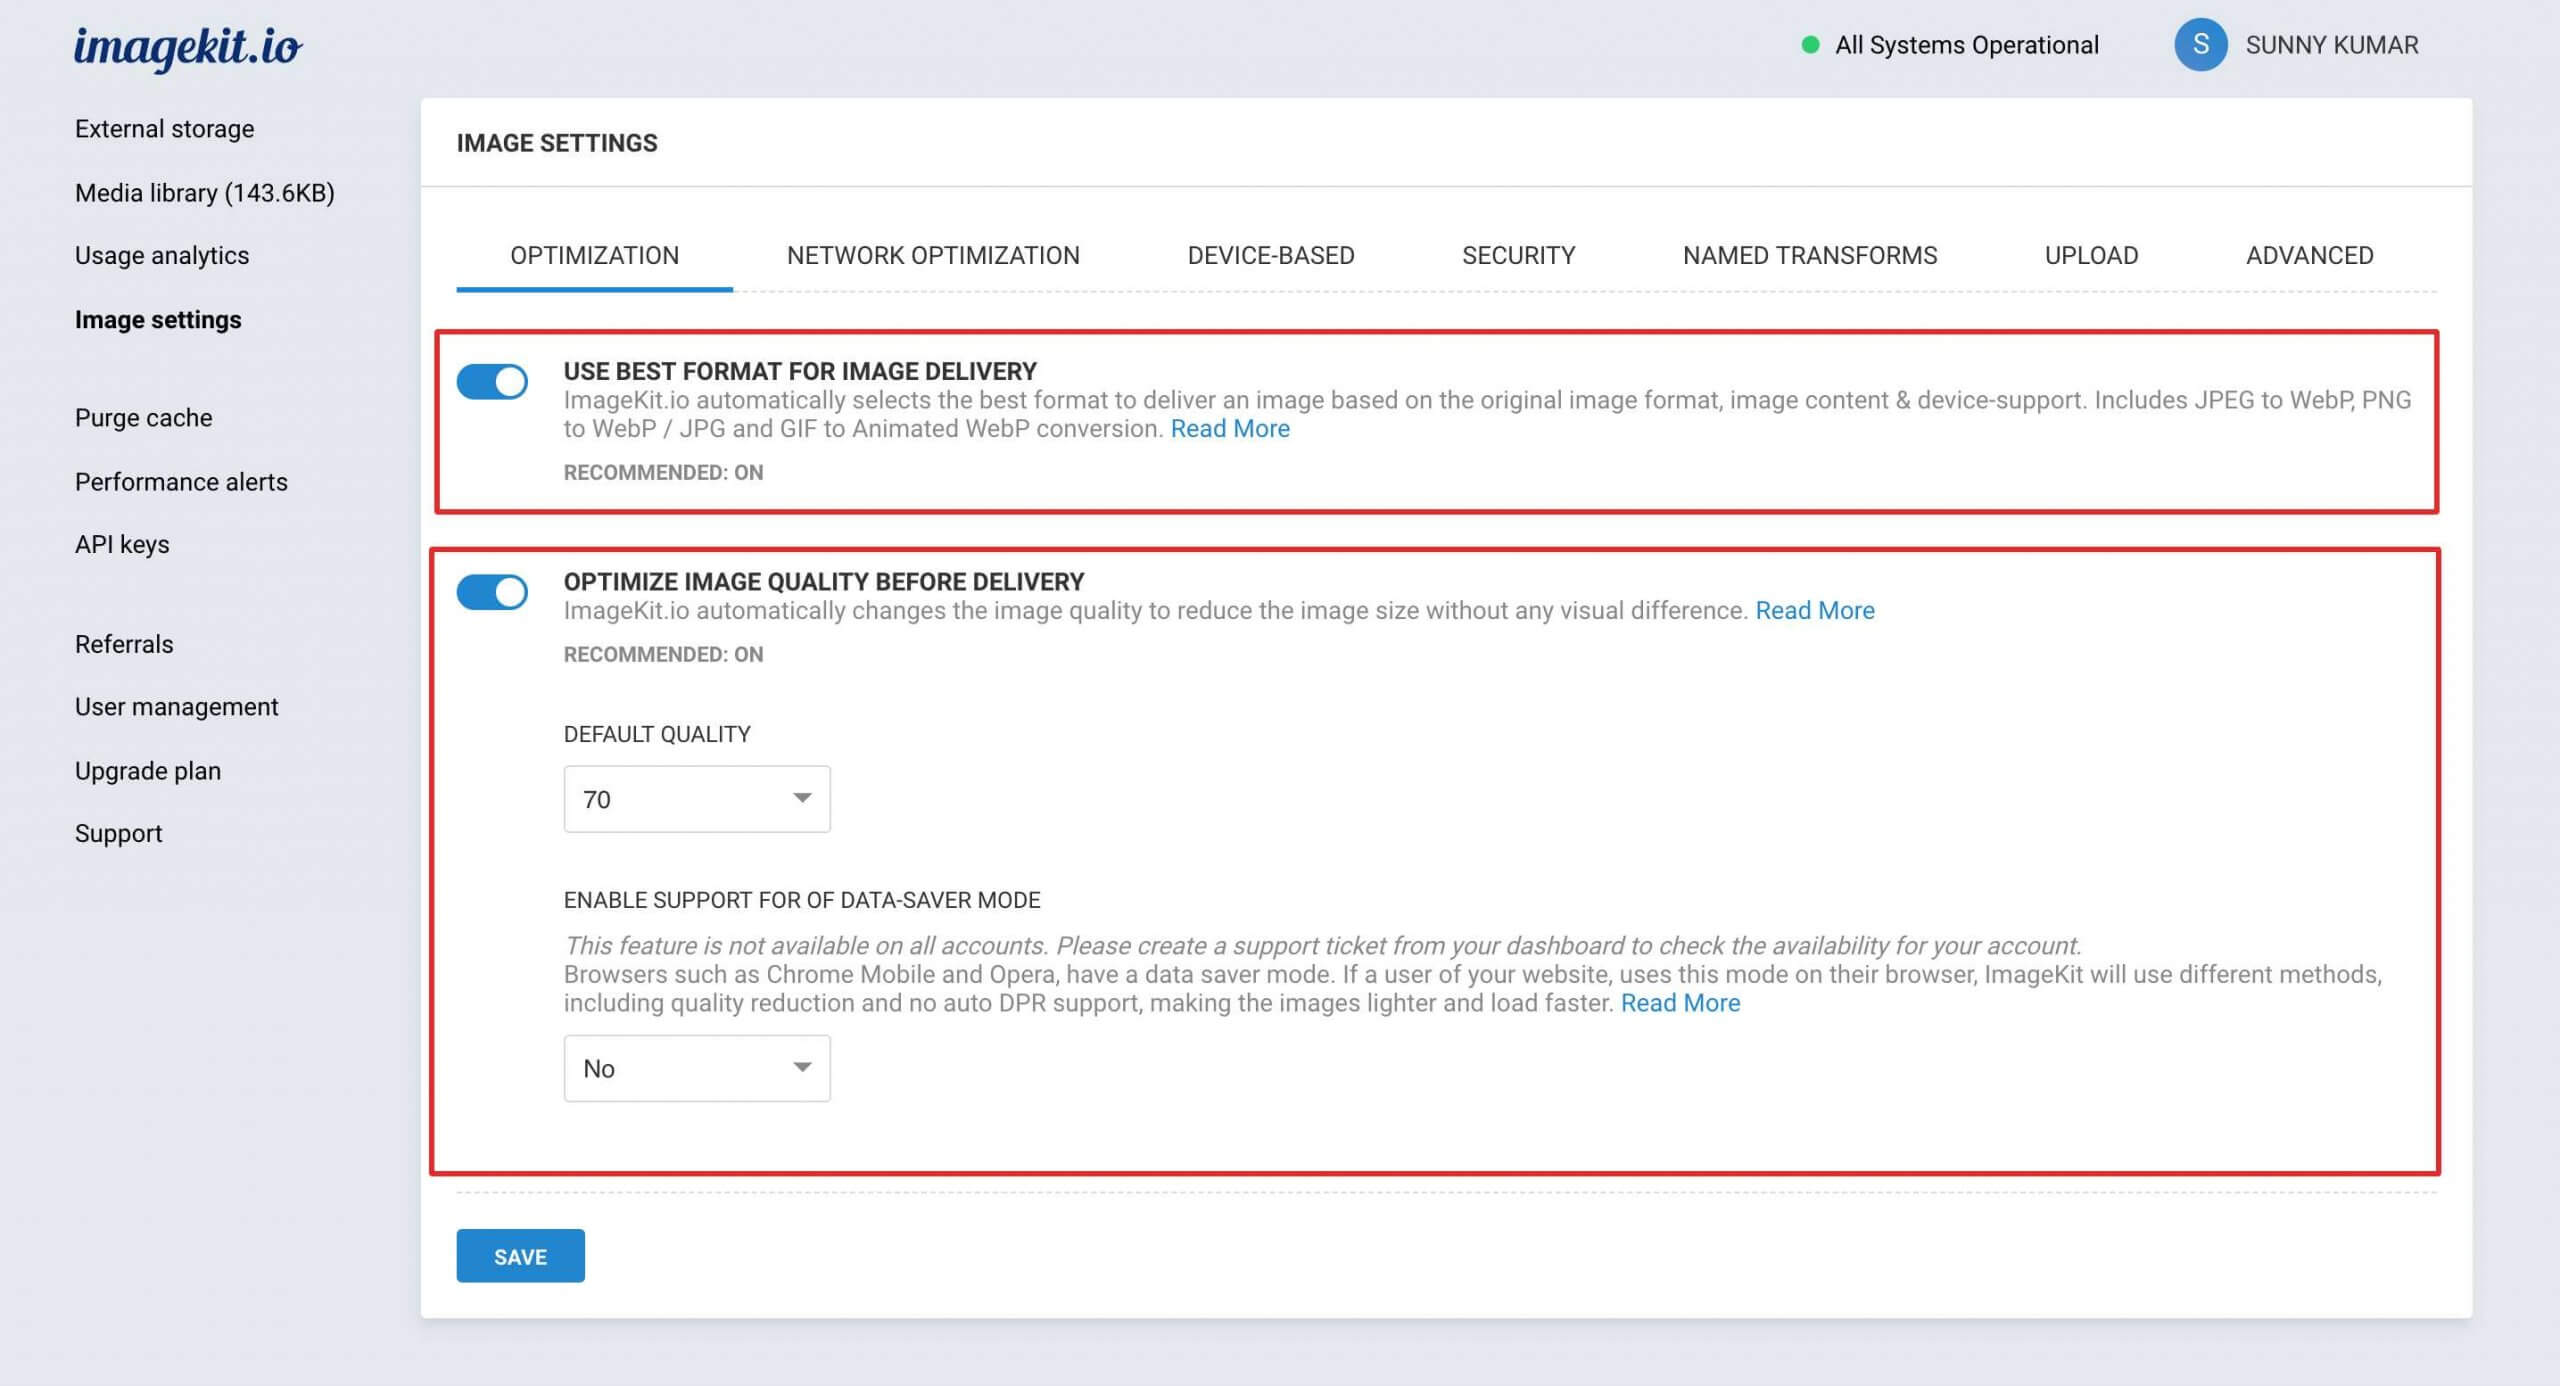
Once you’re on the Image Settings page, you can customize the settings according to your needs.
Here as you can see, I’ve enabled the “Use Best Format for Image Delivery” and also enable Image Quality to 70%.
You can also set it as per your needs, but I recommend you not to decrease the size of images below 70%.
If you want, you can also enable the settings for Data Saver. If a user of your website, uses Data Saver mode on their browser, ImageKit will use different methods, including quality reduction and no auto DPR support, making the images lighter and load faster.
And next to Optimization settings, you’ll get an option of Network Optimization. In network optimization settings, you’ll get an option to serve the quality of images as per users’ network type.
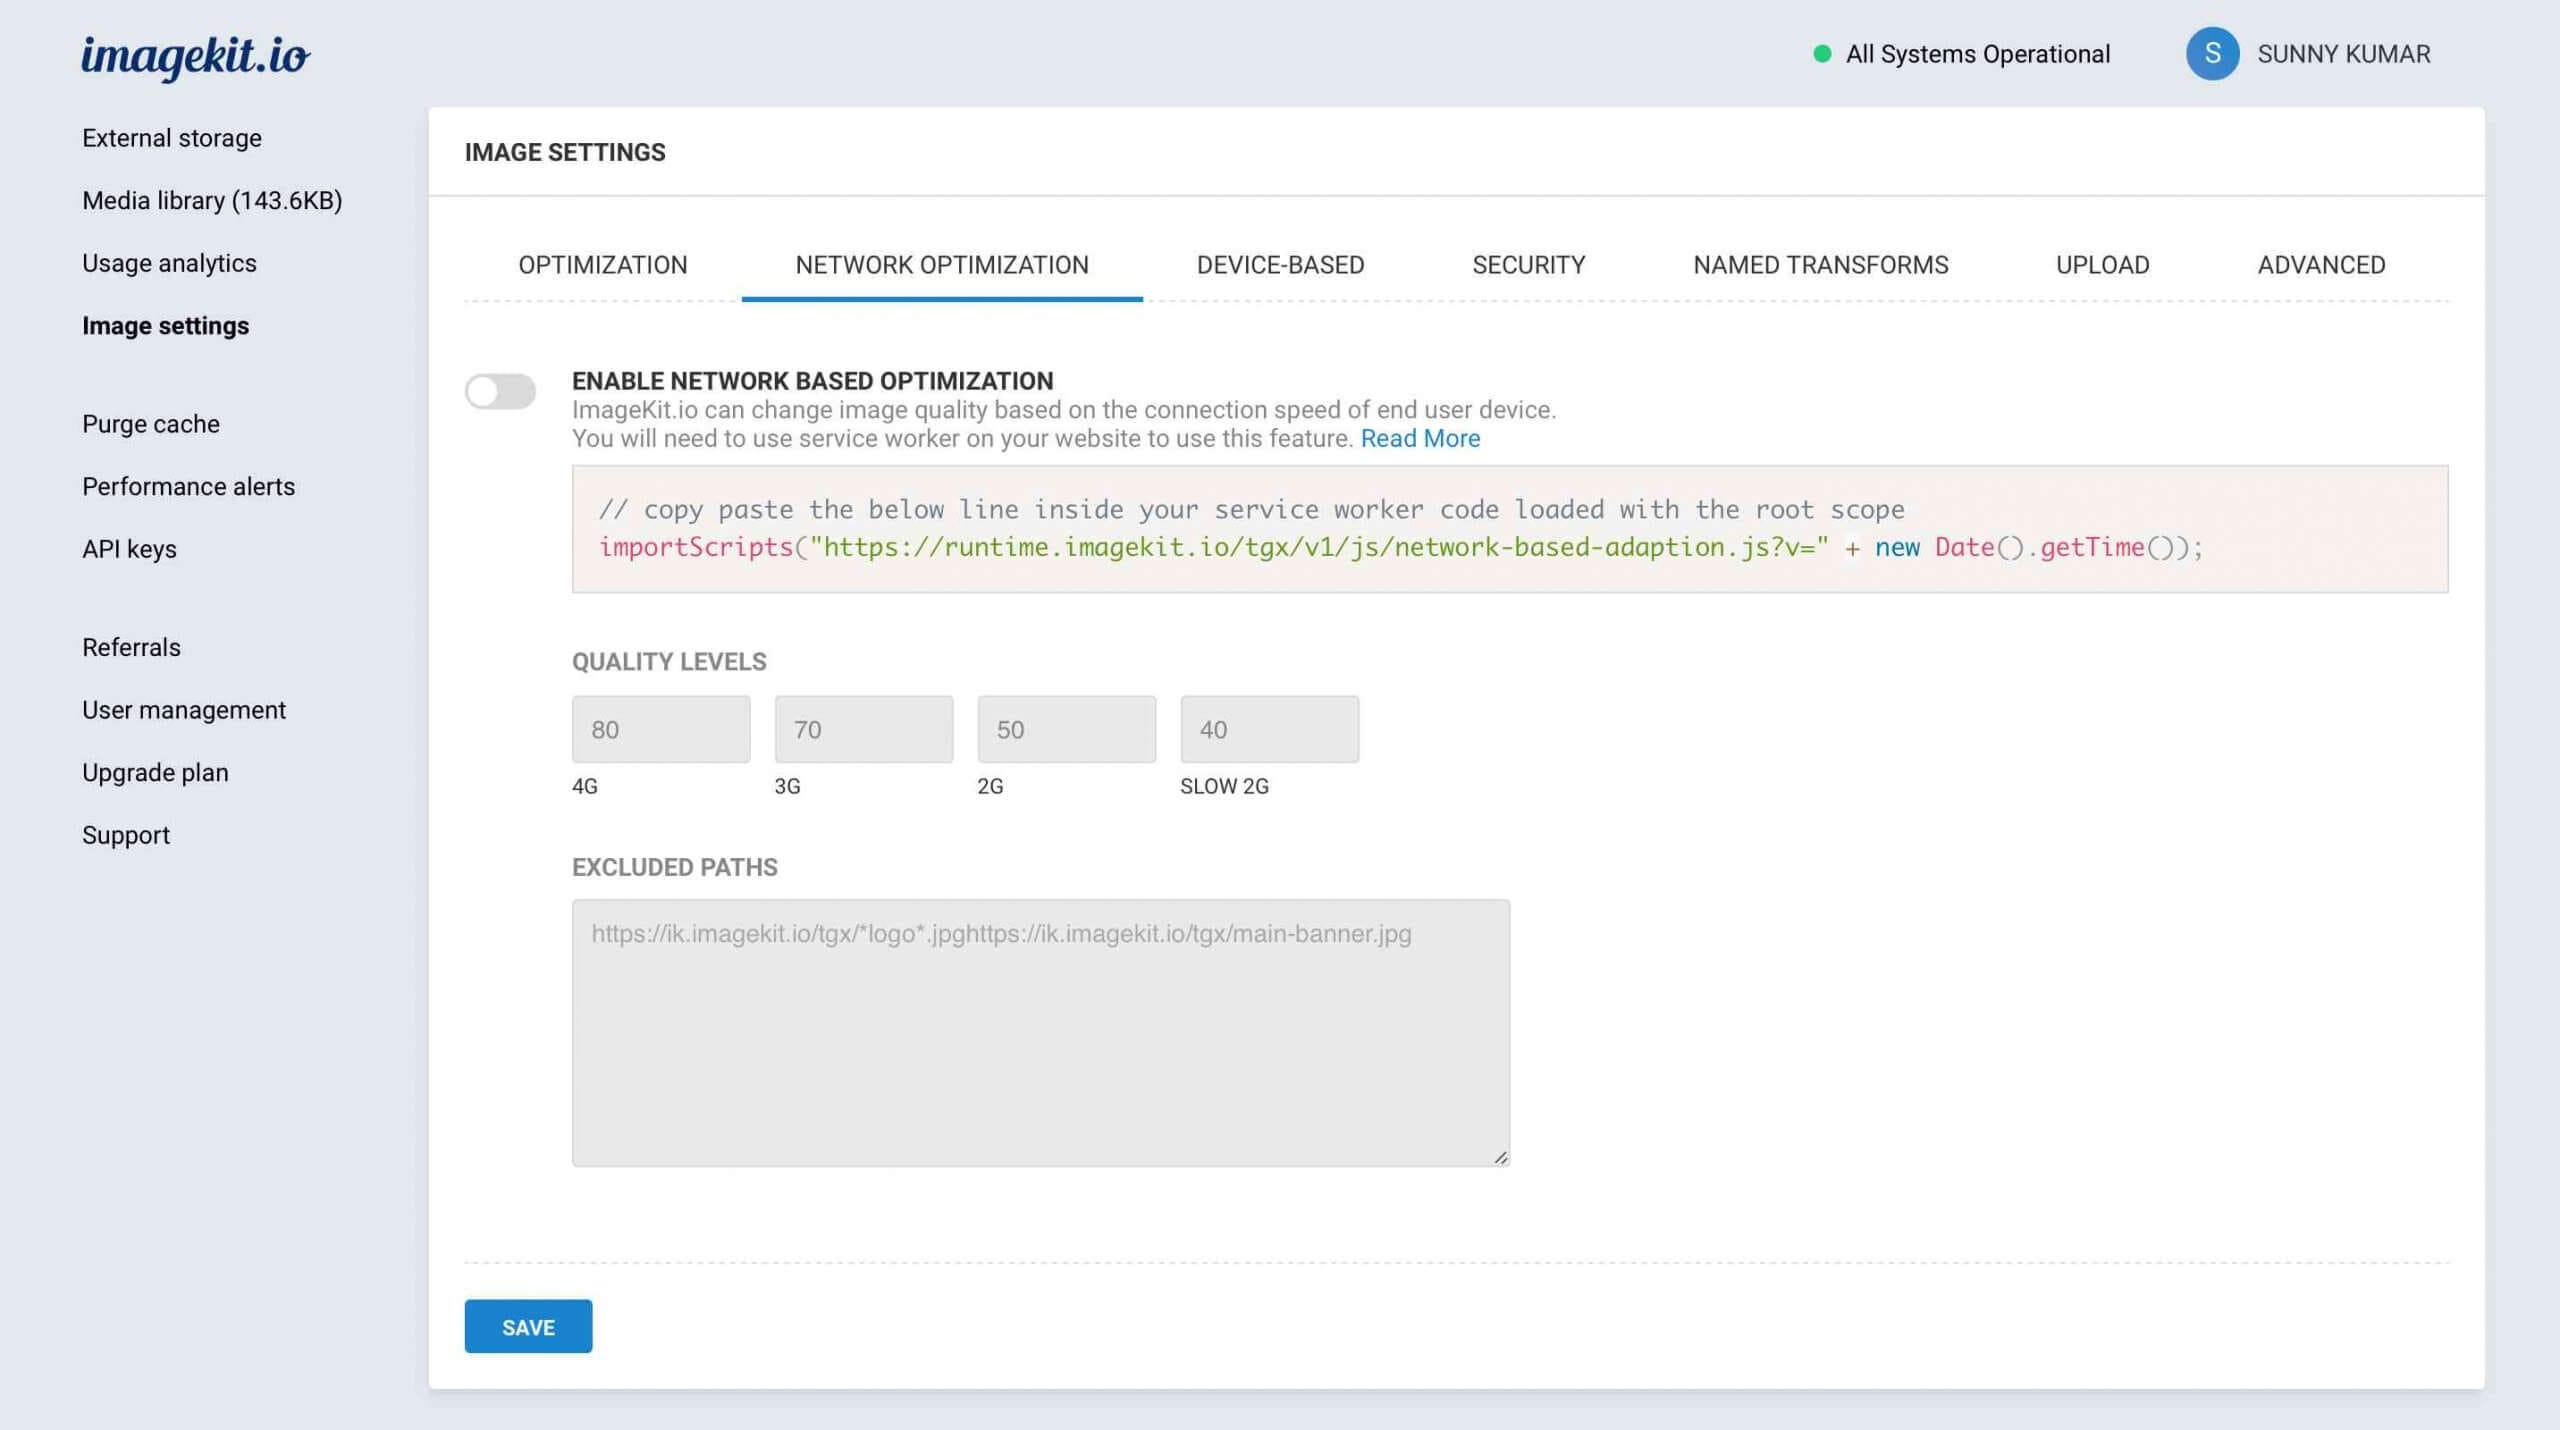
Mostly, people use 4G devices. Closely examine your analytics to learn more about the Network type. If you find out that people are using the slower network to access your website, then you can manually set the image delivery quality from here.
So these are the most important settings for ImageKit, but you can do a lot more settings from their Image Settings page.
These settings can include manually setting image height and width for mobile & desktop devices, saving a copy of your images, etc. but we will not discuss these settings in this post, and they’re of no use to us.
Now we will move to the third part of using a CDN on our website. And in this step, we’ll show you how to implement and use Cloudfront on our website for JS & CSS.
4.3 Use Amazon Cloudfront for JS and CSS
As you know, Amazon CloudFront is one of the most popular CDN you ever get, and the world’s biggest websites rely on Amazon CloudFront CDN service.
They have 61 servers deployed around the globe, which are capable of transmitting and delivering the images of the websites faster in specific locations.
First, click on the “Get Started with Amazon Cloudfront” and register at their website using your existing Amazon ID, or you can also use a new email ID to register on their platform.
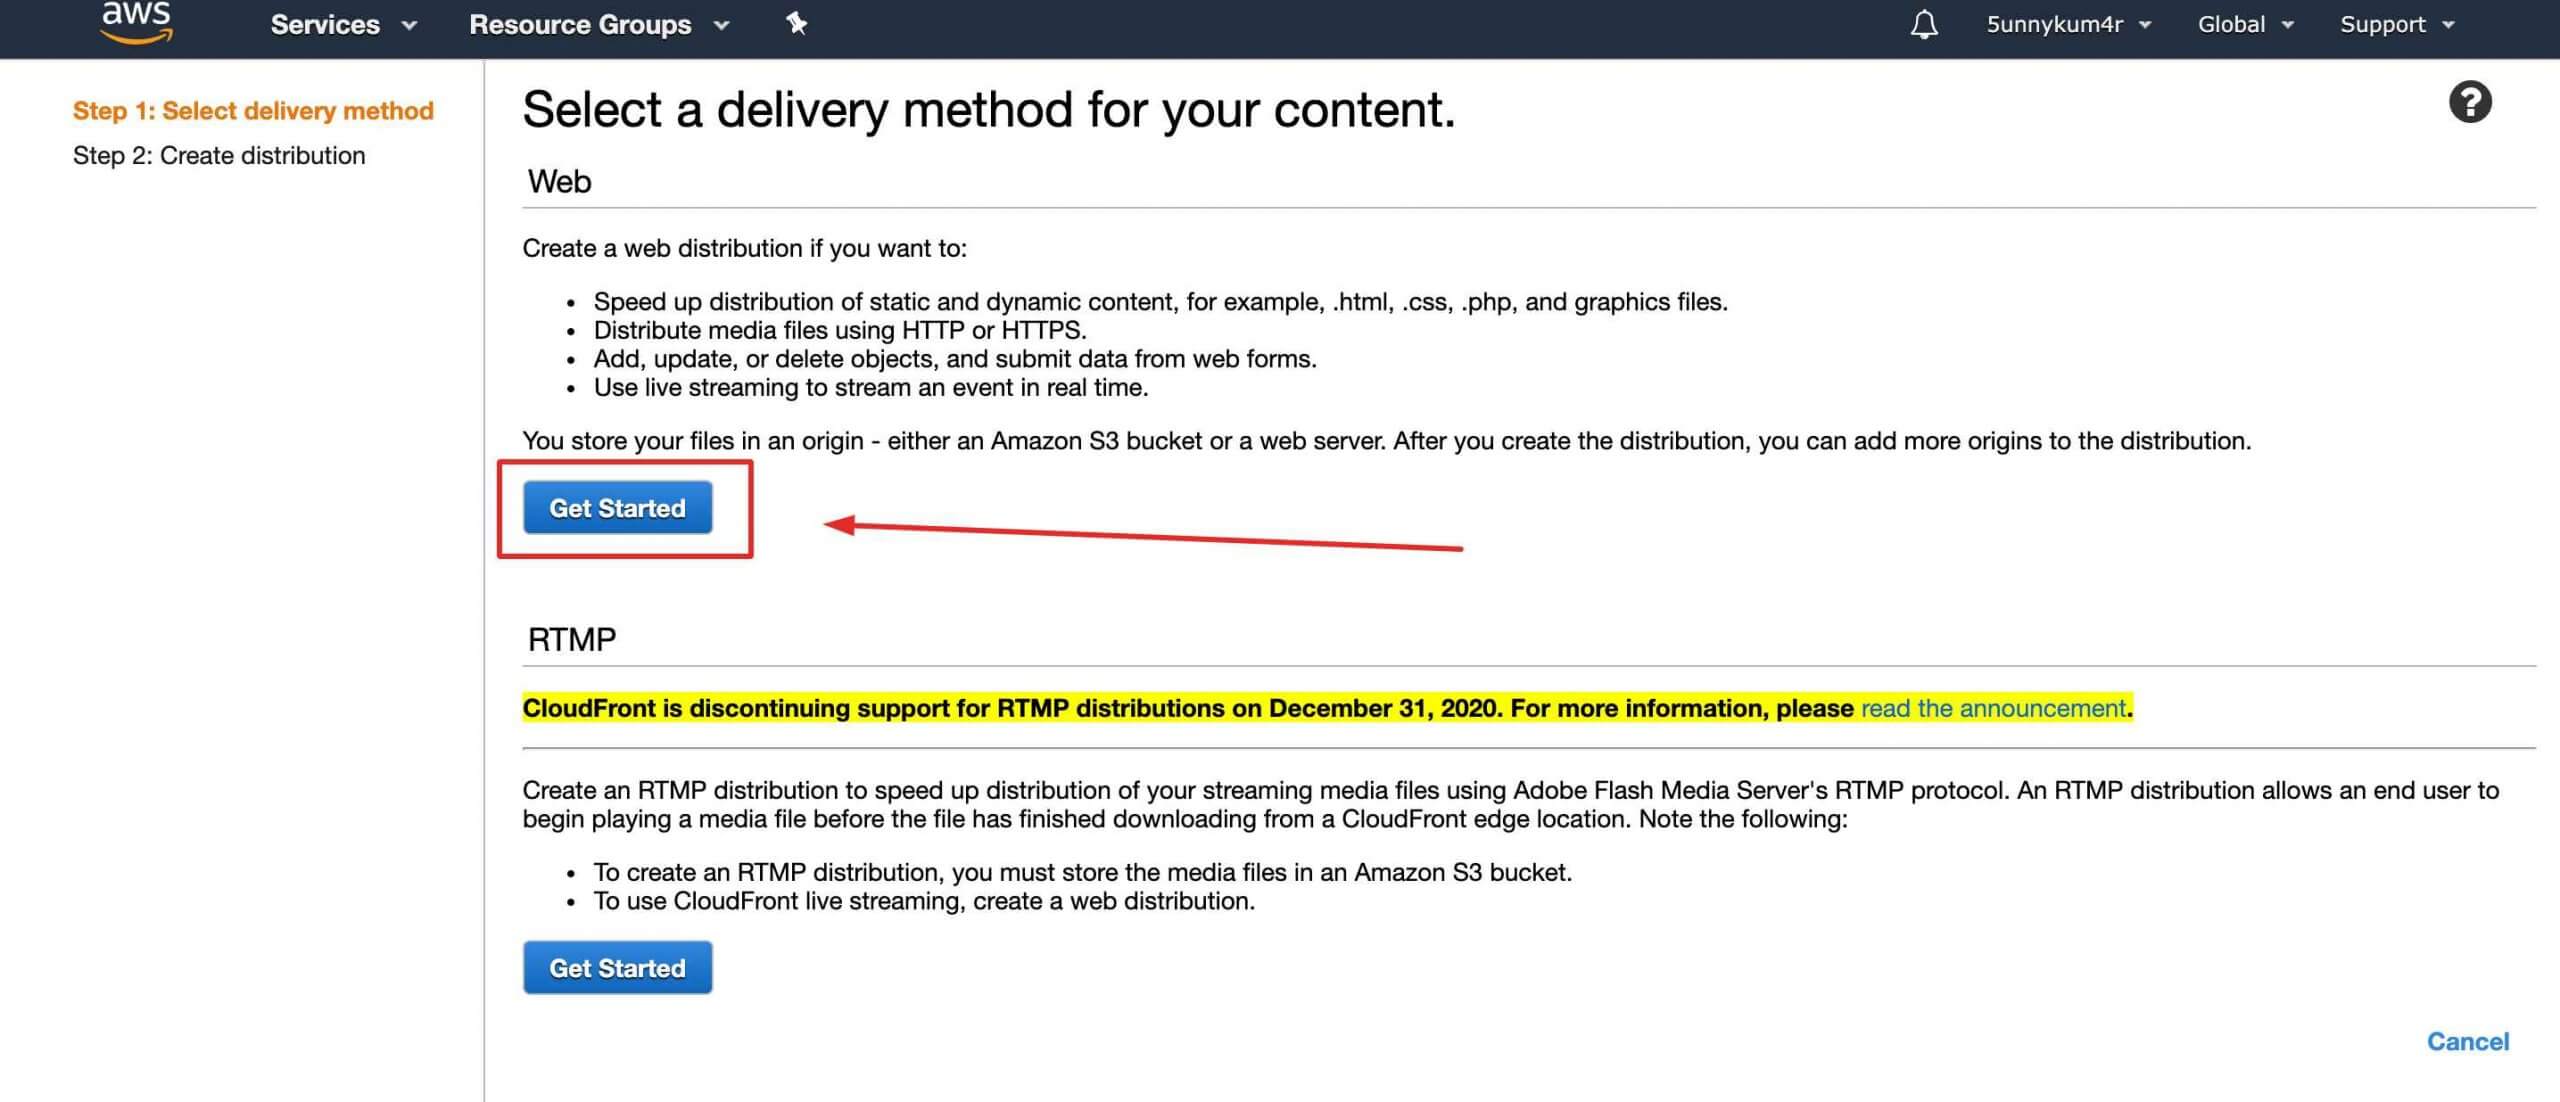
Once you logged in to the Amazon AWS account, search for the Cloudfront (you can also click here to visit Cloudfront page directly) and then click on the “Create Distribution” and then select the Web property and click on “Get Started.”
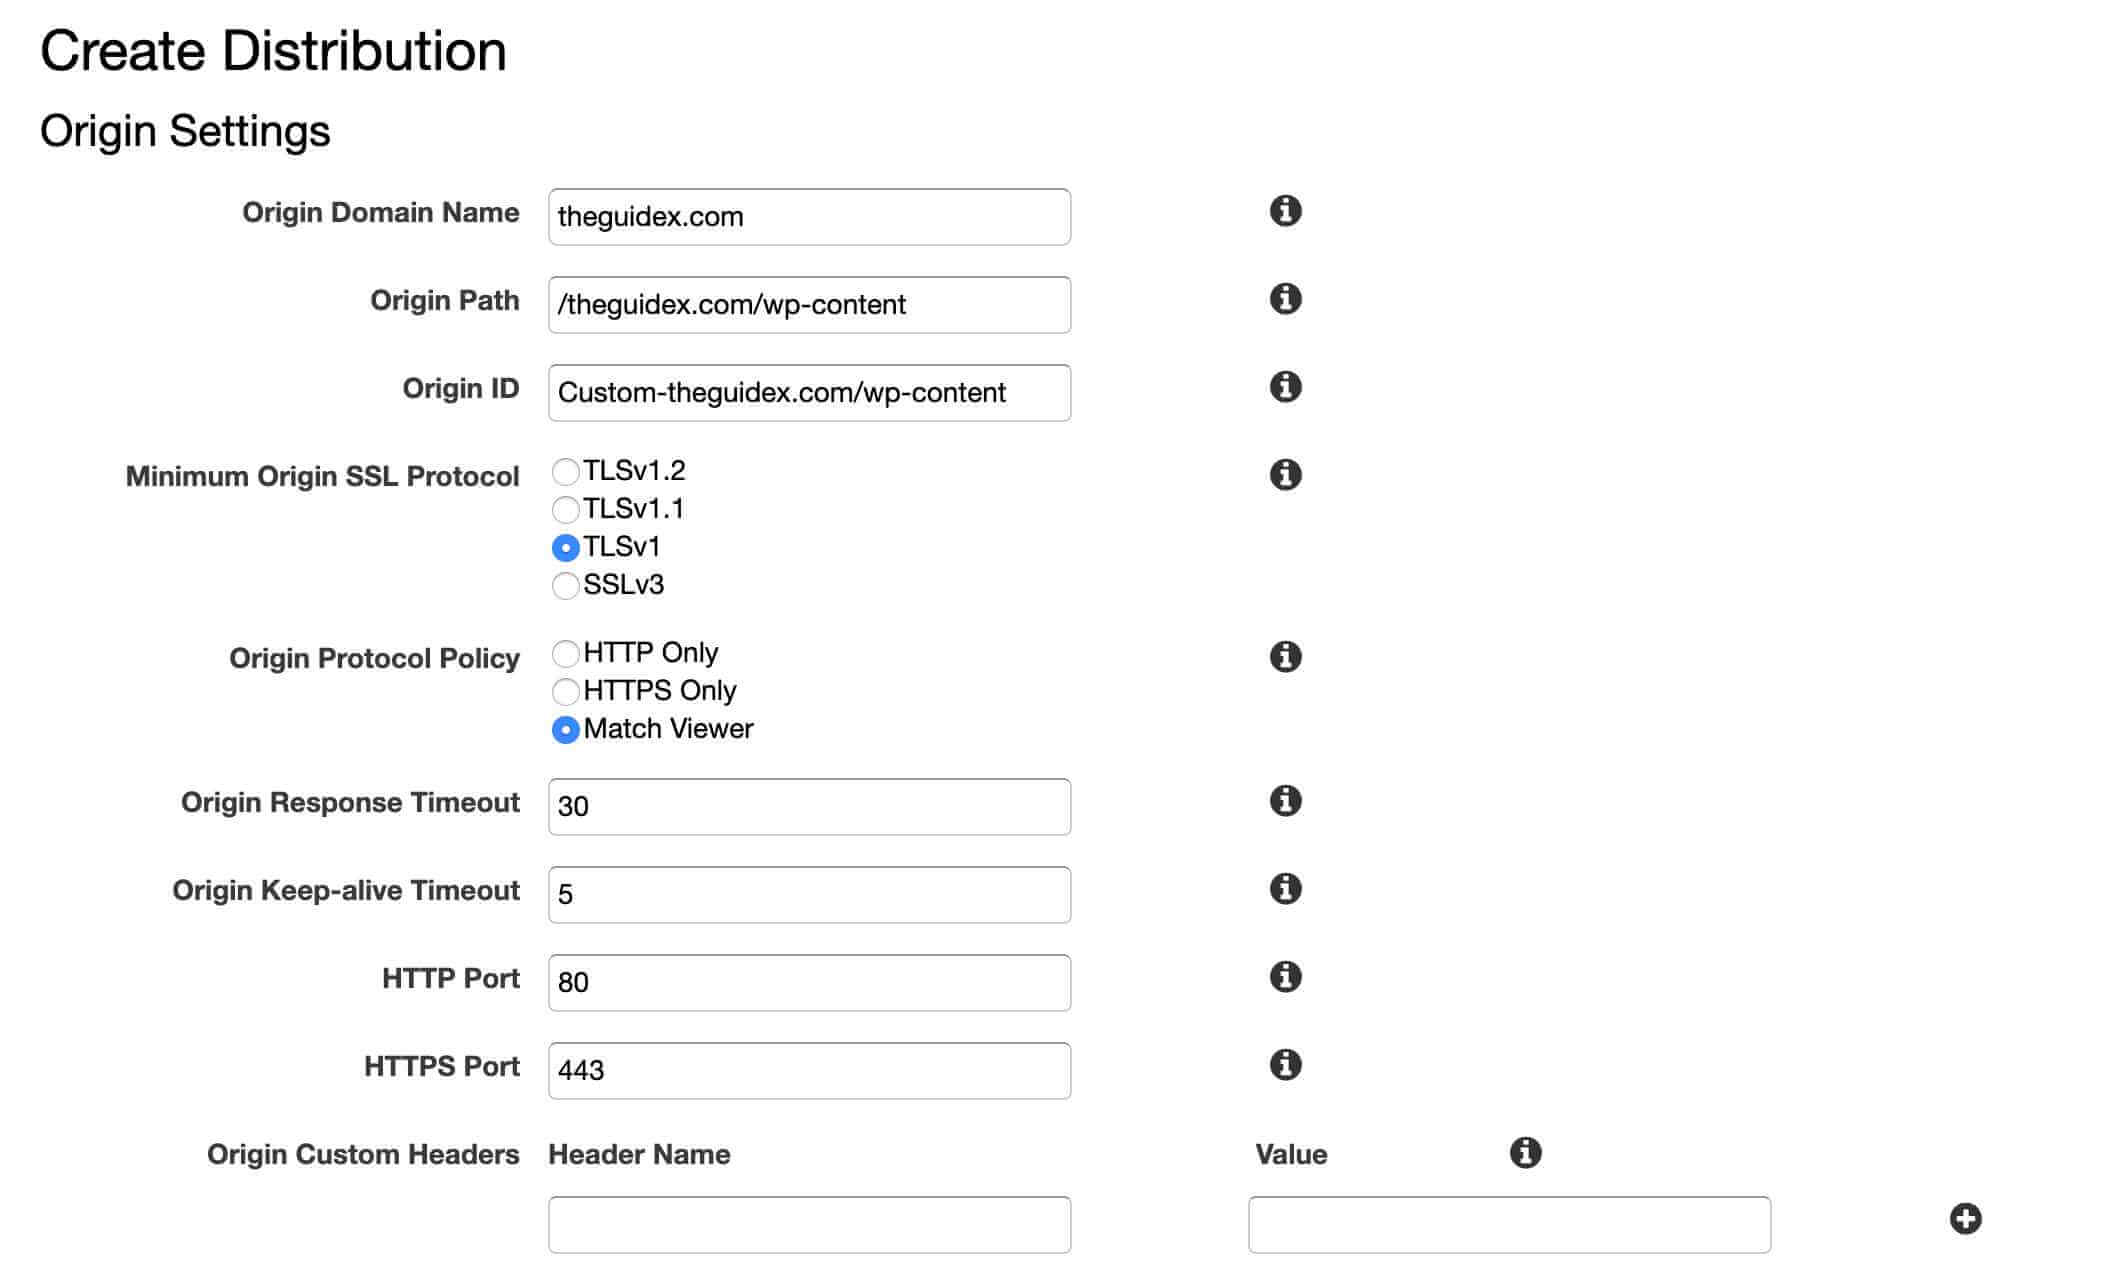
In the Origin Domain Name, enter your domain name. In this case, my domain name is https://theguidex.com, so I’m entering theguidex.com (without www or https).
Next to it, you’ve to enter the origin path, enter the path to your wp-content folder and then select TLSv1 in SSL protocol & select “Match Viewer” in origin protocol.
Now, scroll down to the “Distribution Settings,” and then select “Use All Edge Locations” in the price class and set the default CloudFront SSL settings.
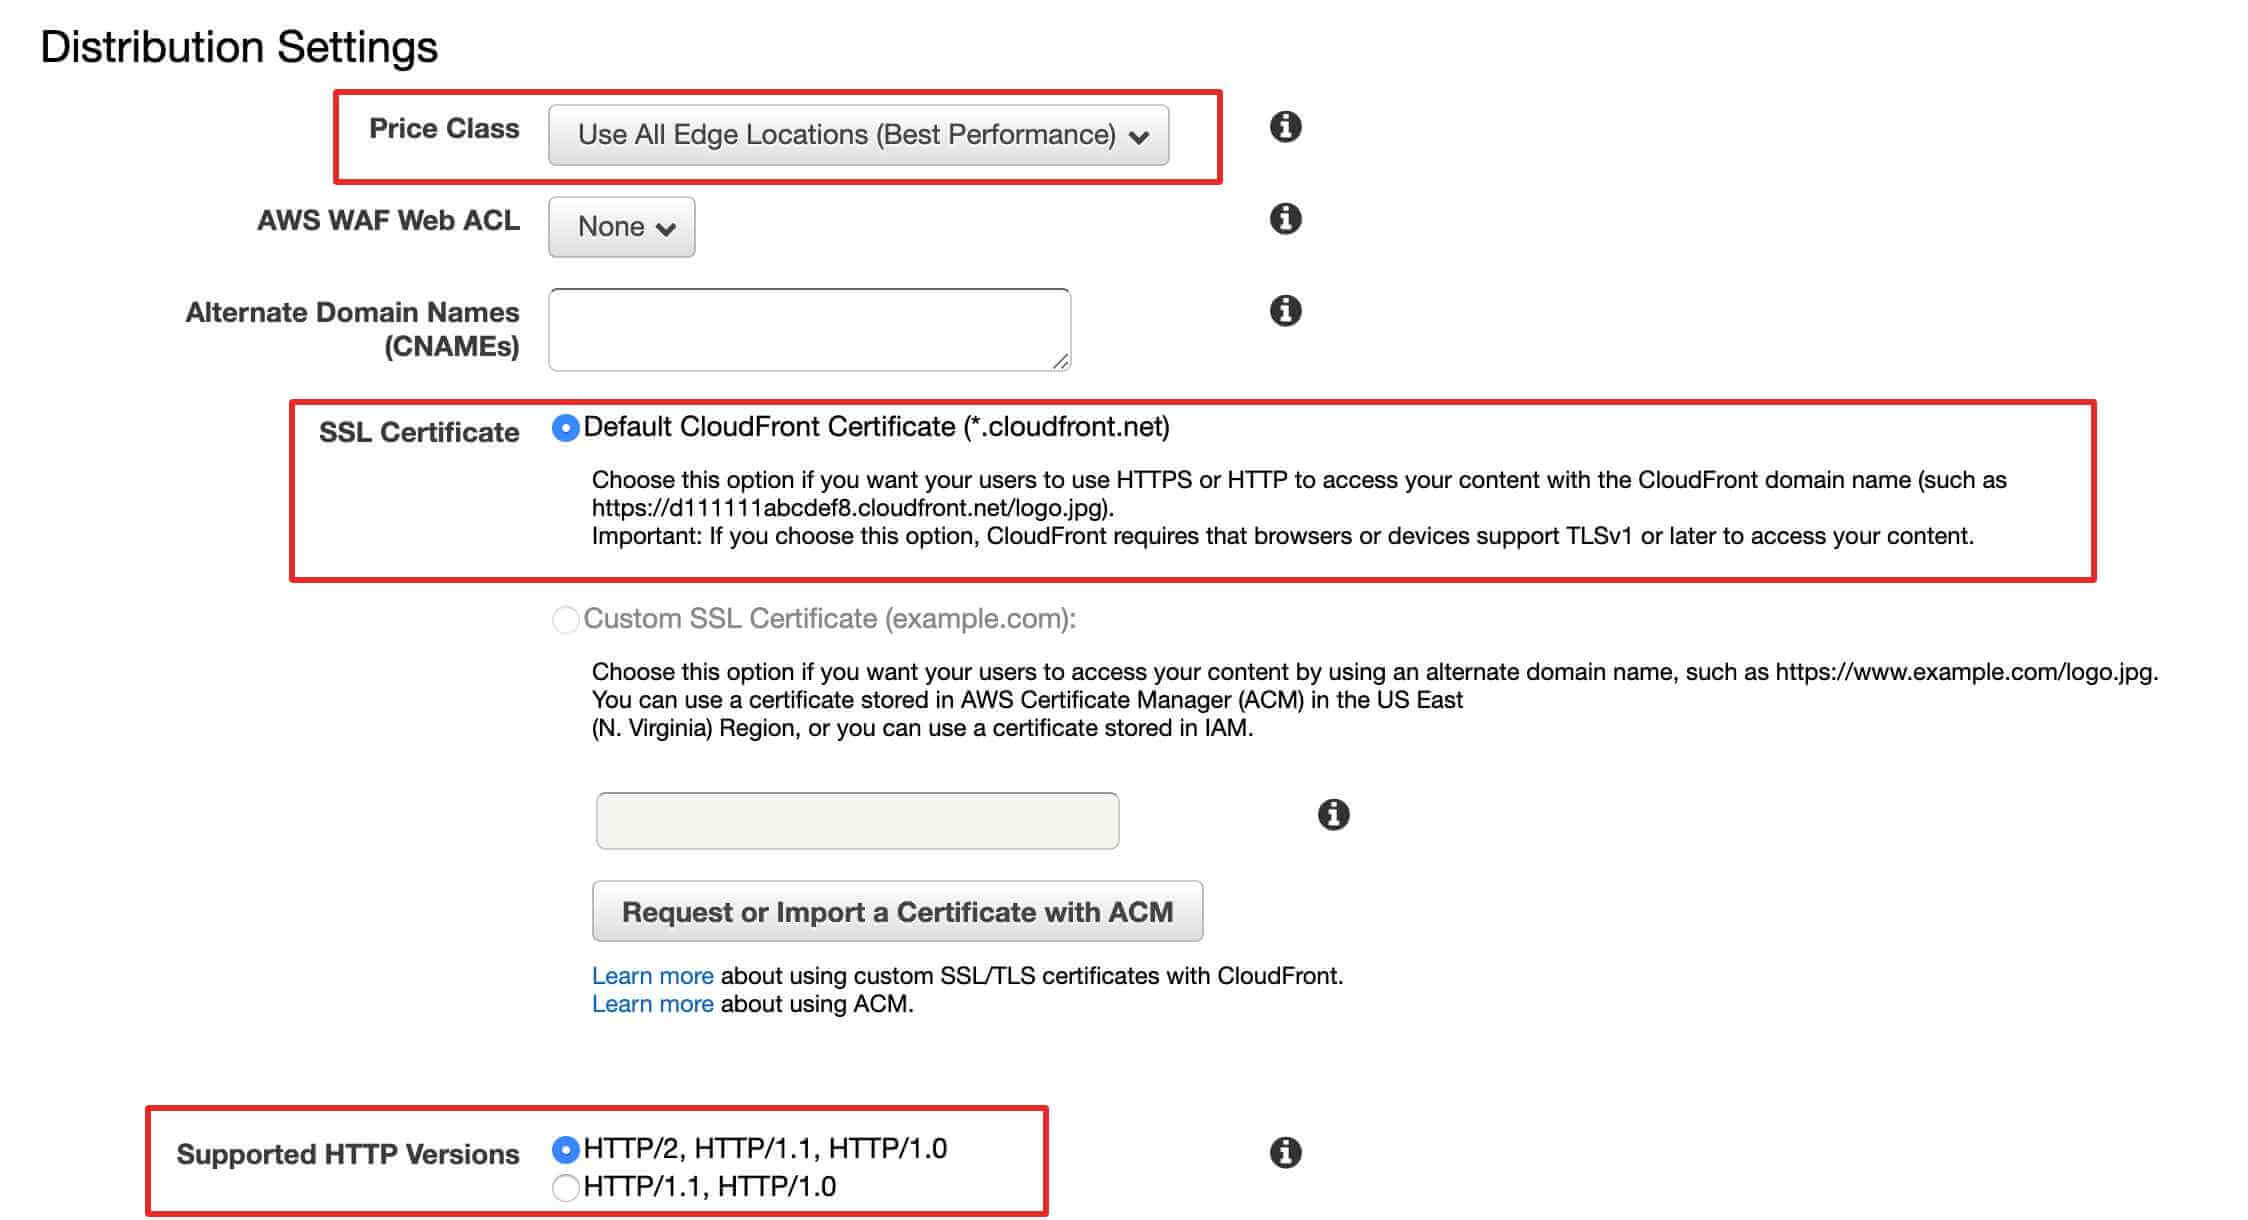
You can also set the Supported HTTP Version and change it to “HTTP/2, HTTP/1.1, HTTP/1.0”. Once you’ve done these settings, click on “Create Distribution.”
It will take a few minutes to create a distribution in Cloudfront, and once it is created, you’ve to wait for around 5-6 hours (In my case, it takes 7-8 hours to work properly).

Again go to the Cloudfront distribution page and check if your distribution is properly enabled (It will show in the green color text under the state section).
Once it is enabled, click on the ID of your origin domain.
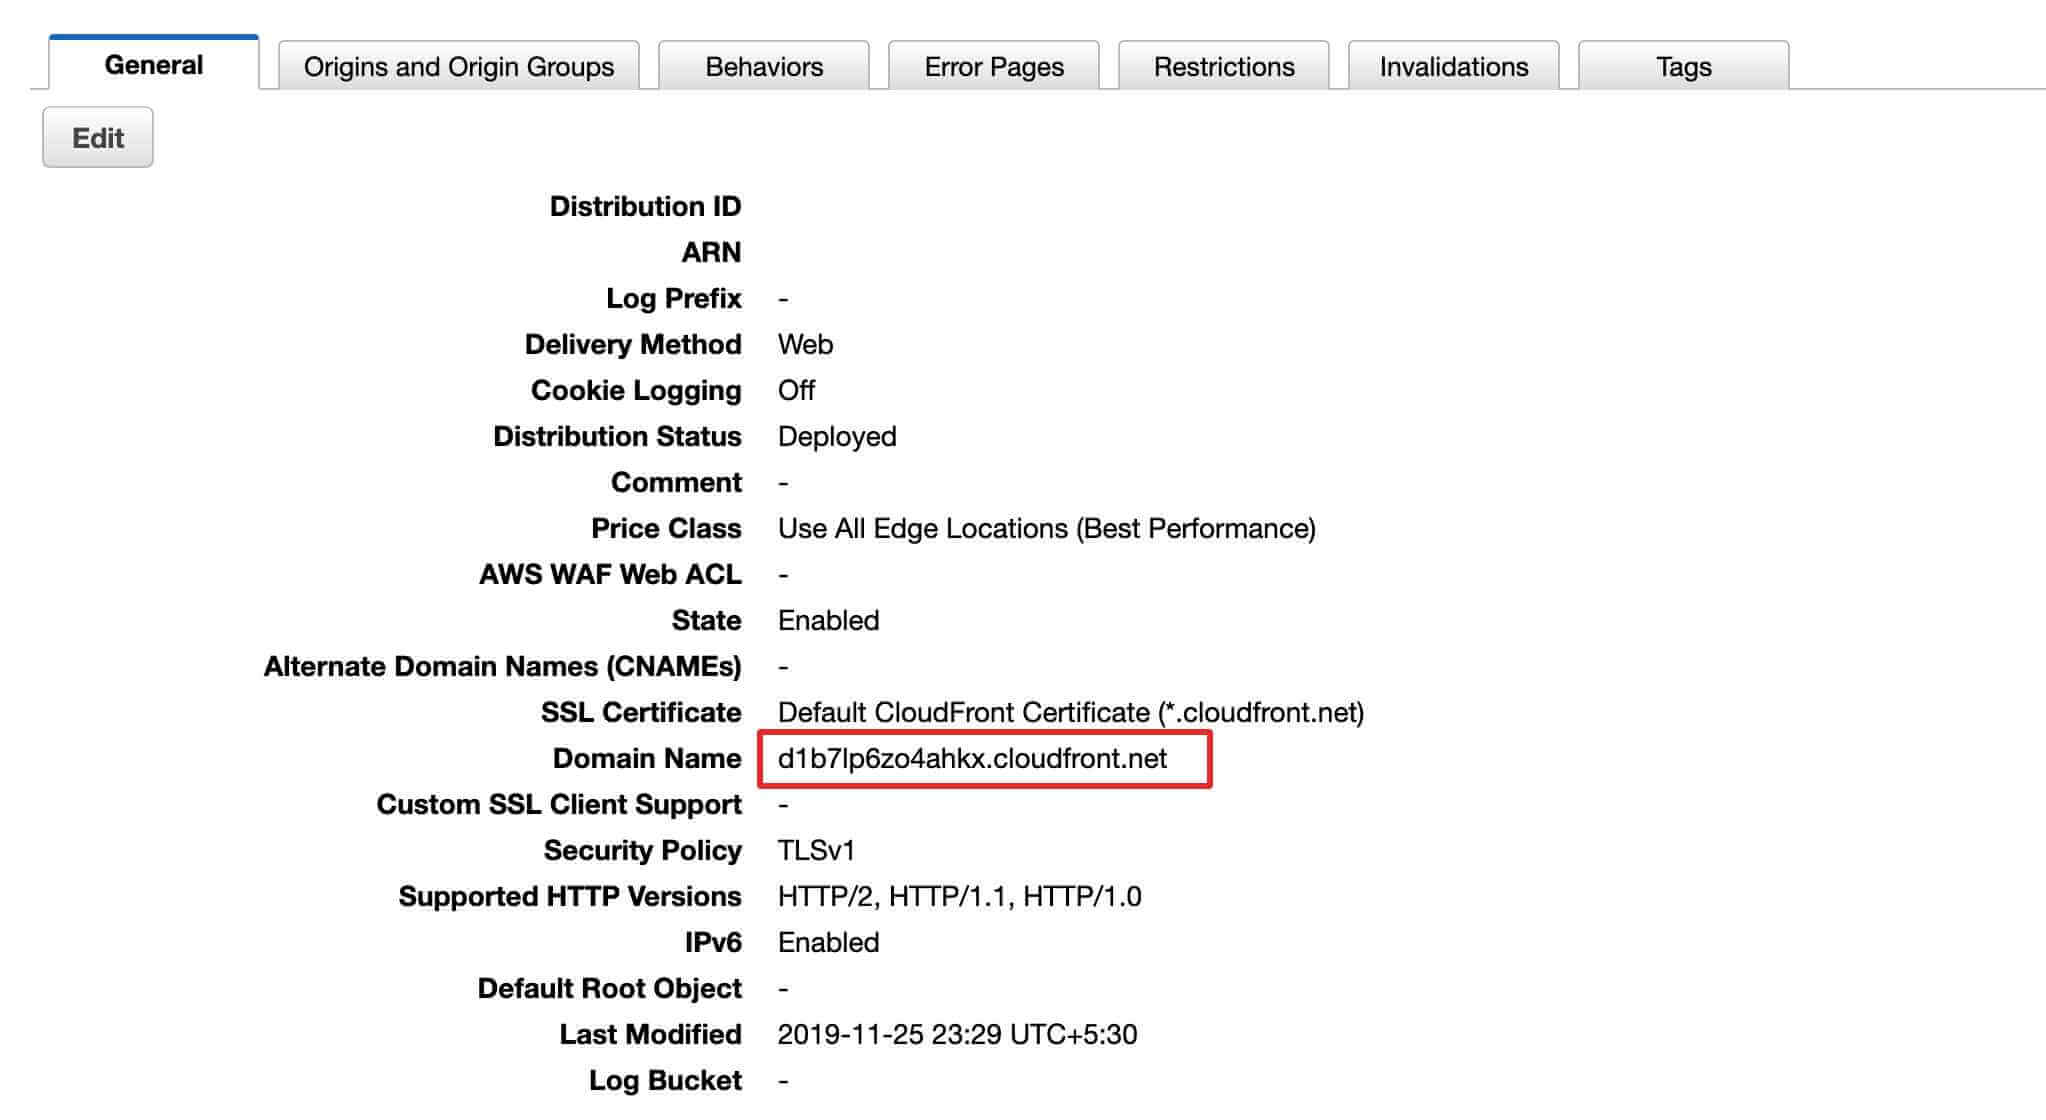
When you click on the distribution ID, it will open a similar page I’ve shown in the image above. Copy the domain name (shown in the red box) and paste it on the CDN section of WP Rocket.
Once you paste the domain name in WP Rocket, then select the reserved for to => “Javascript/CSS.”
Now you’ve successfully setup the AWS Cloudfront on your domain name.
These settings are enough for your website to increase its performance in Google PageSpeed Insight, GTmetrix, and Pingdom. You can now see instant growth in your website performance.
Still, if you’re not sure how to increase the speed of your website, or you need a website speed optimization service, you can reach me at [email protected] email.
Till now, we have done mostly all possible things to optimize our website speed – But if you’re an advanced user, then I’m sharing few more methods that will help you to increase your website speed.
But if you’re a beginner or if you don’t have any technical knowledge, then I would recommend you to contact your hosting support for managing these kinds of stuff.
Fine-Tuning WordPress for Speed (Advanced)
In this fine-tuning WordPress speed optimization method, we’re sharing some advanced tips that work amazingly to optimize the speed of your website.
1. Use Latest PHP Version
So the first method to optimize your website is by using the latest PHP version. The newer PHP 7 is two times faster than its predecessors. That’s a huge performance boost that your site must take advantage of.
Why Use Latest Version of PHP?
If you don’t know why to use the latest version of PHP on your website then here is the answer, The WordPress is mainly written in PHP language, and PHP is a server-side language.
So if you use the latest PHP version on your website can increase the performance of your website. The latest and stable version of PHP is v7.4; I even use this version of PHP on this website.
2. Limit Post Revisions
Sometimes we forget to optimize our database using plugins like WP-Optimize, and as I mentioned above, that when I was writing this post, It has saved more than 40+ revisions in my database.
Sometimes auto-saving of this much revisions can decrease the performance of your website to the worst level. You can easily limit the number of revisions WordPress keeps for each article.
Add this line of code to your wp-config.php file.
define( 'WP_POST_REVISIONS', 4 );
3. Disable Hotlinking and Leeching of Your Content
Sometimes if we create quality content on our website, it gets stolen by using RSS, and sometimes other websites serve your images directly from their URLs on your website, instead of uploading them to their own servers.
This way, it harms your site because they were stealing your website bandwidth, and you don’t get any benefit from it.
So, in this case, we have to use .htaccess code to block the hotlinking of images to save your website resources and bandwidth. The code is as follow;
#disable hotlinking of images with forbidden or custom image option
RewriteEngine on
RewriteCond %{HTTP_REFERER} !^$
RewriteCond %{HTTP_REFERER} !^http(s)?://(www\.)?theguidex.com [NC]
RewriteCond %{HTTP_REFERER} !^http(s)?://(www\.)?google.com [NC]
RewriteRule \.(jpg|jpeg|png|gif)$ – [NC,F,L]
Note: Don’t forget to change theguidex.com with your own domain name.
You can also disable the RSS feed if you’re not using it on your website.
4. Use DNS Level Website Firewall
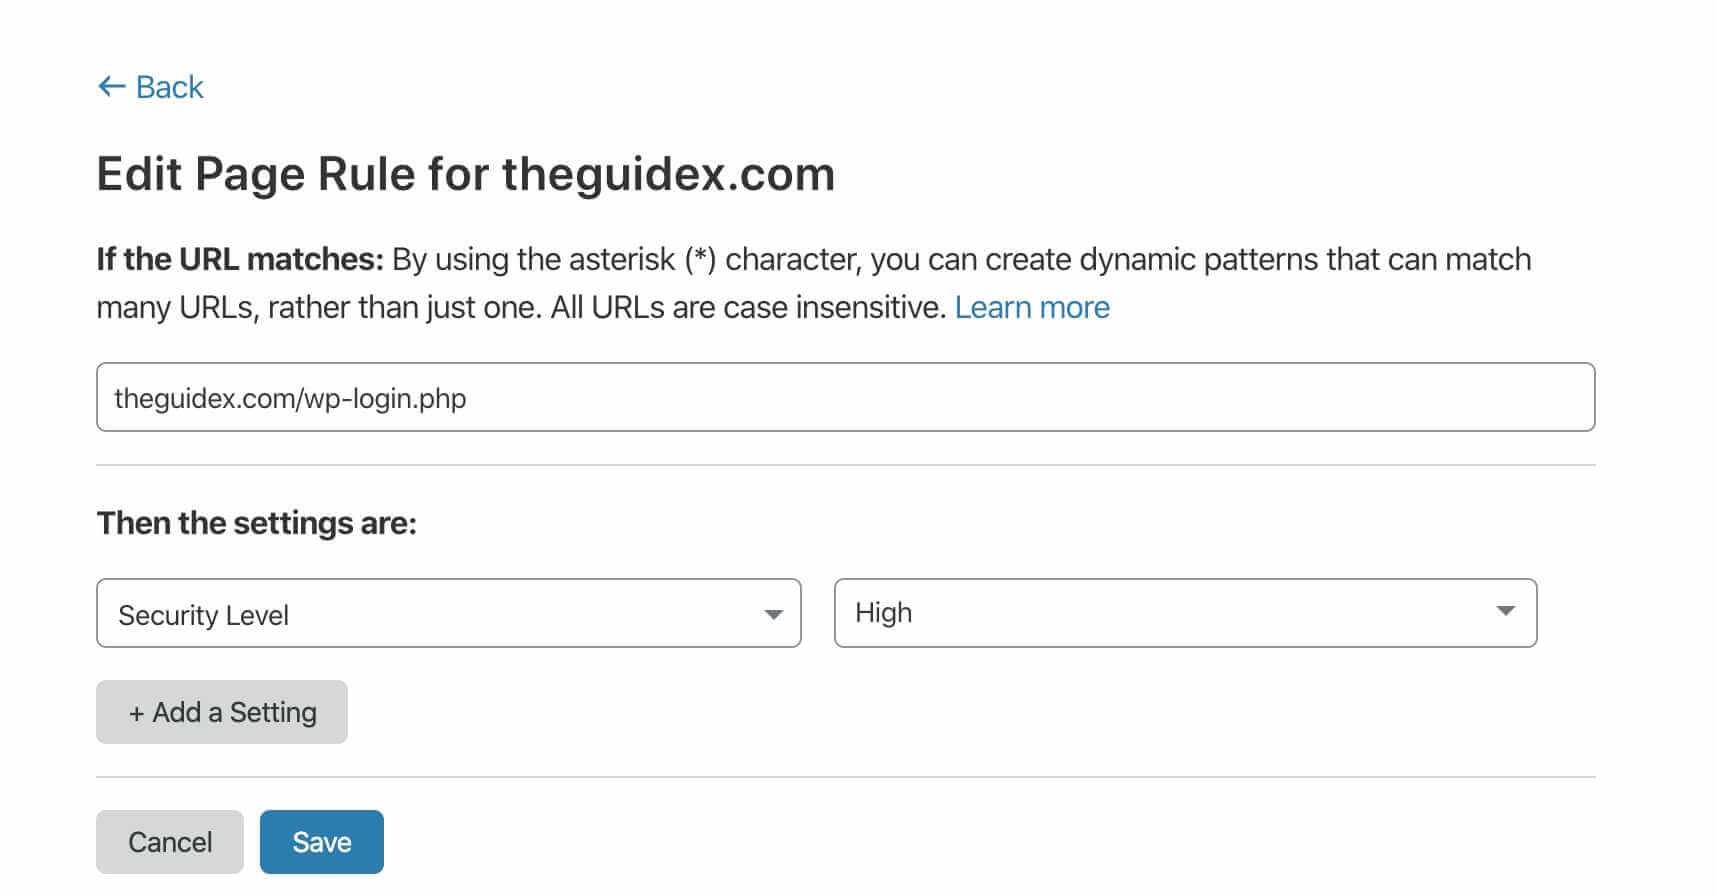
Another most important factor for speed optimization is by using a DNS level website firewall. If you remembered, I’ve created a Cloudflare Page Rule on theguidex.com/wp-login.php to increase the security of my login page.
Well, I’m also using the premium version of Wordfence on my website, It is a fantastic plugin, and it helps to block threats, brute force attacks in real-time but no doubts; it is a heavy plugin, and it takes a lot of my website resources to fight threats.
And for preventing high CPU resource usage, I’m using DNS level website firewalls on my website. So make sure you’re using DNS level firewalls to improve the performance of your website and stop threats at a DNS level.
5. Reduce Database Calls
This step is a little more complex, and it requires technical knowledge to reduce the database calls from your theme. There are many poorly coded themes that don’t follow WordPress guidelines and make too many unnecessary calls to a database.
These themes can slow down your website and reduce it can decrease the database calls and increase the overall performance of your website.
Even some of the clean coded and well-optimized themes make unnecessary database calls to get basic information from the database. So, create a child theme and statically add this basic information to reduce the number of database calls.
6. Split Comments into Pages
If you’re getting a lot of comments on your blog, then first of all, congratulations! That’s a great sign of building a great audience.
But the downside is, loading a post with all comments can slow down the speed.
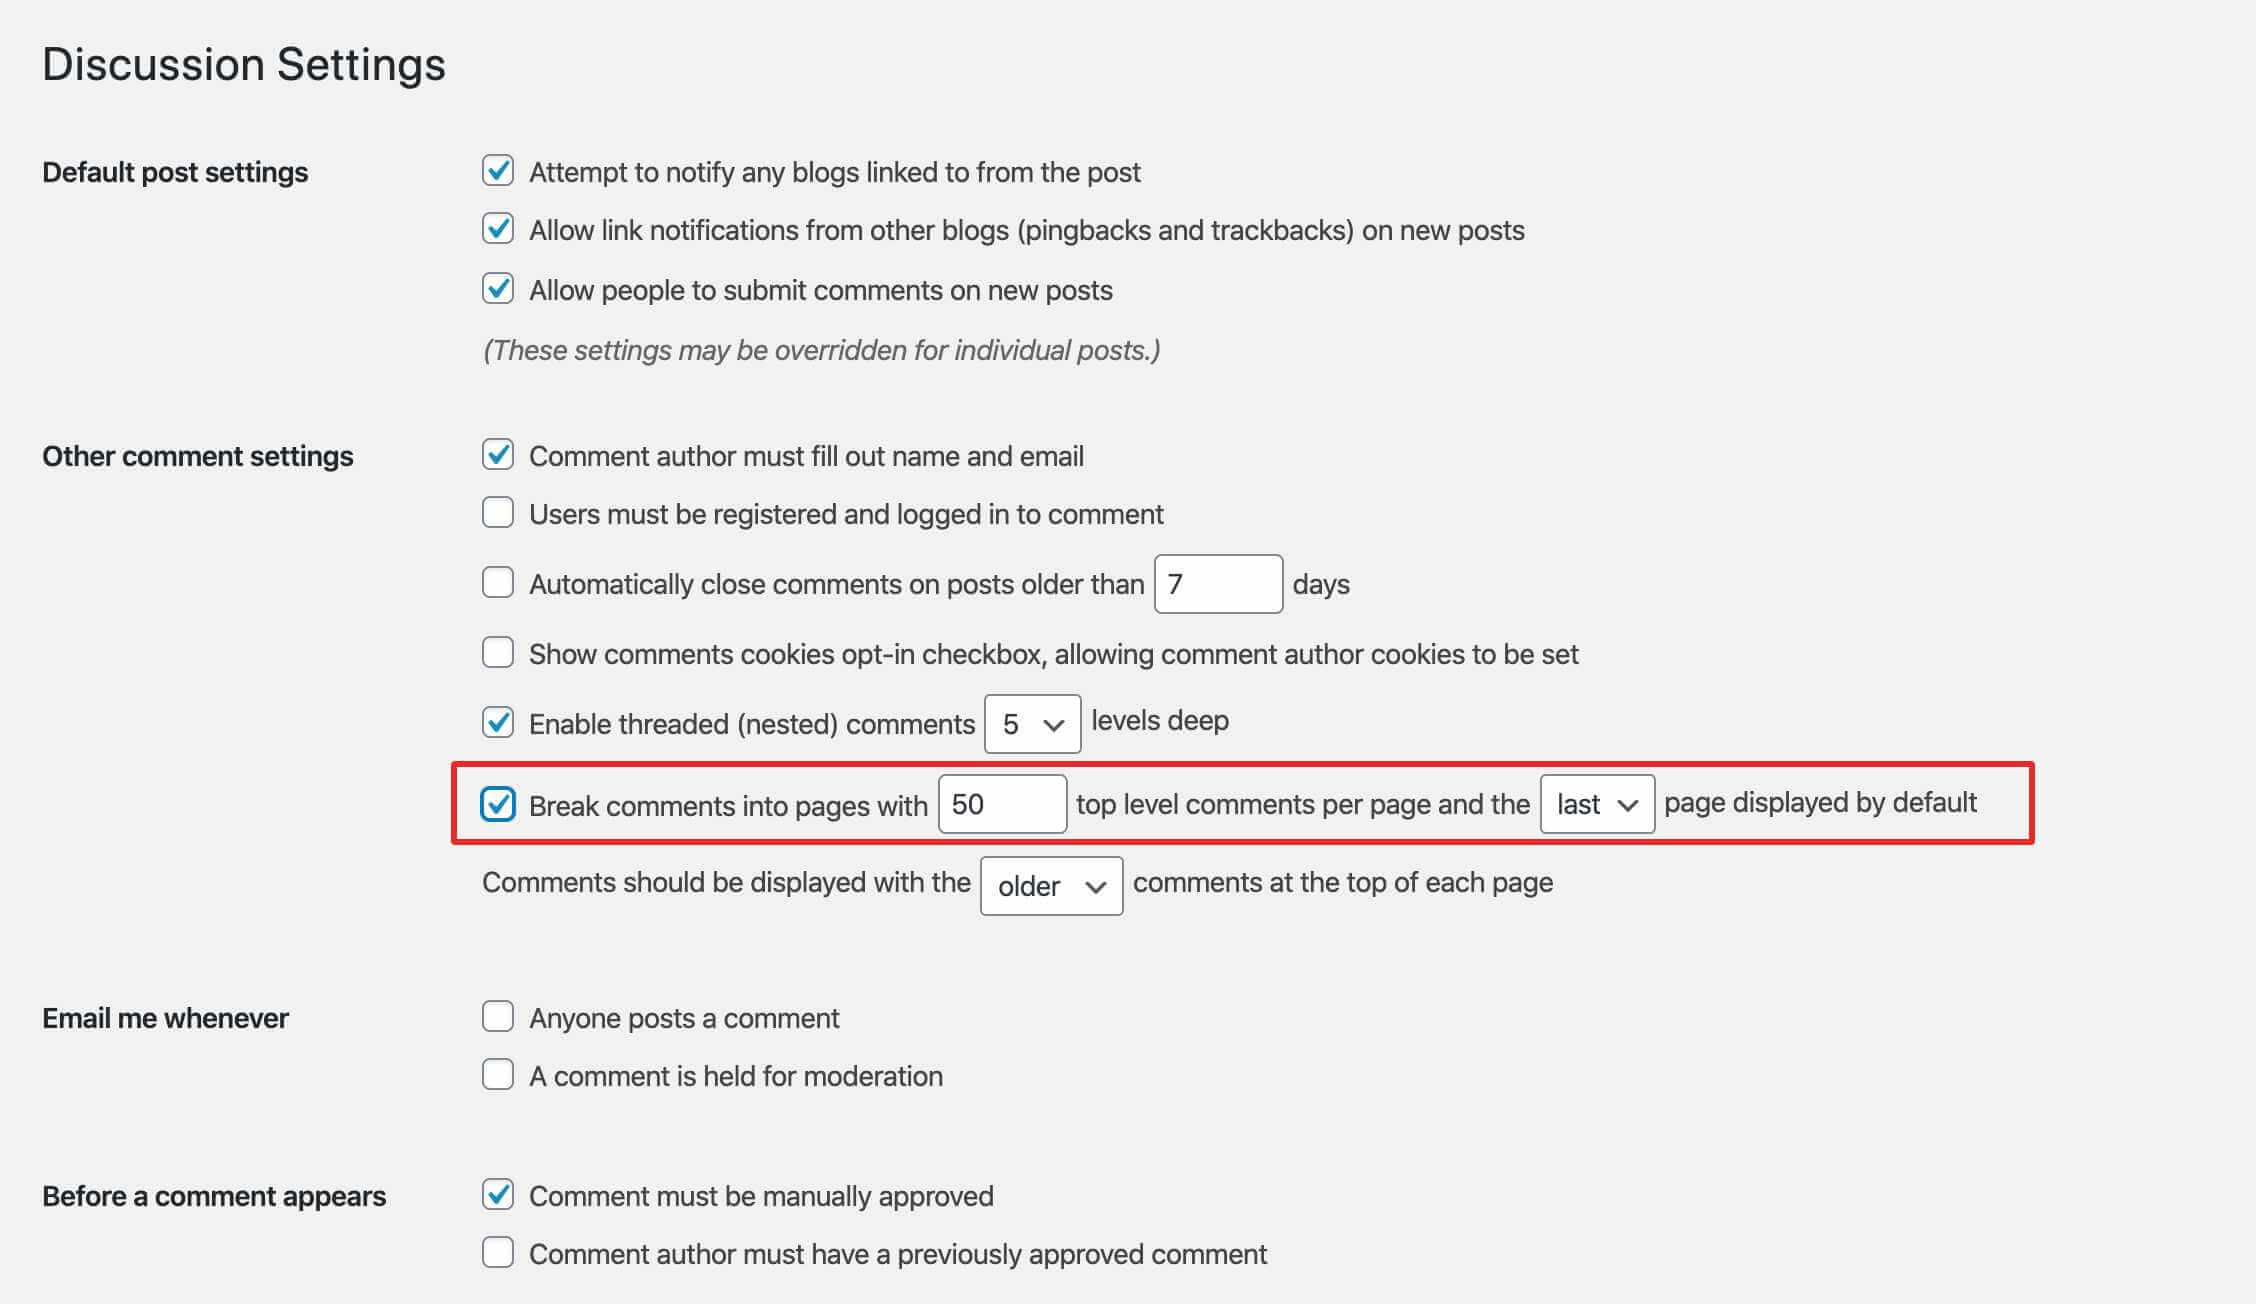
In this case, you can split comments into different pages to further improvise the speed of your web pages. The process is easy, simply go to Settings » Discussion and check the box next to the “Break comments into pages” option.
7. Checking GZIP Compression
GZIP compression is another most crucial factor for increasing the speed of a website. If you’re using wp rocket plugin on your website, then it automatically enables it for you.
GZIP compression is enabled at the server-side, and it helps in compressing the size of HTML, JS, and CSS files. It will not work on images as these are already compressed in a different way.
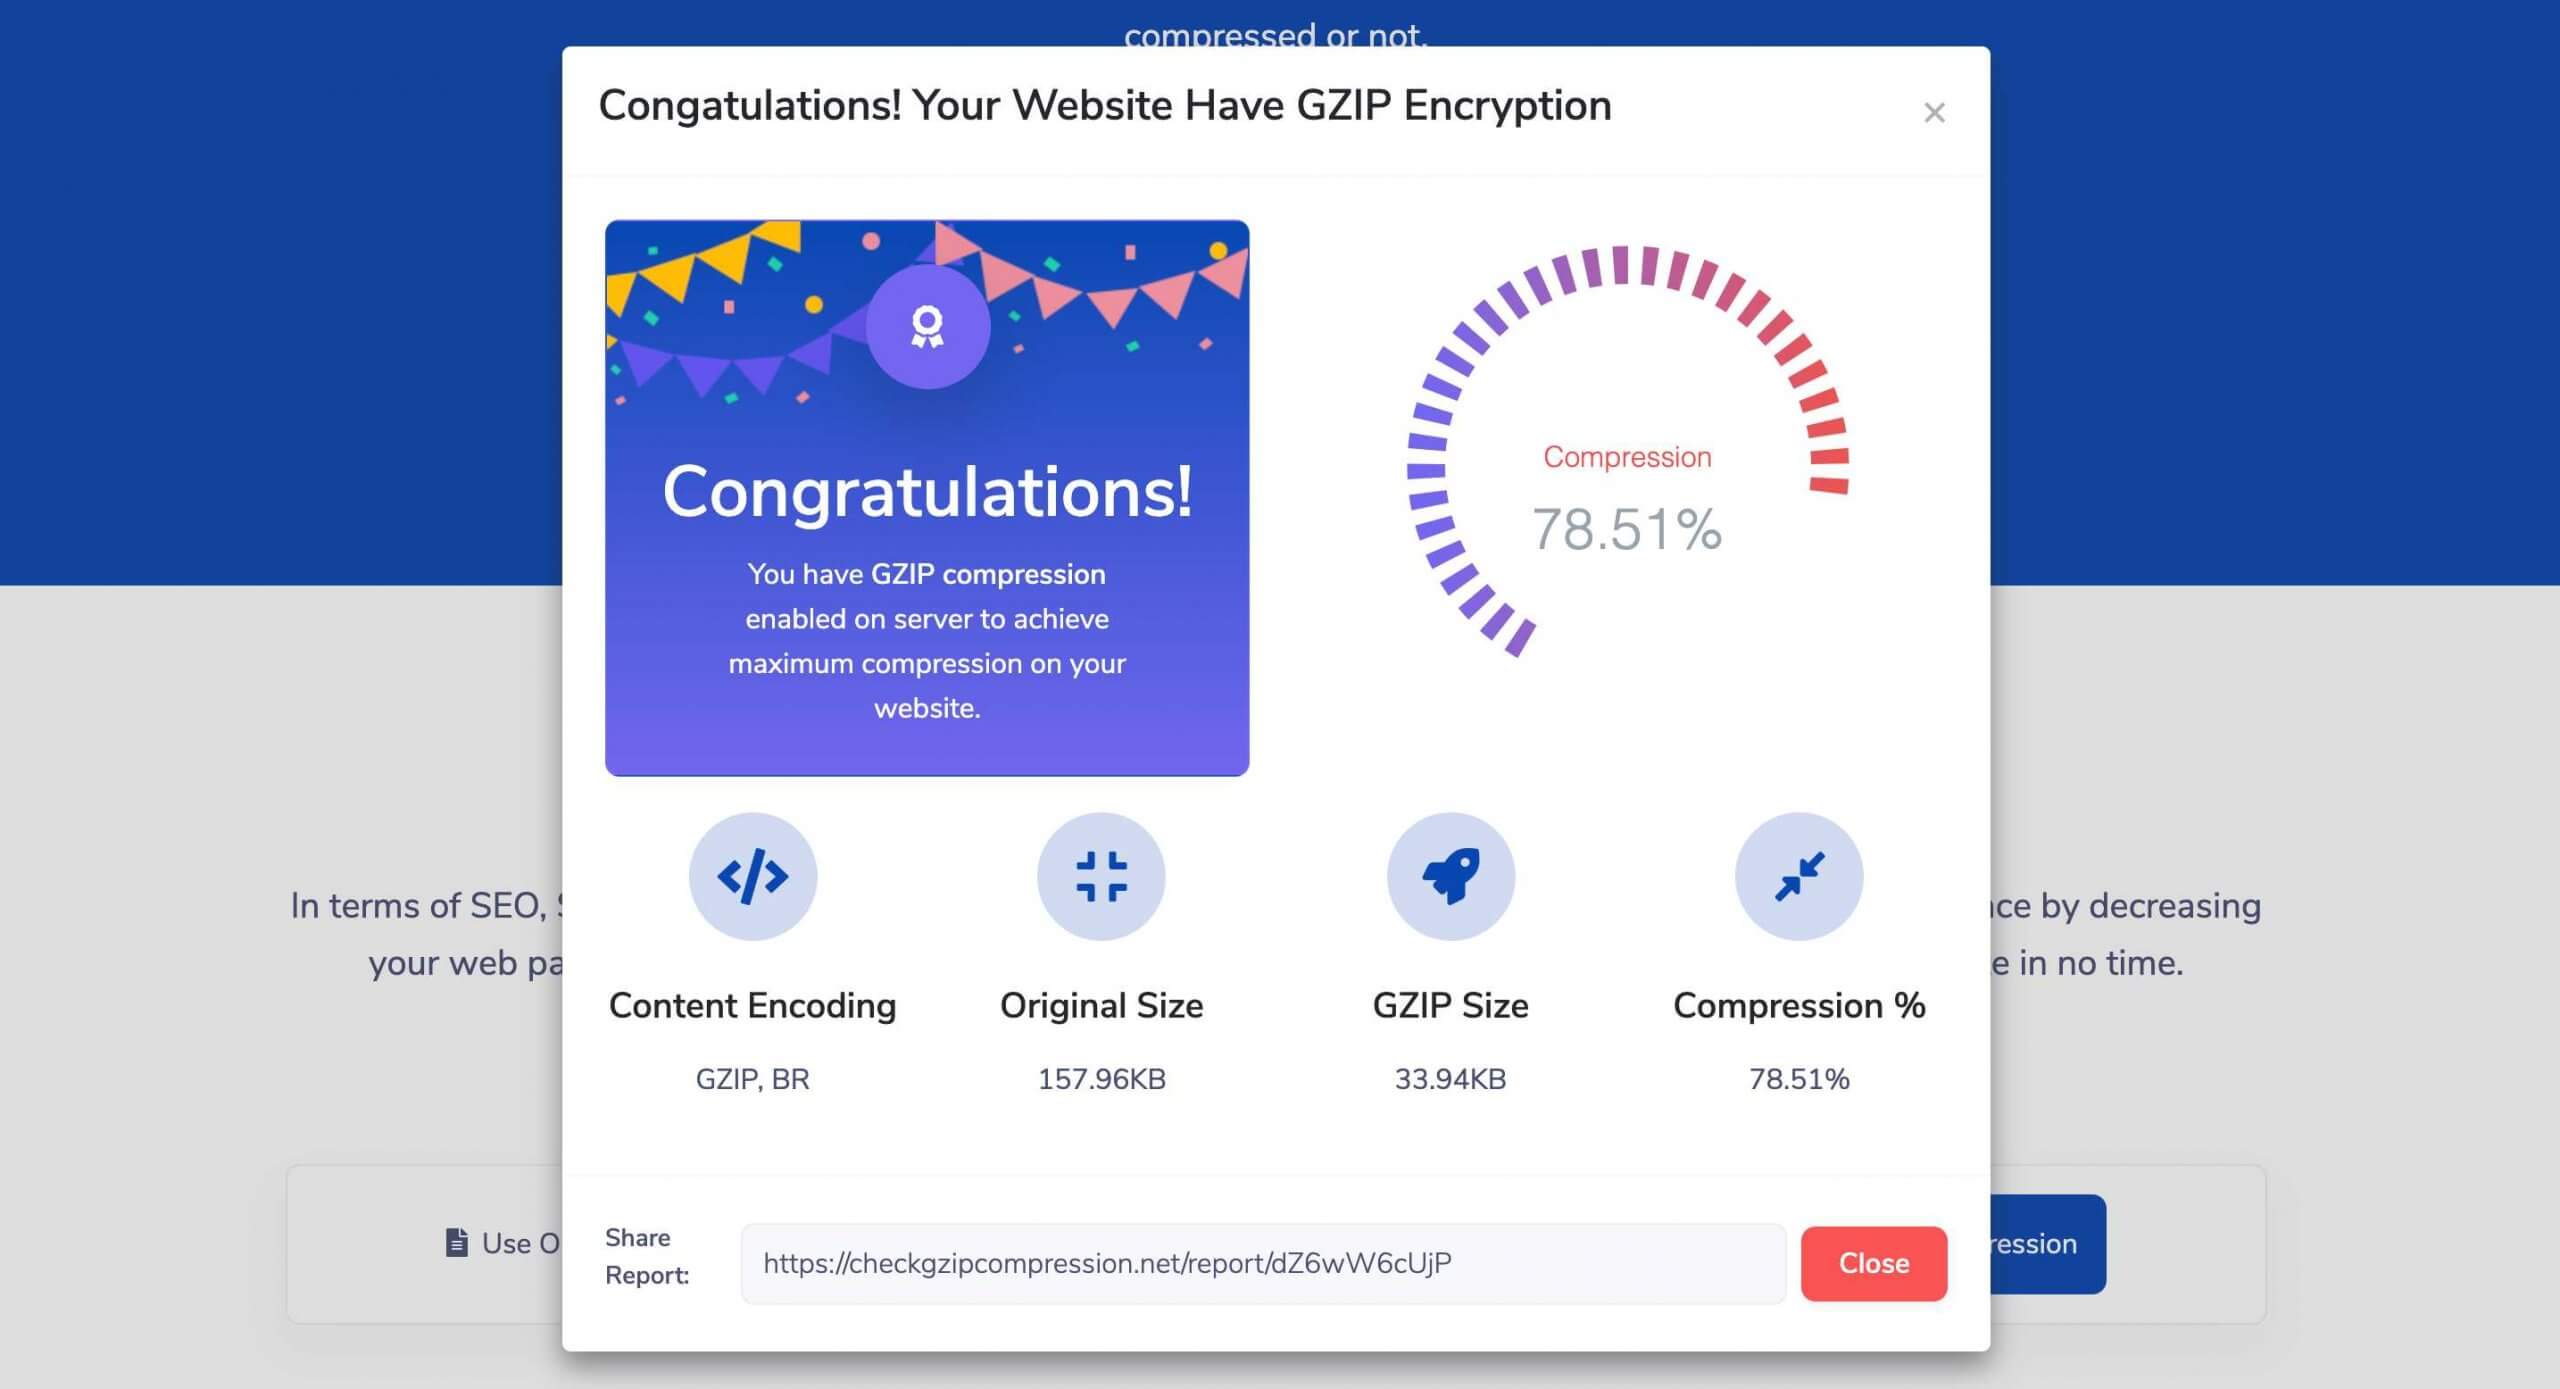
You can use some tools like Check GZIP Compression to check if your website uses GZIP or not.
If your site isn’t using GZIP, then you can use this code in your .htaccess file to enable GZIP on your website – But make sure, you’re using apache server on your site before using this code.
  # Compress HTML, CSS, JavaScript, Text, XML and fonts
  AddOutputFilterByType DEFLATE application/javascript
  AddOutputFilterByType DEFLATE application/rss+xml
  AddOutputFilterByType DEFLATE application/vnd.ms-fontobject
  AddOutputFilterByType DEFLATE application/x-font
  AddOutputFilterByType DEFLATE application/x-font-opentype
  AddOutputFilterByType DEFLATE application/x-font-otf
  AddOutputFilterByType DEFLATE application/x-font-truetype
  AddOutputFilterByType DEFLATE application/x-font-ttf
  AddOutputFilterByType DEFLATE application/x-javascript
  AddOutputFilterByType DEFLATE application/xhtml+xml
  AddOutputFilterByType DEFLATE application/xml
  AddOutputFilterByType DEFLATE font/opentype
  AddOutputFilterByType DEFLATE font/otf
  AddOutputFilterByType DEFLATE font/ttf
  AddOutputFilterByType DEFLATE image/svg+xml
  AddOutputFilterByType DEFLATE image/x-icon
  AddOutputFilterByType DEFLATE text/css
  AddOutputFilterByType DEFLATE text/html
  AddOutputFilterByType DEFLATE text/javascript
  AddOutputFilterByType DEFLATE text/plain
  AddOutputFilterByType DEFLATE text/xml

  # Remove browser bugs (only needed for really old browsers)
  BrowserMatch ^Mozilla/4 gzip-only-text/html
  BrowserMatch ^Mozilla/4\.0[678] no-gzip
  BrowserMatch \bMSIE !no-gzip !gzip-only-text/html
  Header append Vary User-Agent
8. Use Prefetching
Resources pre-fetching is another great optimization technique to increase the performance of your website. We can use it to tell the browser which assets the user might need in the future—before they even need them.
As a developer, we know the applications better than the browser does. So, we use this information to inform the browser about the core resources.
For example,
<link rel="prefetch" href="image.png">
9. Reduce the Use of Web Fonts
Sometimes to make a text catchy, we use several web fonts – But the biggest disadvantage of using too many web font is that it increases the rendering time of the page. This also adds an extra HTTP request to external resources. And generally speaking, you want to keep HTTP requests to a minimum.
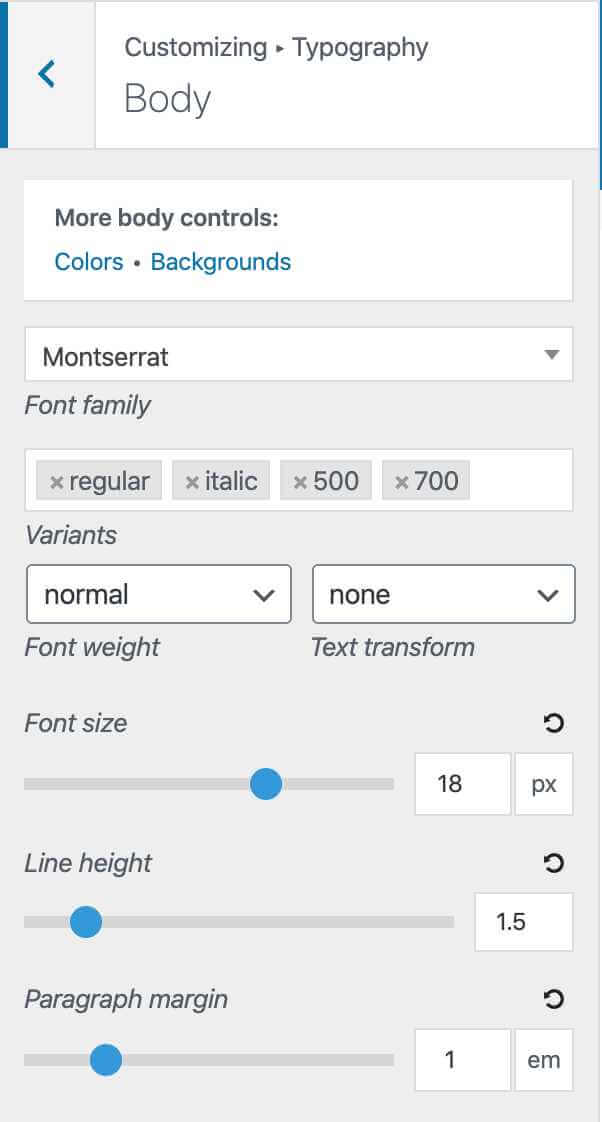
As you can see in the image above, I’m using only four web fonts on my website, which I actually need. You should also have to make sure that your blog is not using tons of unnecessary web fonts to decrease the rendering time of your page.
Now It’s Your Turn
Among the various ways to optimize your WordPress blogs, I’ve shared a few optimizations techniques, which I personally use on my own website for speed optimization. These methods are simple and easy to implement.
And now it’s your time to invest an hour on improving the speed of your WordPress website.
And trust me, once you optimize your blog carefully using these methods, Your websites’ performance will increased, and it also improves the overall loading time of the website.
I hope this article gives you a clear-cut clarification on some of the efficient ways to increase the speed of your WordPress blog, and If you found this article helpful, let us know in the comments section. And if you’re using some other method to optimize your website also do let me know in the comment section below.

Nice sir well explained
Does CDN work with AMP?
Yes,
I’m using AMP on my other blog (I shared about it in this guide) and it works for me.
Let me know if you face any other issue…
Hi Sunny,
I’m the author of the WordPress plugin called SpeedGuard. It monitors site speed daily and notifies you in case it’s not good.
I find it handy to check the impact of optimization actions too, like before-after comparison. I was wondering if you would like to give it a try? https://wordpress.org/plugins/speedguard/
Cheers,
Sabrina
Many many thanks to you, the best article on the Internet for speed optimisation. Bro, Start an amazon affiliate series also on this blog or do you have any other blog where you write articles about it.
Yes, I also think to start a podcast on Amazon Affiliate and surely I’ll publish another in-depth post regarding amazon affiliate.
Well, Explained, I have three questions please reply to it. This question may also help someone like me looking for this answer.
1. When I inspect element on your site homepage, no wp-content, wp-includes folder shows. How you did it? I want to know to implement on my website too.
2. You are using paid or free (12 months) plan of amazon CloudFront.
3. Which hosting will be best for me cloudways or DO? I have basic knowledge of LINUX.
Thank you
Hello Bhanu,
1. I’m using Asset Cleanup Pro for removing meta generators from my website.
2. As of now, I’m using free for a 12-month Cloudfront plan.
3. If you have basic knowledge of Linux, I would suggest you to go with Cloudways (You’ll also get $30 free credit using TheGuideX coupon).
Thanks for sharing nice post, very use full information thanks a lot.
Great Post !! Thank You So Much For Sharing…
I regularly read every article on your site. because every topic is full fill with a lot of knowledge. thank you sir
Hey Sunny
Very comprehensive post.
I just checked my blog speed using GTmertix and it’s showing 1.9sec loading time. I hope it’s good.
Thanks
Amit Garg
Yes, it is really impressive. 🙂
Thanks for this sharing information. Nice blog.
Thanks Sunny. Gmetrix is super useful for me, I had only seen Pingdom before. I am not sure if you heard about the lazy loading attribute( loading=”lazy” ), its new and very effective. You can insert this in images and embeds now and almost all the browsers support it now. It will load the images after the page is loaded so the page loads way faster and doesn’t require any fancy plugins etc! It is a game changer for website speed.
Thanku for this valuable description.
This is maria, thanks for the posting, I really got lots of help with this post for my affiliate blog,. I will try these methods
Very comprehensive post.
I just checked my blog speed using GTmertix and it’s showing 1.9sec loading time. I hope it’s good.
This guide is a BANG.
There is always something new to learn from this guide about WordPress Speed Optimization. Just like I learned about the Cloudflare page rules.
Thanks
You’re welcome Vashishtha 🙂
Id go to GTmetrix.com, test your site and go to the waterfall part, check to see whats slowing down your site.
Work on it!
Thank you for your helpful sharing. I will advise more on these issues thoughtfully.
Thank you for sharing the steps on how to speed up WordPress site with WPRocket plugin. I am using Cloudflare for my blog and highly recommend everyone. It is easy to set up Cloudflare with a click of a button. Also, at one-click you can enable SSL, Brotli compression and Auto minify options.
Thanks for beautifully composing this blog post. This article is well written and is very descriptive and comprehensive
I think you share all the quires regarding speed optimization and cover all the topic step by step . It’s really helpful for readers.
Hiii Sunny
It is actually exciting. I just checkered my blog rate by GTmertix and its viewing 1.9sec loading time.
Thankyou.