This article is for you if you are looking for an easy way to revert your website’s WordPress version back to a previous one.
Sometimes, after updating WordPress, our website may not work properly. This can happen because some of the plugins we use or the website theme itself may not be compatible with the newer version of WordPress.
It could also be a problem with the WordPress update itself. I highly recommend troubleshooting the issue rather than downgrading the WordPress version. You need to identify the cause of the problem in order to solve it.
Most often, the issue lies with plugins or themes. That’s why I always suggest using themes and plugins from reliable developers who regularly update and maintain them.
Downgrading your website may provide a quick fix, but it’s not a reliable solution. It’s important to update plugins, themes, and WordPress itself in a timely manner to ensure the safety and performance of your website.
How Can You Identify the Cause of the Issue?
You need to manually check the issue. First, you should disable all your plugins. This can be done easily from the WordPress admin dashboard. If you cannot access the admin area, you can also deactivate the plugins from the server side.
To deactivate the plugins from the server side, log in to your hosting provider, go to the “wp-content” directory, and rename the “plugins” folder to something else. This will deactivate all the plugins.
Now try to open your website again. If everything is working correctly, then the problem is with one or more of your website’s plugins. They may not be compatible with the newer version.
To identify which plugin is causing the problem, you need to manually activate each plugin one by one and then check if the issue persists. Start by activating a plugin and refreshing your website, then repeat this process for all plugins until you find the one that is causing the problem.
If you find that a particular plugin is not important for your website’s functionality, it is better to remove it instead of downgrading your WordPress version. You can also consider using an alternative plugin that serves a similar purpose.
However, if deactivating the plugins does not solve the issue, then it might be a problem with your theme. In this case, you may need to downgrade your WordPress version until your theme becomes compatible with the newer version.
How to Downgrade WordPress?
It’s quite easy to downgrade your WordPress version. I will provide you with the complete instructions, which will only take a few minutes. There are two ways you can downgrade WordPress:
- Using WordPress Plugins: This is my recommended method if you’re not familiar with server-side tasks. With the help of plugins, you can easily downgrade WordPress. Make sure to back up your website before proceeding.
- Manual Downgrading: If you’re comfortable with server-side tasks, you can manually downgrade WordPress. Again, remember to back up your website before starting the process.
I highly advise you to take a backup of your website regardless of the method you choose. This will ensure that your data is safe in case anything goes wrong.
How to Backup Websites?
There are many backup plugins available, both free and paid. One popular backup plugin among professionals is Updraft. It allows you to back up your websites online. You can save the backup on various cloud platforms like Google Drive and Dropbox.
To get started, log in to your website. Go to the Plugin section and click on Add New. Search for Updraftplus and click Install and Activate the plugin.

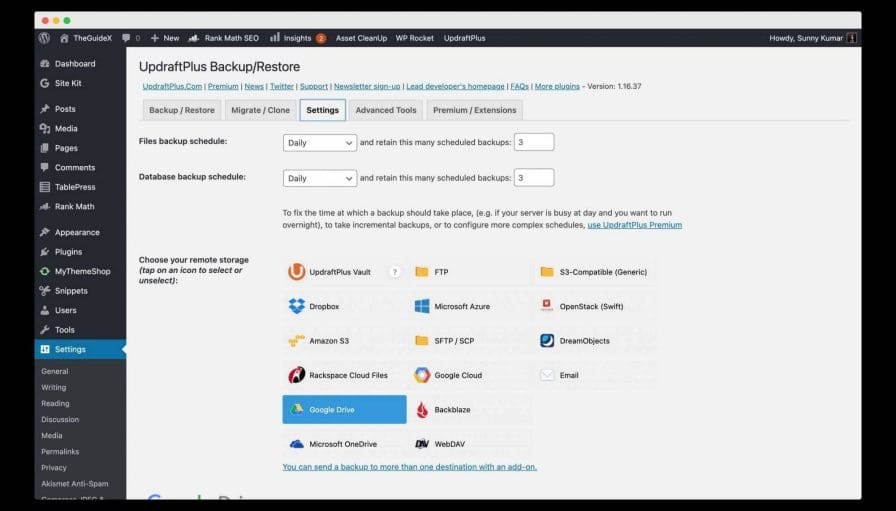
After you install the plugin, you need to set it up and create a backup. To configure the plugin, go to the Settings menu and click on UpdraftPlus Backups. You will then be taken to the plugin’s configuration page.
You can find the option labeled “Settings” in the top menu. Click on it. From this settings page, you can configure everything from when you want to create the backup to where you want to save it. It is recommended to use a free cloud storage platform like Google Drive or Dropbox.
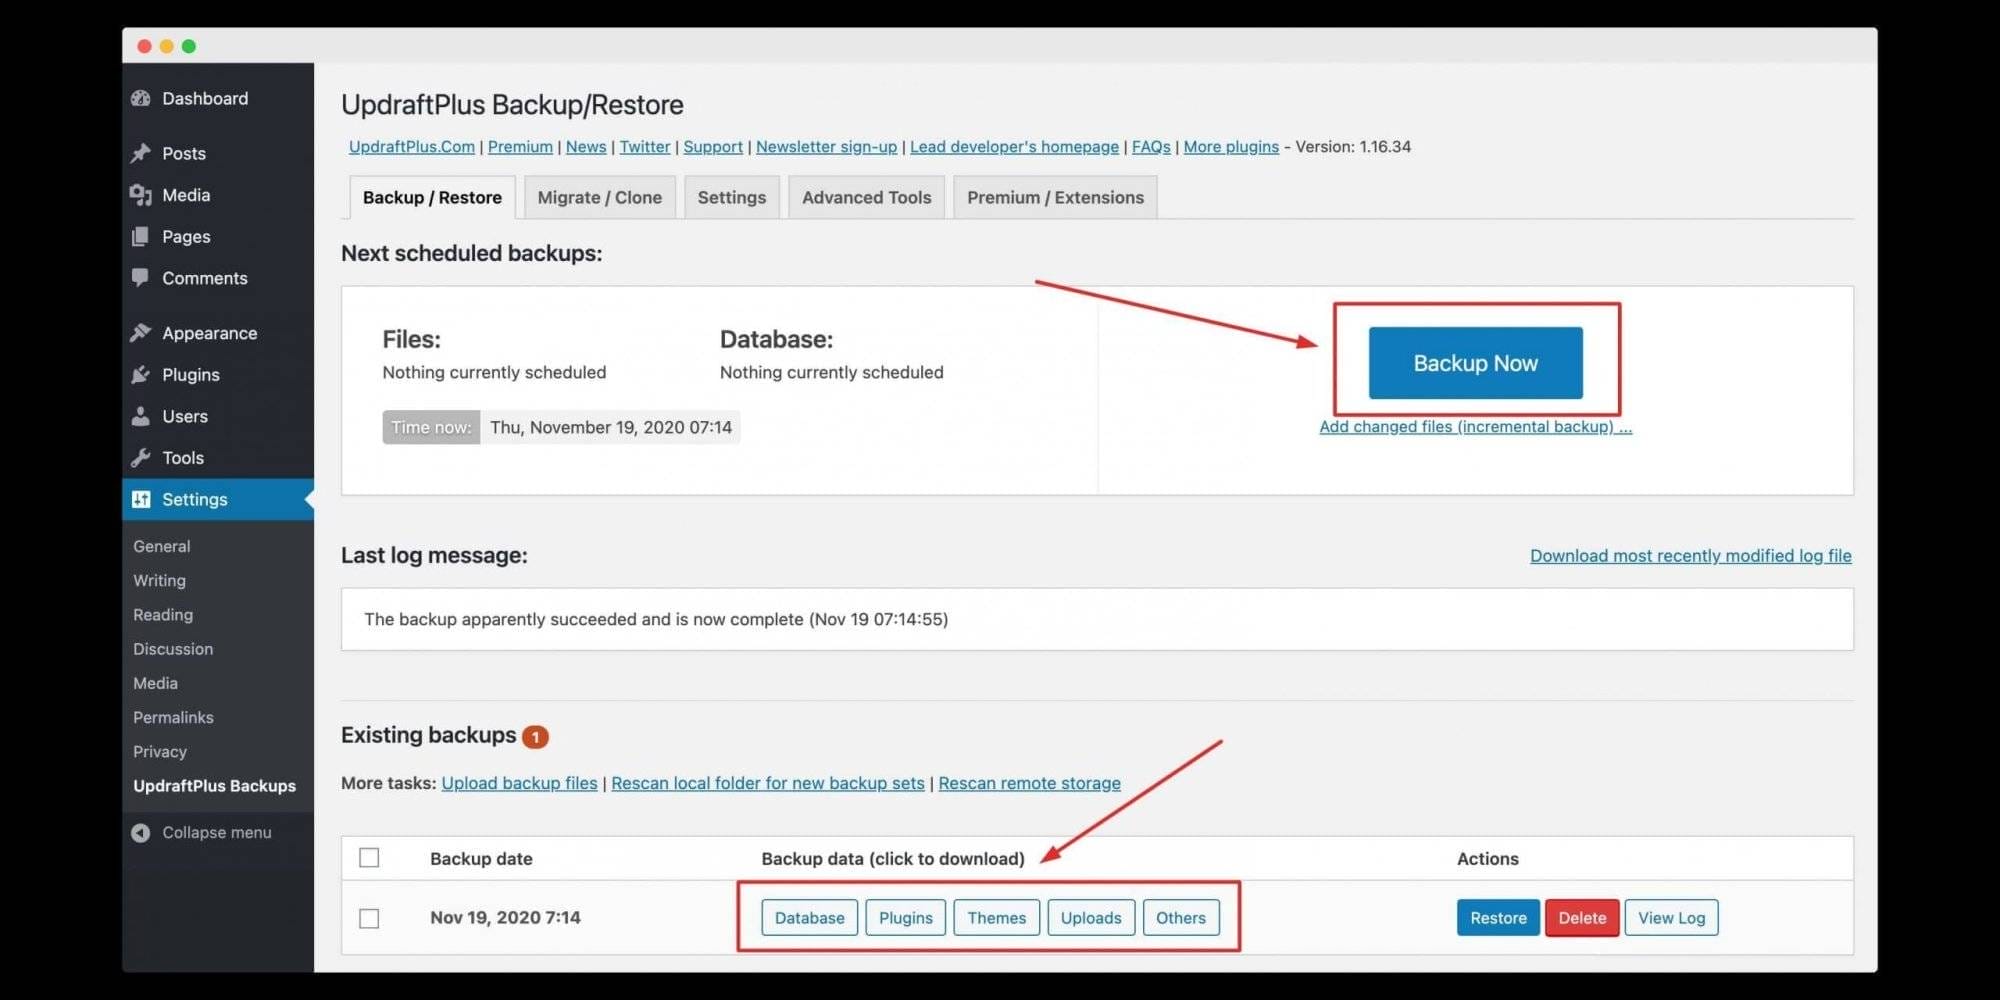
Configure everything and set up the cloud storage. Then, click on the first option, “Backup/Restore.” Click on the large “Backup Now” button to create a backup of your websites. The backup process will take a few minutes, depending on the size of the website.
Once the backup is completed, you will find it in the “Existing Backup” section below the page. There is also an option to download it locally.
That’s how you can easily create a backup of your websites.
If you can’t access the WordPress admin area, don’t worry! You can still create a backup of your website. Just ask your hosting provider to make a backup of your current files along with the database, or you can do it yourself.
To do it yourself, follow these steps:
- Log in to your hosting account.
- Find the files of your website.
- Select all the files.
- Click on the option to compress or zip the files.
- Download the compressed file.
To back up the database, go to PHPMyAdmin, select the database of your website, click on the export option at the top, and then click on Go.

That’s how you can manually create the complete backup of your websites.
Downgrade WordPress Using Plugins
It is straightforward to downgrade the WordPress version using a plugin. There are tons of plugins that can help you with it. Here in this article, I am going to share the complete instruction by using WP Downgrade By Reisetiger.
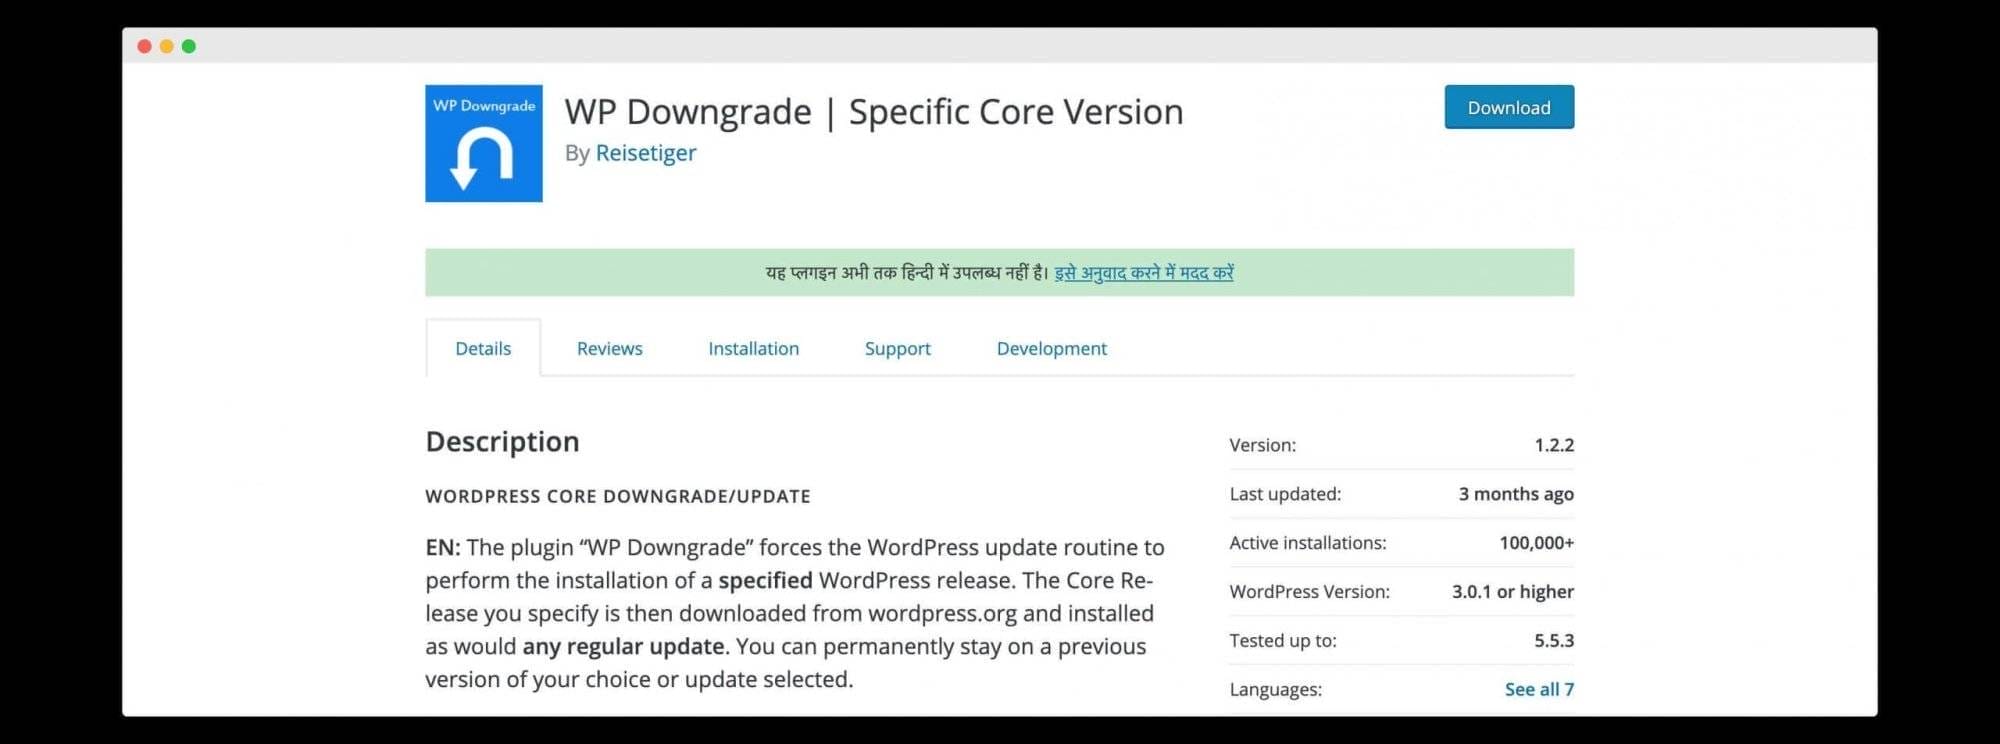
It is free to use the plugin, which you can directly install from the WordPress plugin library. Follow the below instructions carefully to be done with it.
First, you need to install the WP Downgrade plugin. Login to your WordPress websites >> Go To Plugin >> Click on Add New >> Search for WP Downgrade >> Click on Install and Activate.

Now go to Setting >> And click on the WP Downgrade option. You will be redirected to the plugin configuration page. You have to manually enter the exact version number of WordPress to which you want to downgrade your website. What you have to do is to enter the version number and click on save changes.

Check here to get complete information about WP Releases.
This plugin also provides you with the option to edit the download URL. That means if you have the older WordPress version, you can paste the URL, and the plugin will use your files in the downgrading process.
That’s how you can easily downgrade your WordPress version by using WP Downgrade By Reisetiger. It is not necessary to use only WP Downgrade By Reisetiger, you are free to use any plugin.
Manually Downgrading WordPress
The manual downgrading on the WordPress version is also very straightforward. What you have to do is just to replace some files. You can only perform the manual downgrade if you have hosting / server access. If your website is hosted on managed WordPress hosting, you can not do it.
In that case, you can ask your hosting provider to downgrade your WordPress. Most probably, they will immediately do it. Follow the below instructions carefully if you have decided to do it yourself.
First of all, login into your hosting account. If your website is hosted on VPS, then you can get access to your files by using an FTP client. I recommend you to use FileZilla. FileZilla is a free FTP solution. It supports FTP over TLS (FTPS) and SFTP.
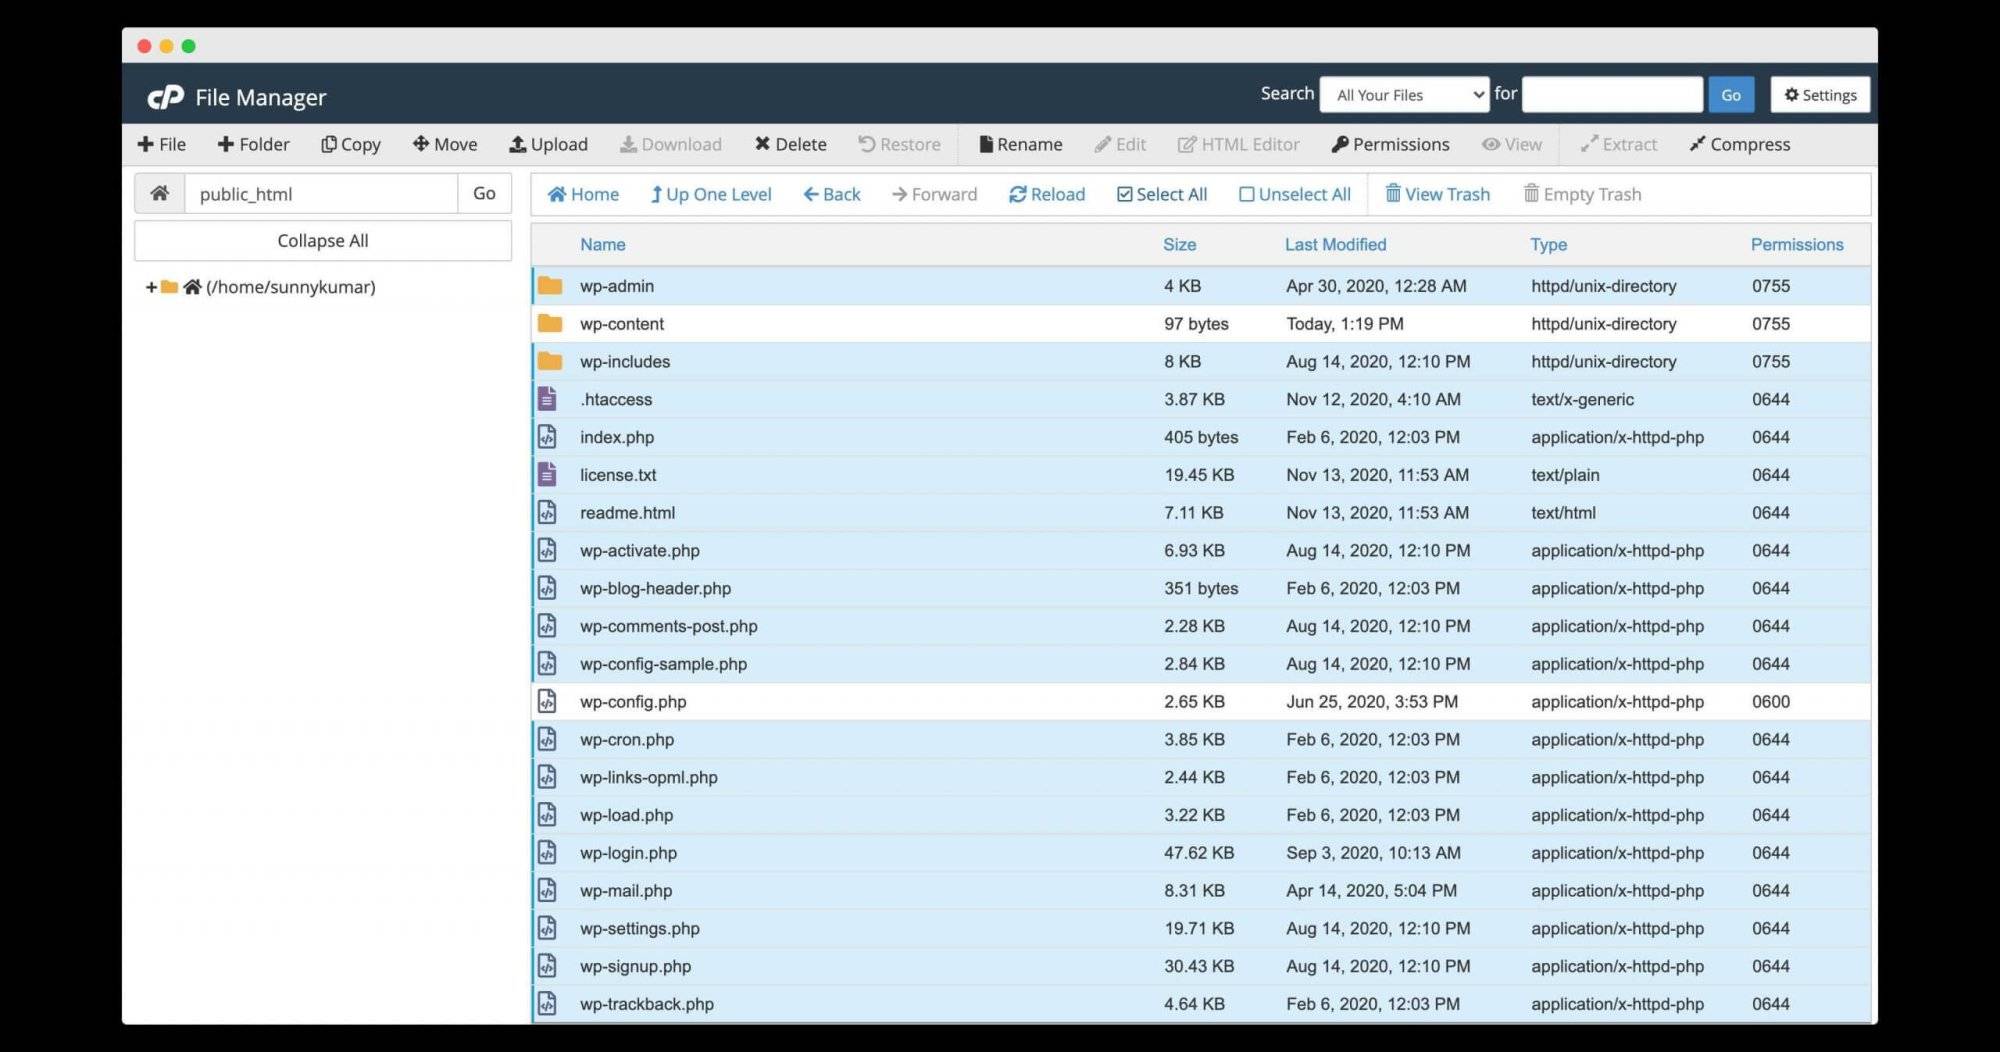
Go to the file manager and locate the files of your websites. Now from here, you need to delete all the files except the “wp-content” and “wp-config.php” files. Select all files, unselect those two and click on the delete option at the top.
You have done half the work. You have successfully deleted the new version. Now you need to download the older one and copy all the files over here.
To download the older WordPress version, check the WP Releases page. You can download any WordPress version from there. Make sure to download the zip file of the version to which you want to downgrade.
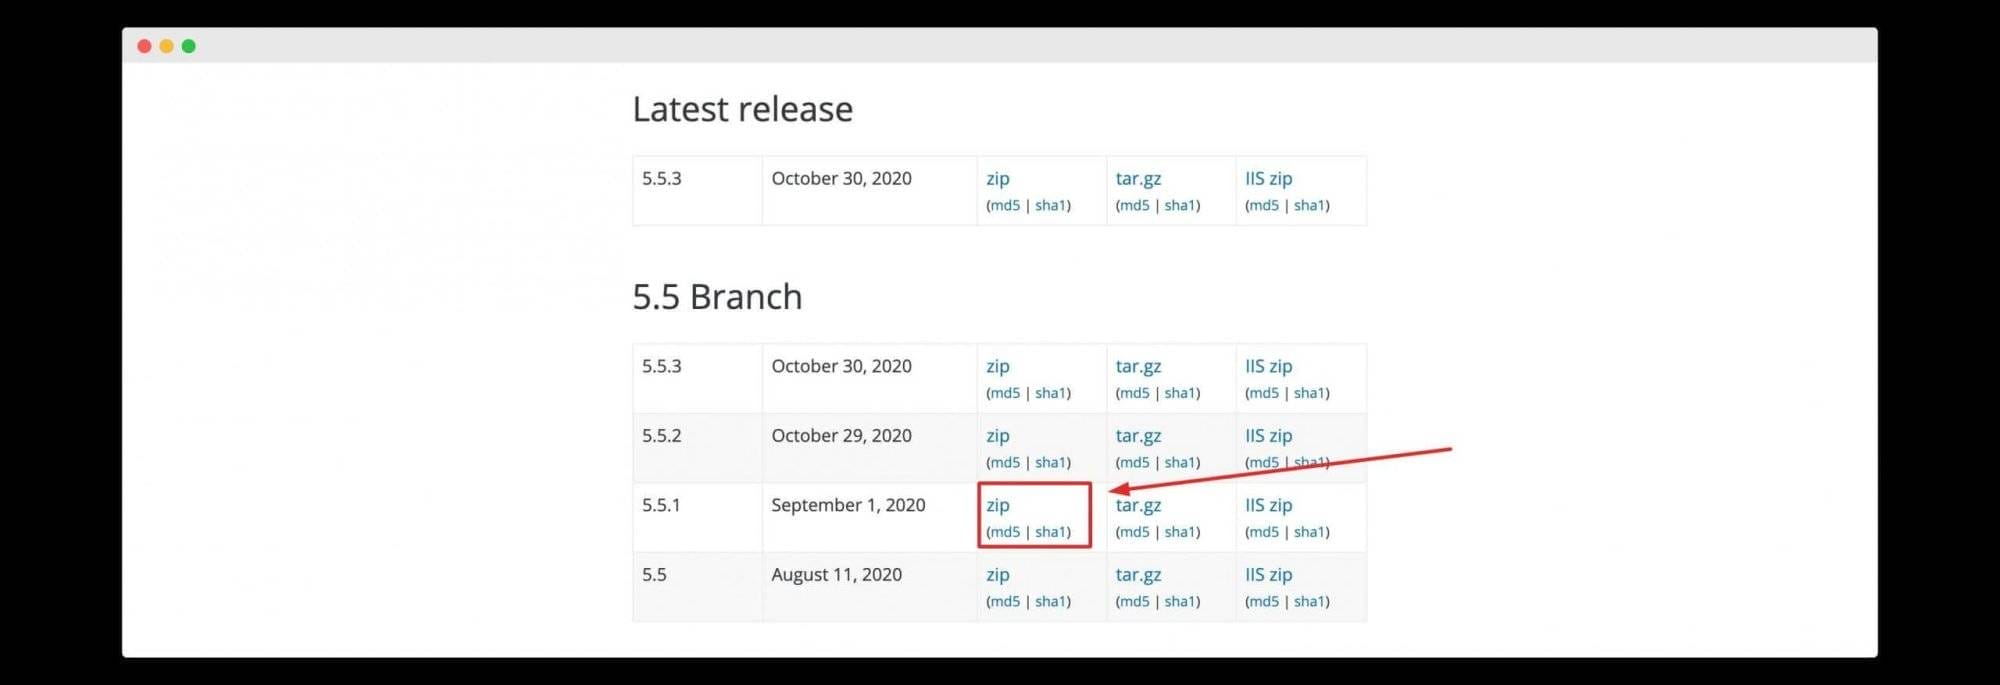
After completing the download, Go to the download folder >> Select the downloaded files >> Right-click on it and click on extract.

Now open the extracted folder and delete the “wp-content” and “wp-config.php” file for here.
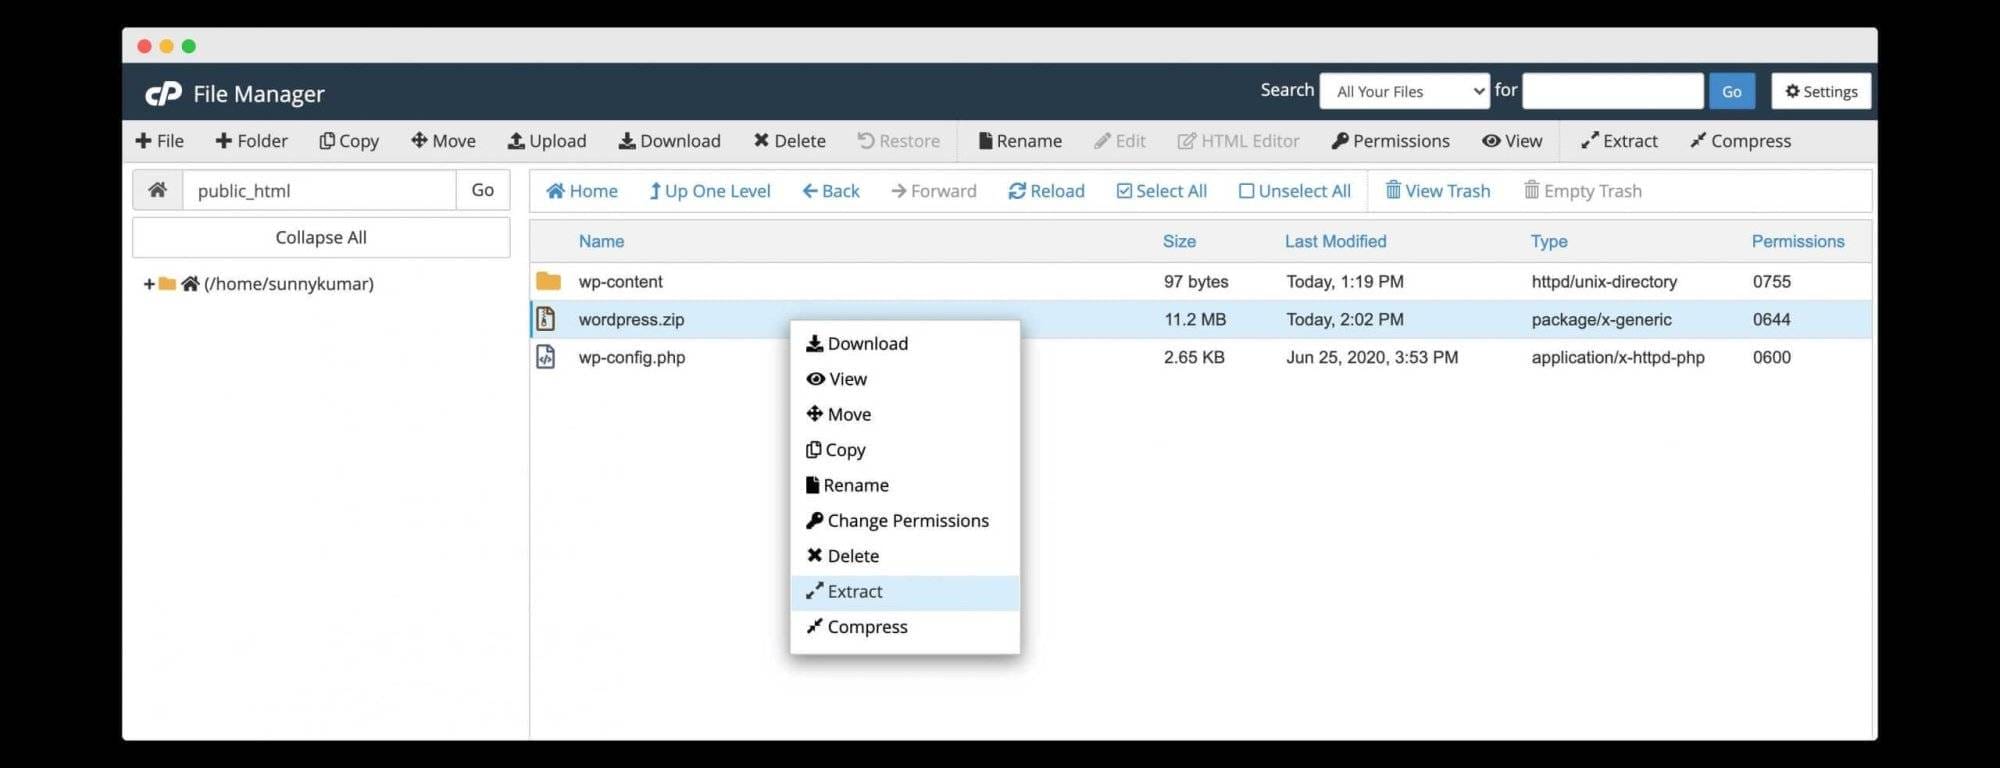
Now compress the file again and upload it to your server. Click on the upload button at the top, select the file, and click on upload. Once the zip file is uploaded, right-click, and click on extract, it will extract the file to your server.
Done, you have successfully downgraded to the older version.
Keep in mind. You should downgrade down to the version before the newest one. Downgrading the websites to the way-back version will put your site totally at risk.
Bonus Tip: Restore the Most Recent Backup
Instead of downgrading the WordPress version, you can easily restore the most recent backup of your websites. It is easier than downgrading.
Most WordPress users use a backup plugin to regularly create backups of their websites. If you have a backup, you can simply install WordPress on your domain and restore the backup.
Some premium hosting companies even automatically backup websites regularly. Check the hosting control panel for backups, and if you find any, you can restore them with just one click.
Do We Recommend Downgrading WordPress?
No, when you downgrade the WordPress version, you make it easier for hackers to take control of your website. It’s important to keep your WordPress version up to date because the WordPress team constantly fixes performance and security issues and provides new security patches.
Downgrading is usually done by those who have recently updated their WordPress version and are experiencing issues or problems with their website. If you find yourself in this situation, I recommend trying to troubleshoot the problem before considering downgrading to an older version.
If you have already decided to downgrade, I advise you to install a reliable security plugin that can provide an additional layer of protection for your website.
You may also like:
Final Words
You can easily revert to an older version of WordPress for your website by following these methods. If you are not familiar with server-side tasks, I suggest using a plugin.
Regardless of how you choose to downgrade WordPress, whether through a plugin or manual steps, it is important to take a backup of your entire website. This will help you restore your website in case of any technical issues during the downgrade.
I have personally downgraded WordPress more than 20 times without experiencing any data loss. However, it is always a good practice to have a backup available. I hope this information has been helpful to you. If you found it useful, feel free to share it on social media.
